Hey Shopify users!🙋🏻♀️ We are more than glad to have Shopify as part of our integration family. If you are a Shopify merchant, you can now skip all the hectic delivery booking processes and have your orders be fulfilled as well as downloading all the AWBs in your Shopify store without making you break a sweat! 🤩 We will be showcasing 2 ways of Shopy integration – seamless version and simple version. Follow our steps to learn about how to integrate your store with EasyParcel easily. 🙌🏻
Table of Contents
Step-by-Step Tutorial: Integrate Shopify Store with EasyParcel (Plugin Version)
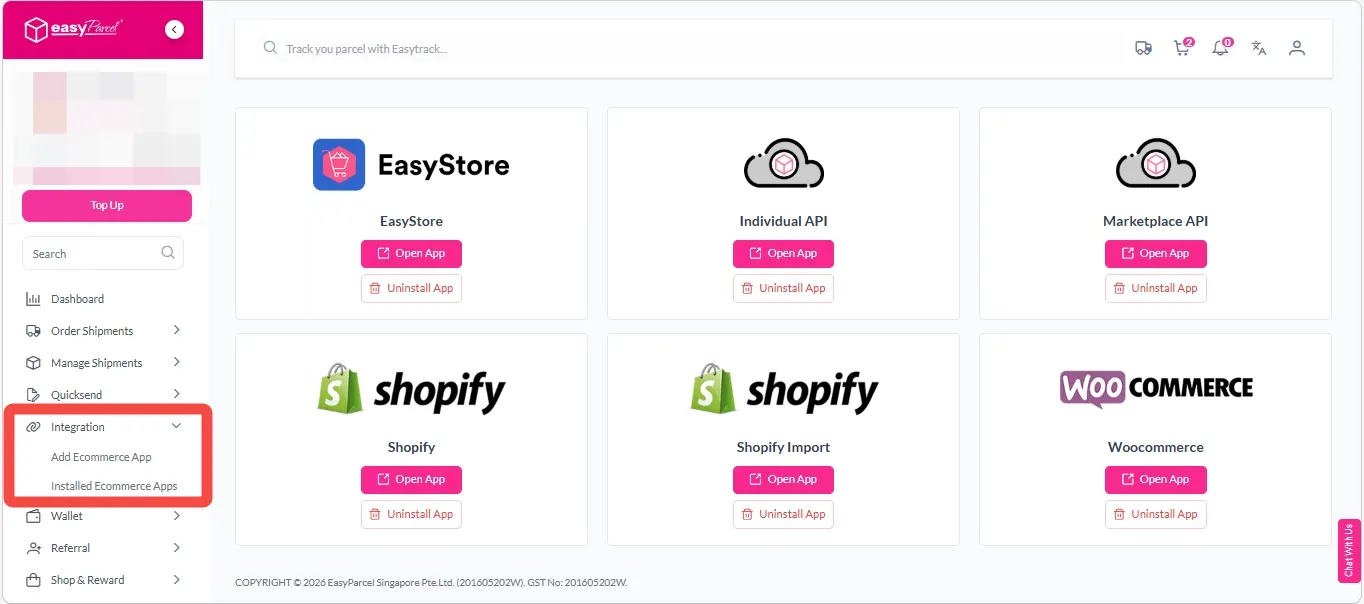
Step 3: Click ‘Add Ecommerce App’. Find ‘Shopify’, and then click ‘Install App’.
Step 4: Select ‘Seamless Version’.
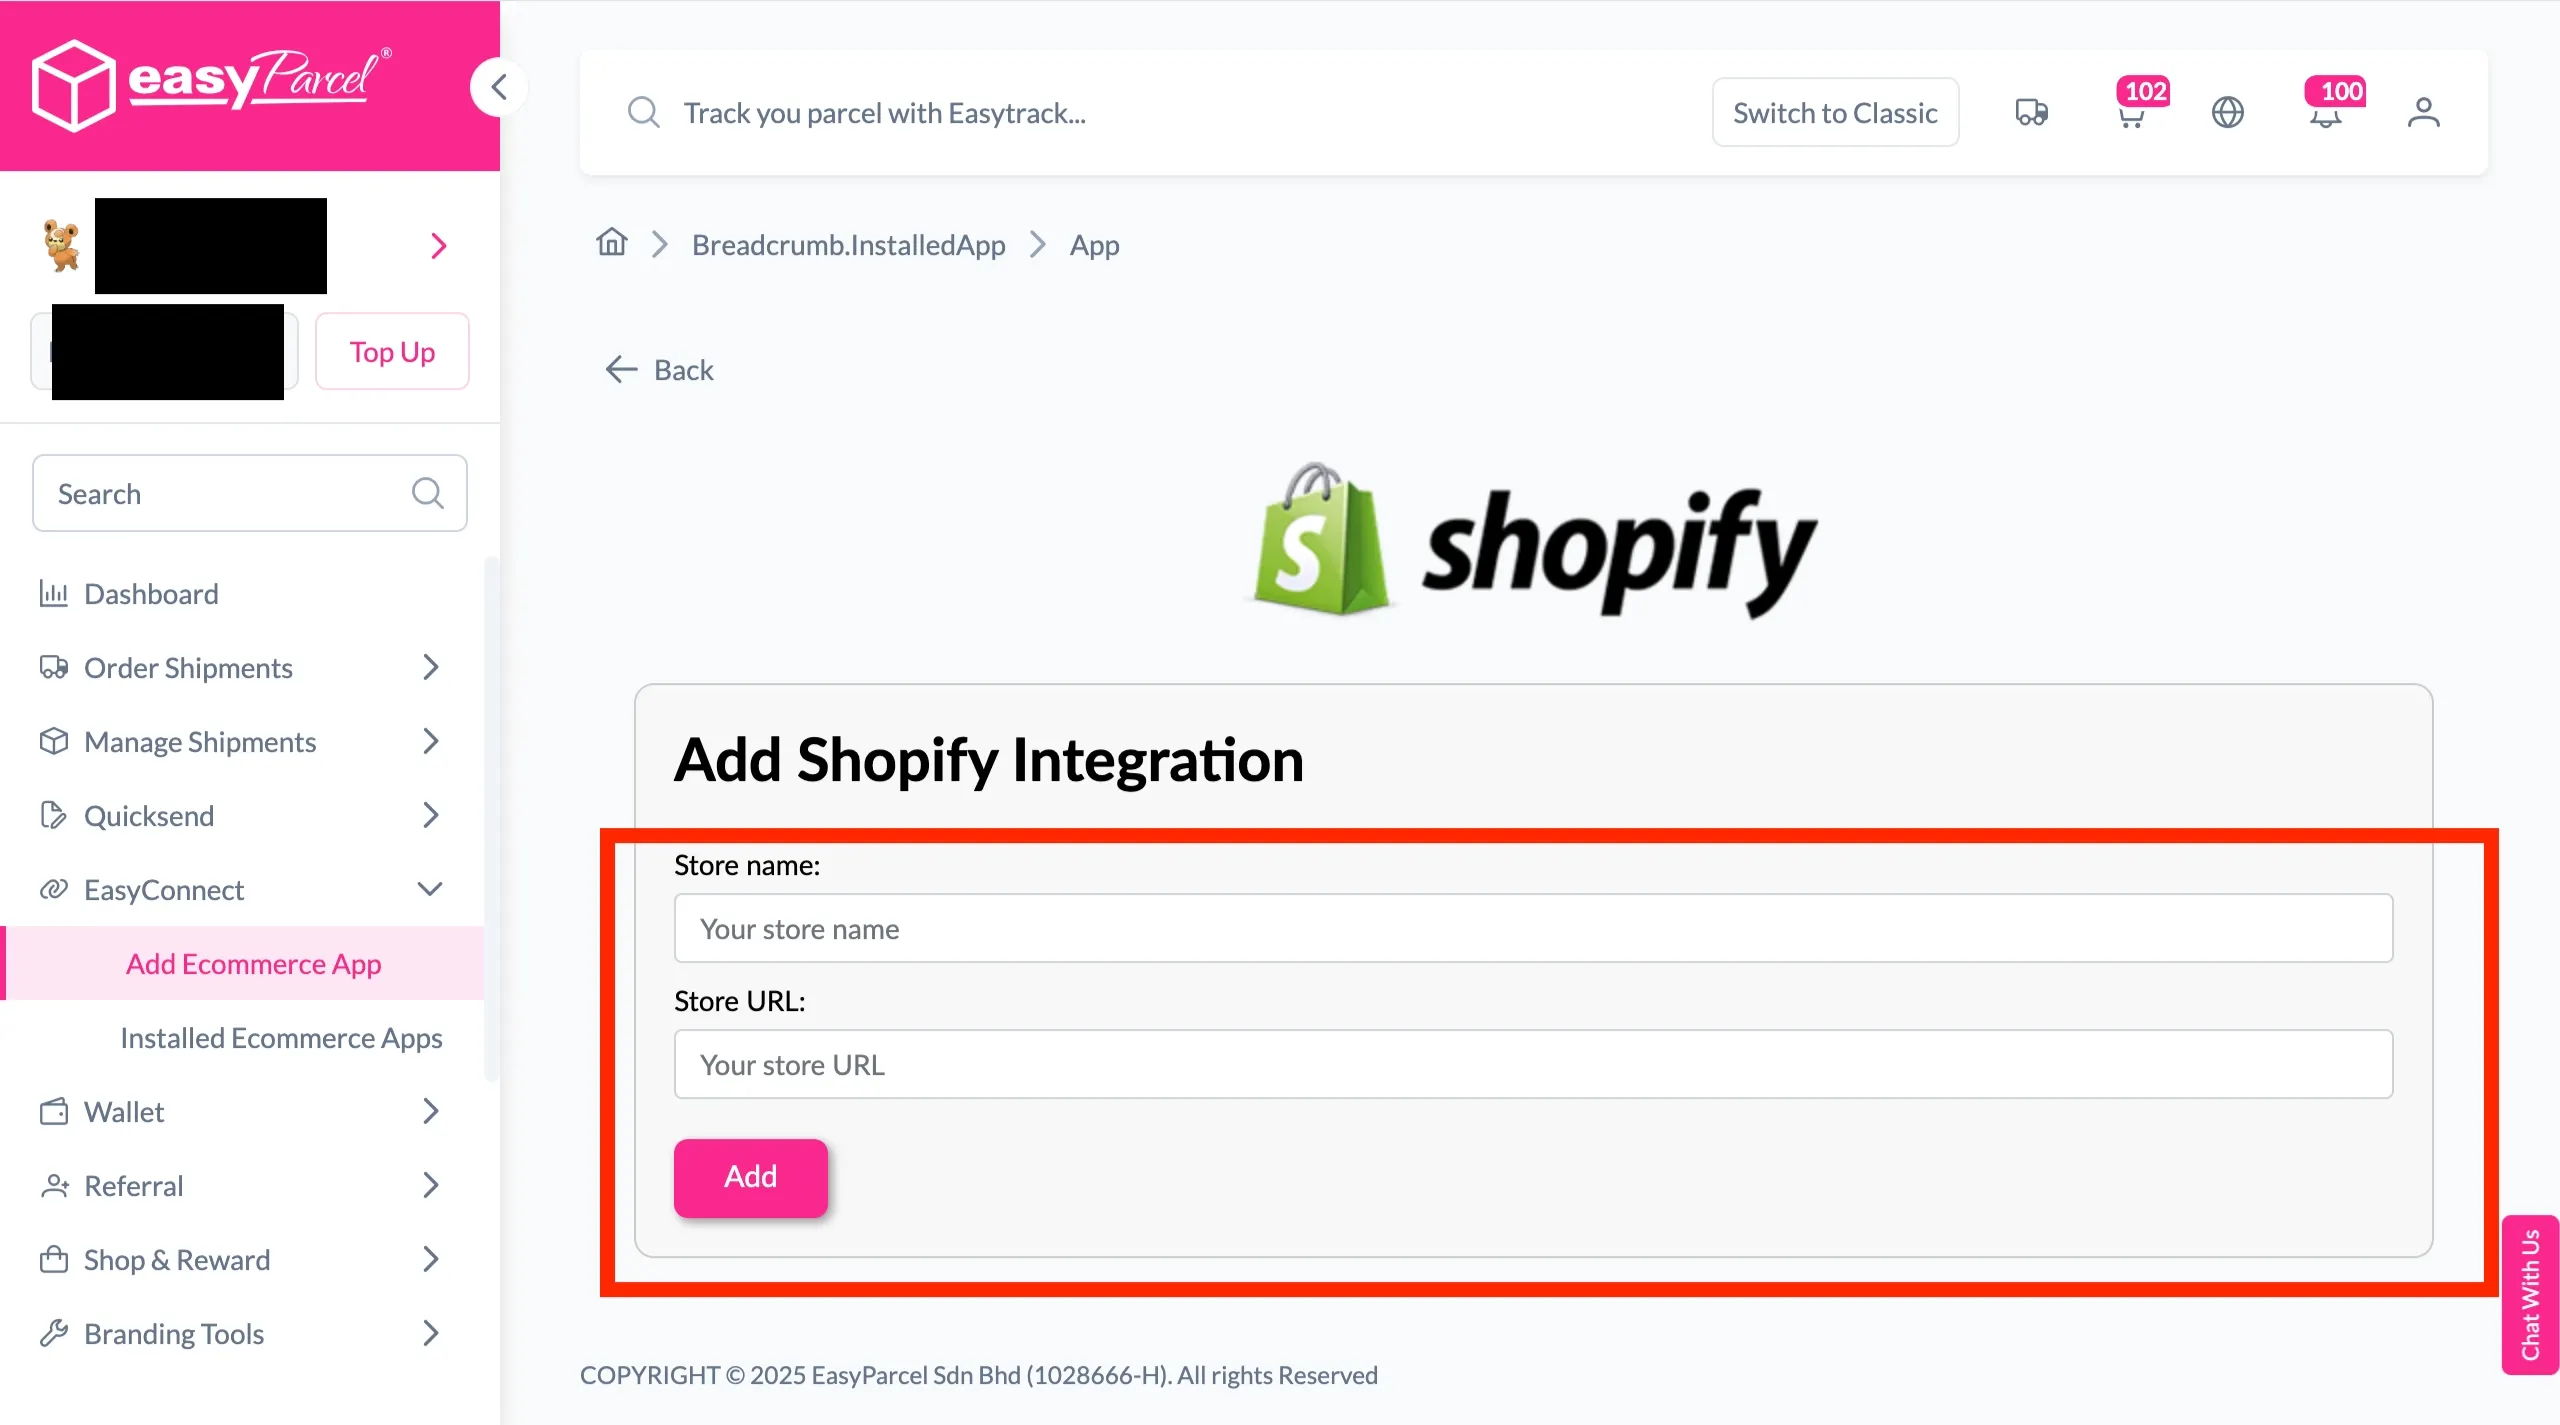
Step 5: Fill in the ‘Store name’ and ‘Store URL’. After that, click ‘Add’.
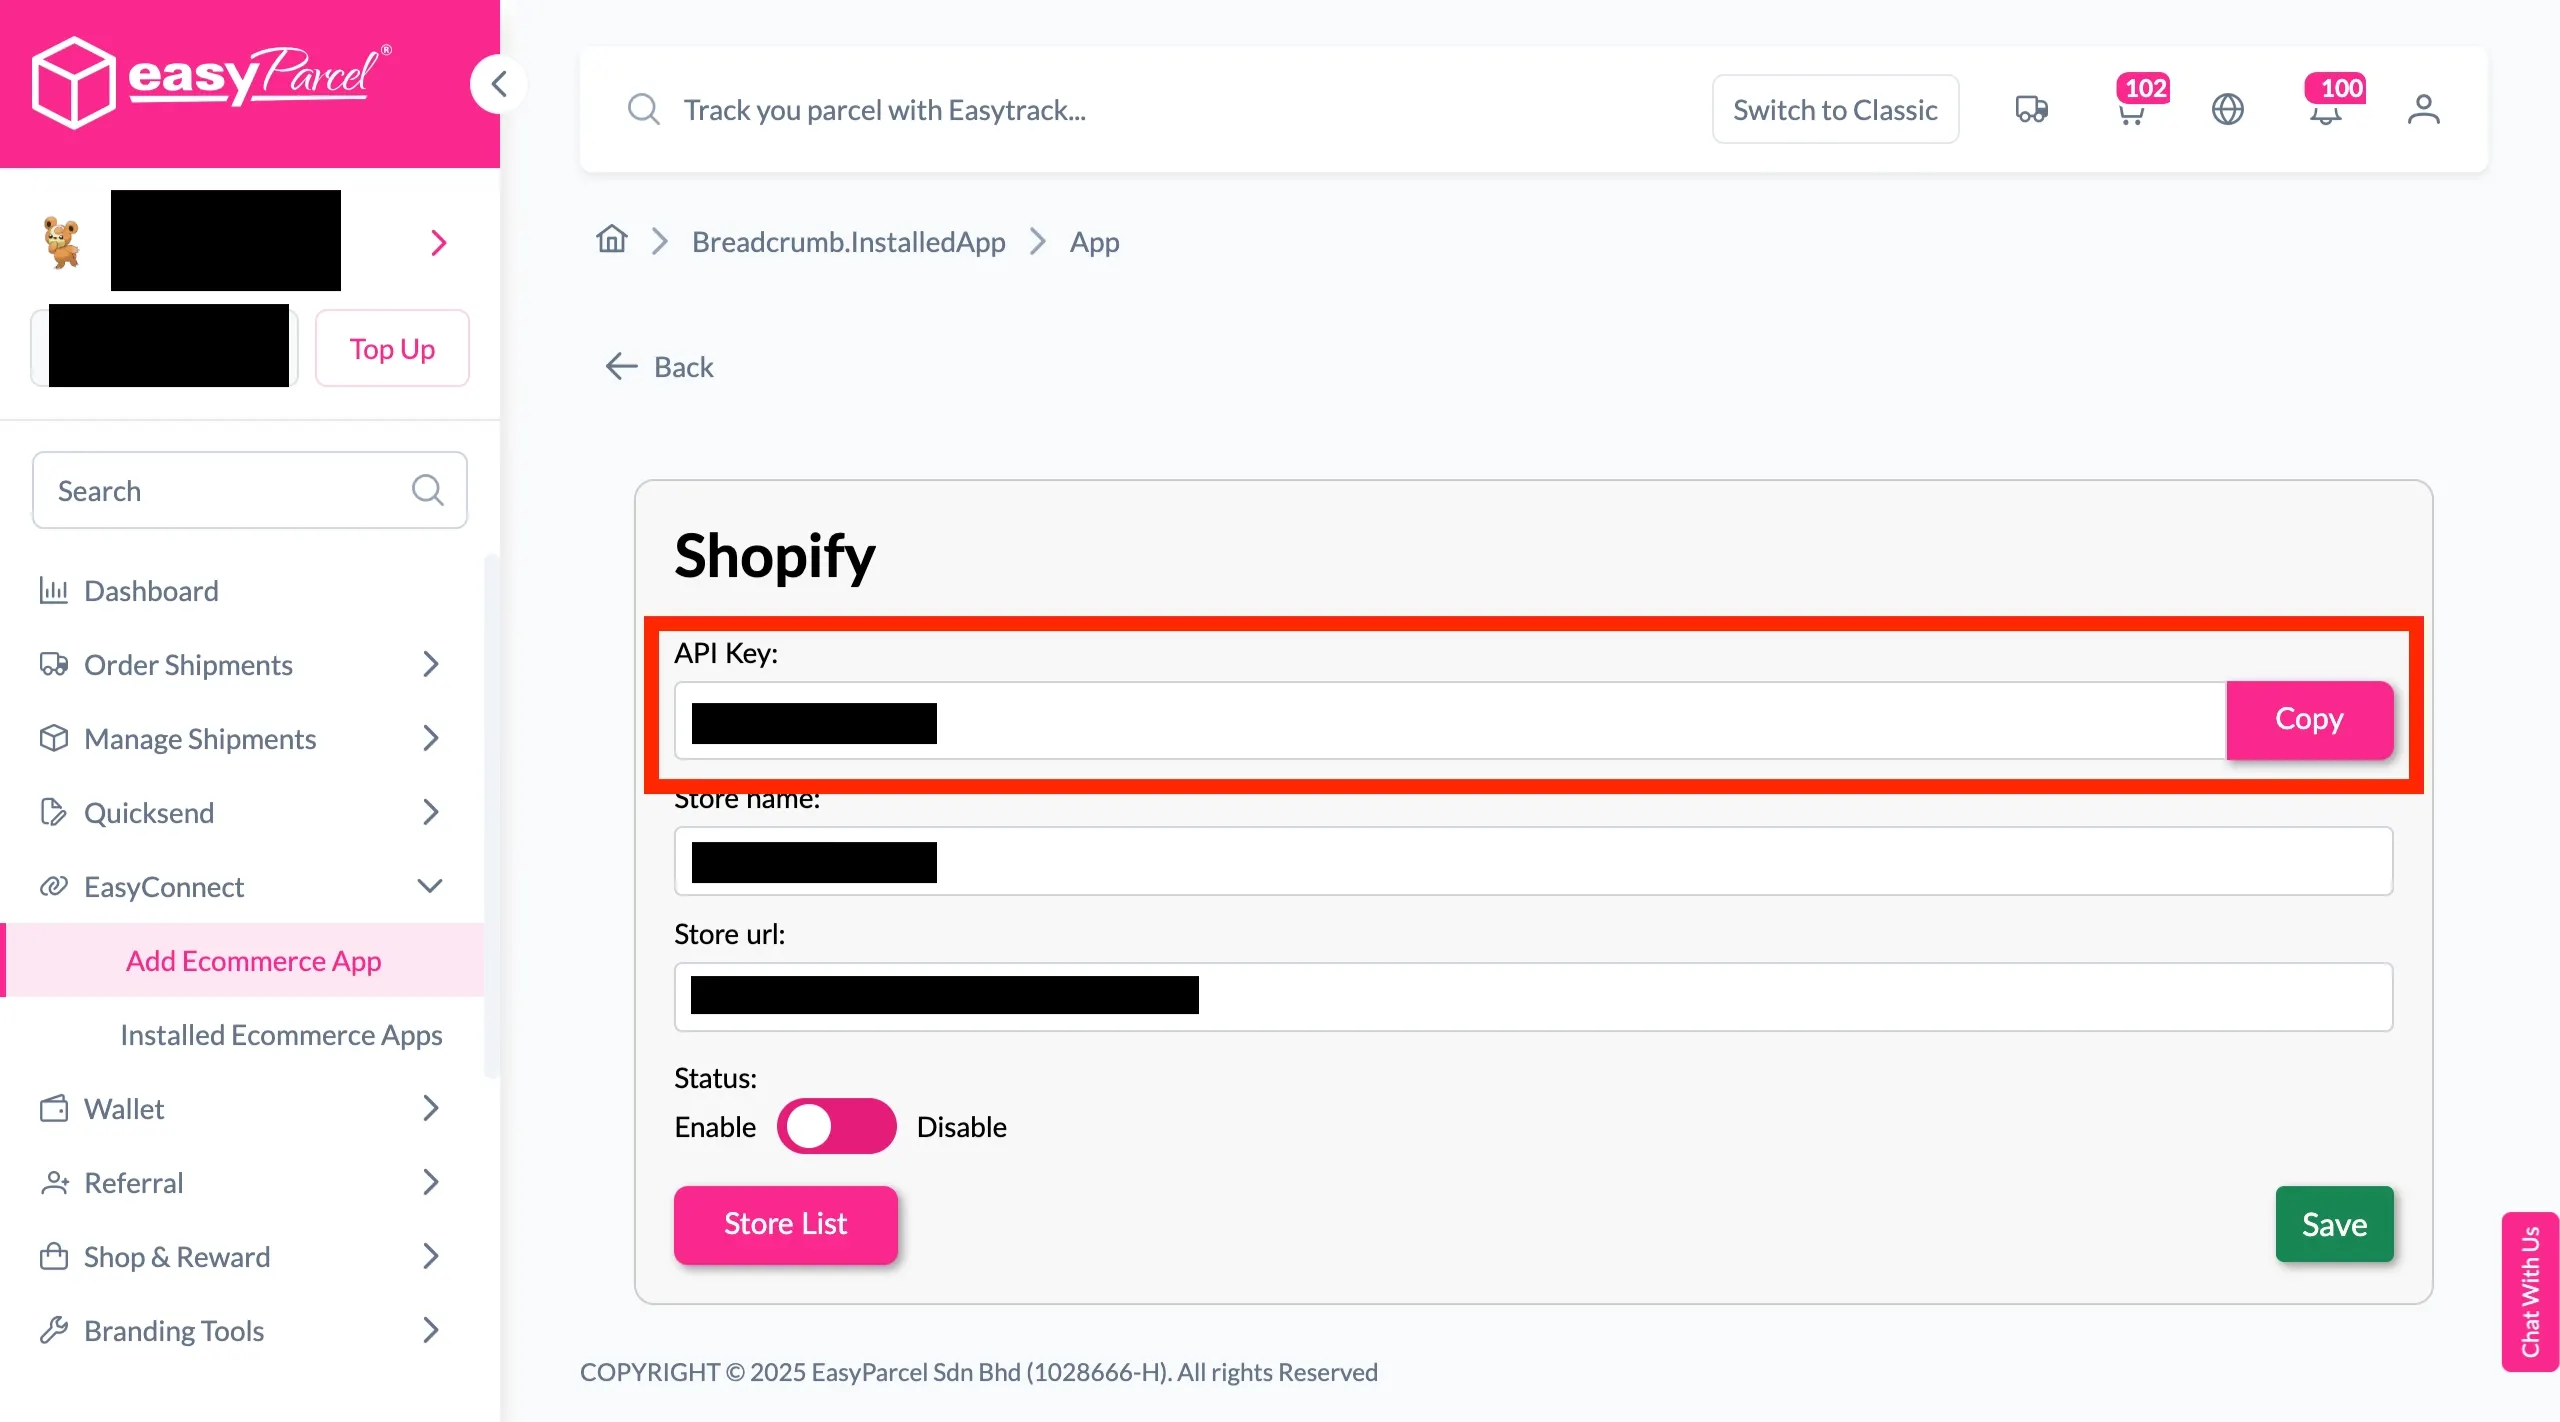
Step 6: Your store API key/Integration ID will be generated. Copy it to integrate with your store.
Step 7: Go to your Shopify admin panel, click on ‘Apps’, search for “EasyParcel – Delivery Made Easy”, and click ‘Install’.
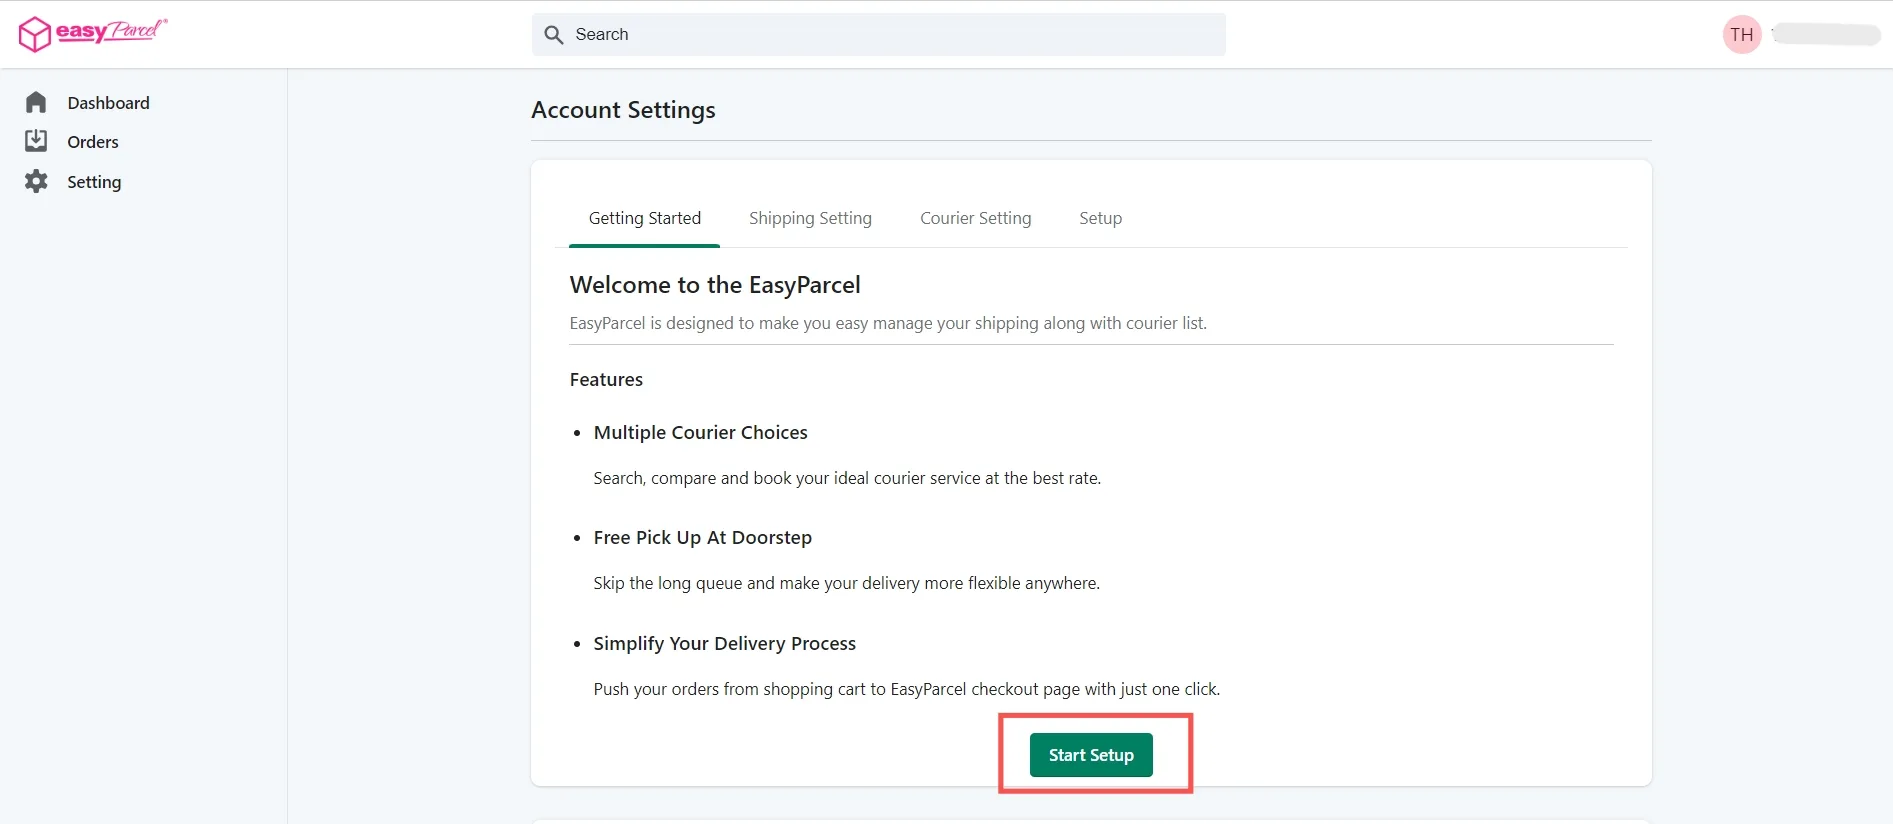
Step 8: You’ll be redirected to the EasyParcel settings under the ‘Getting Started’ tab. Read through the instructions and click ‘Start Setup’.
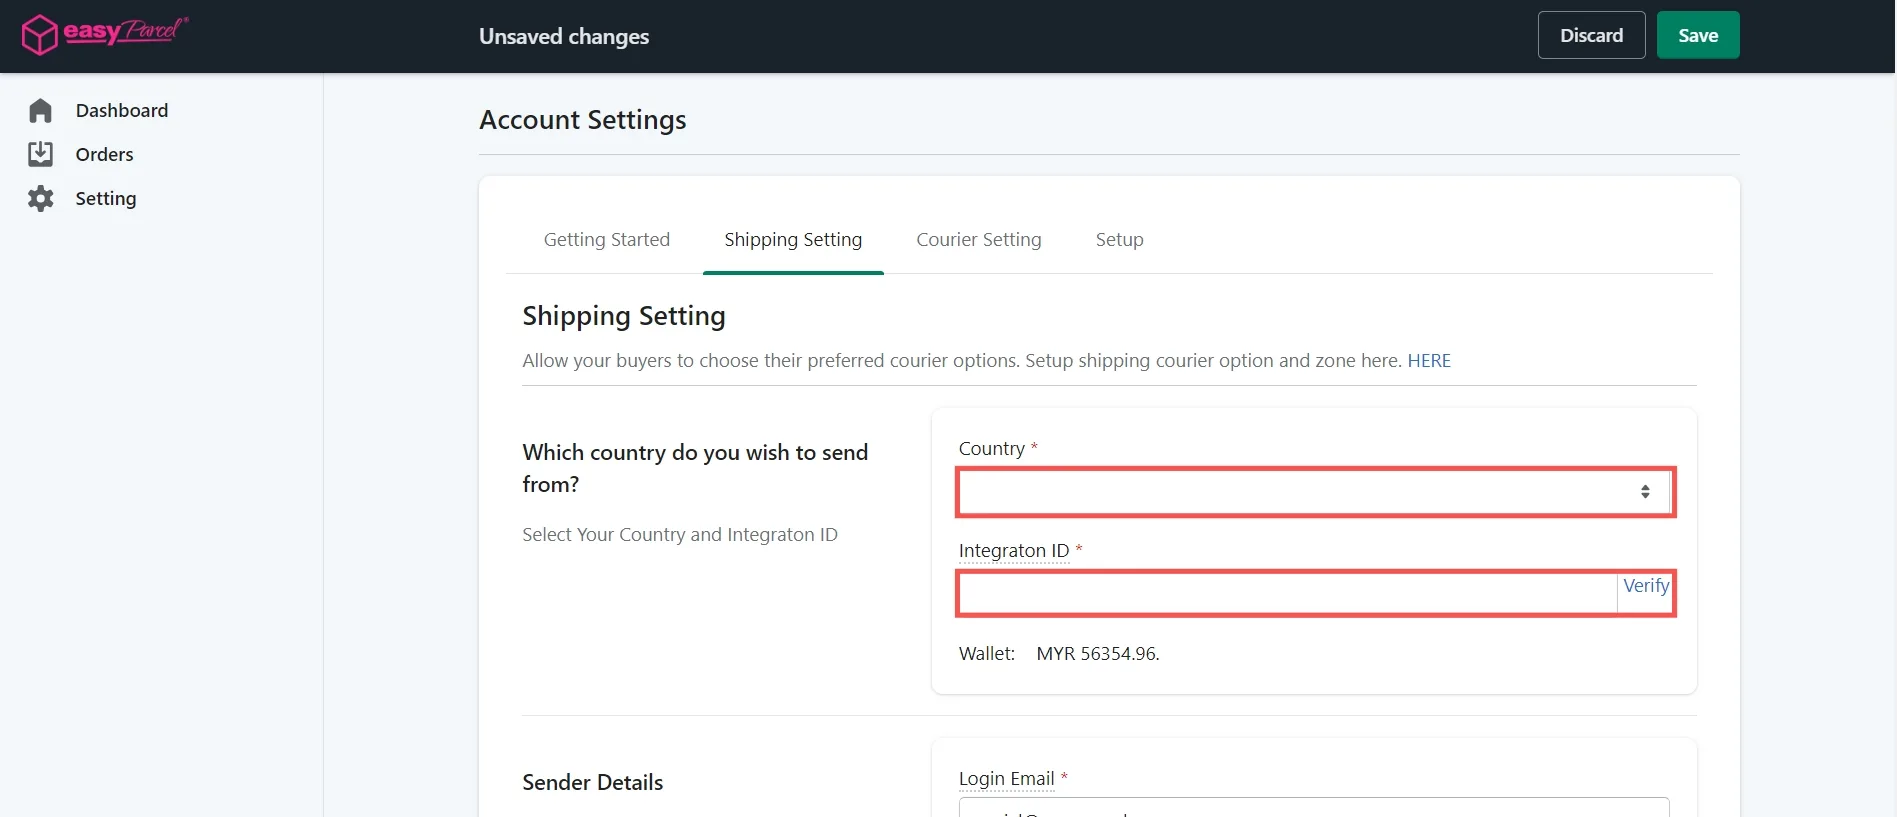
Step 9: You’ll be brought to the ‘Shipping Setting’ tab to fill in your details. Choose which country you’d like to ship from and insert your integration ID (which you obtained in Step 5). Copy the integration ID to paste into the ‘Shipping Setting’ tab.
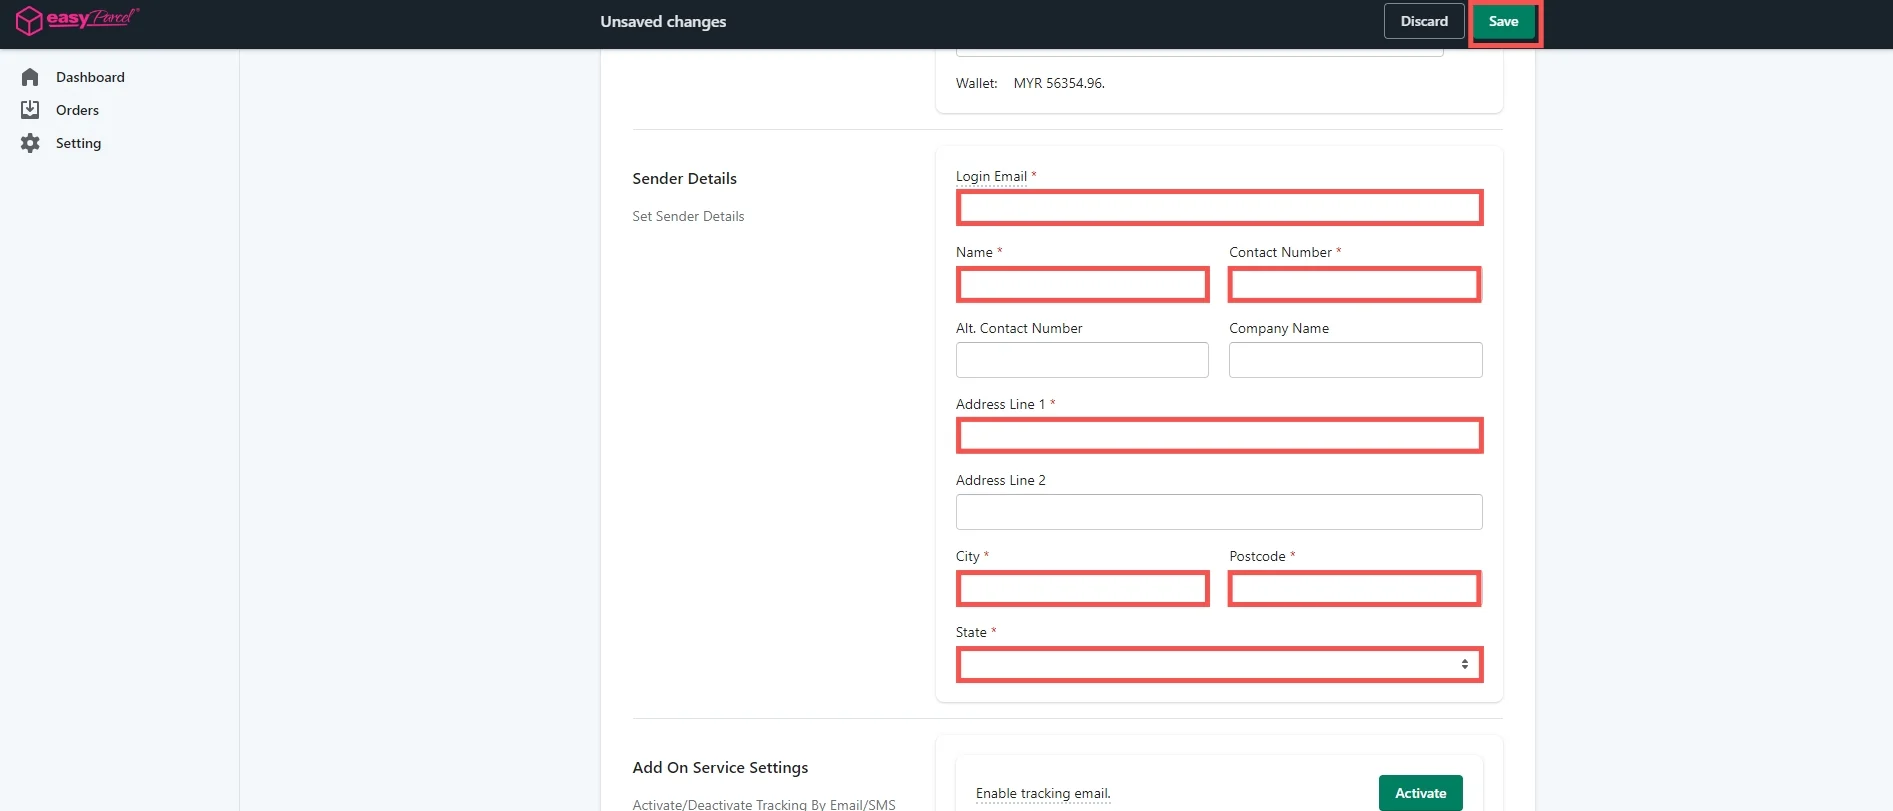
Step 10: Please review the auto-filled ‘Sender’s Details’ to ensure accuracy. If any information needs editing, make the necessary adjustments. Once you have verified the details, click ‘Save’ to store the information.
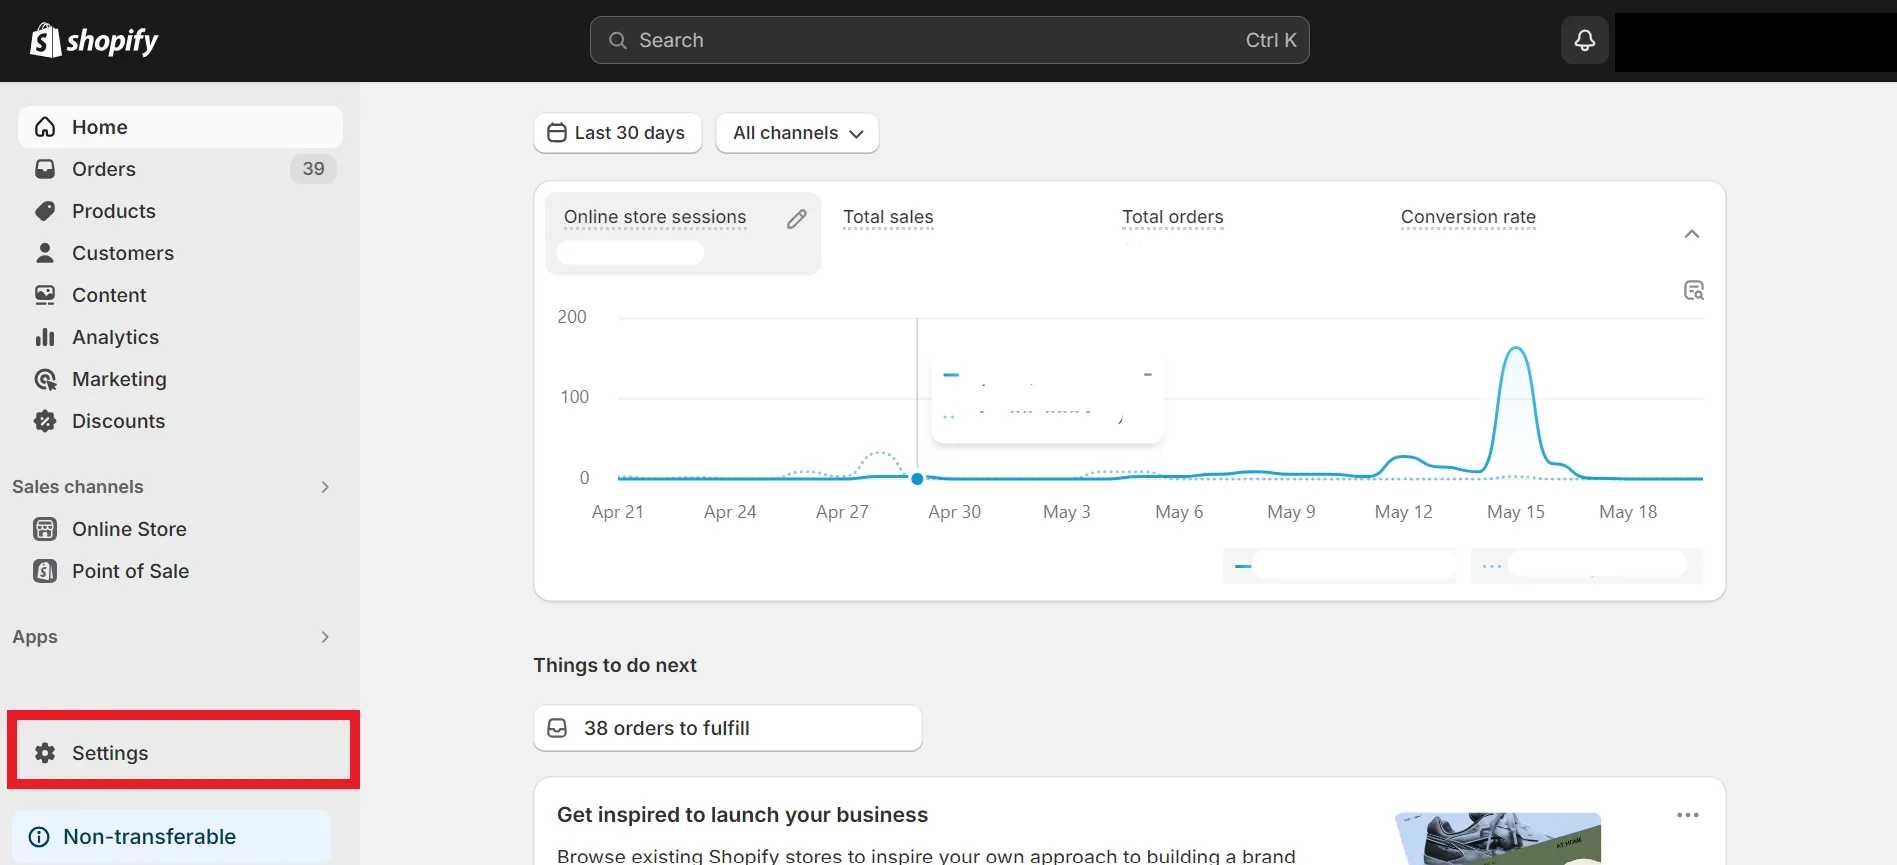
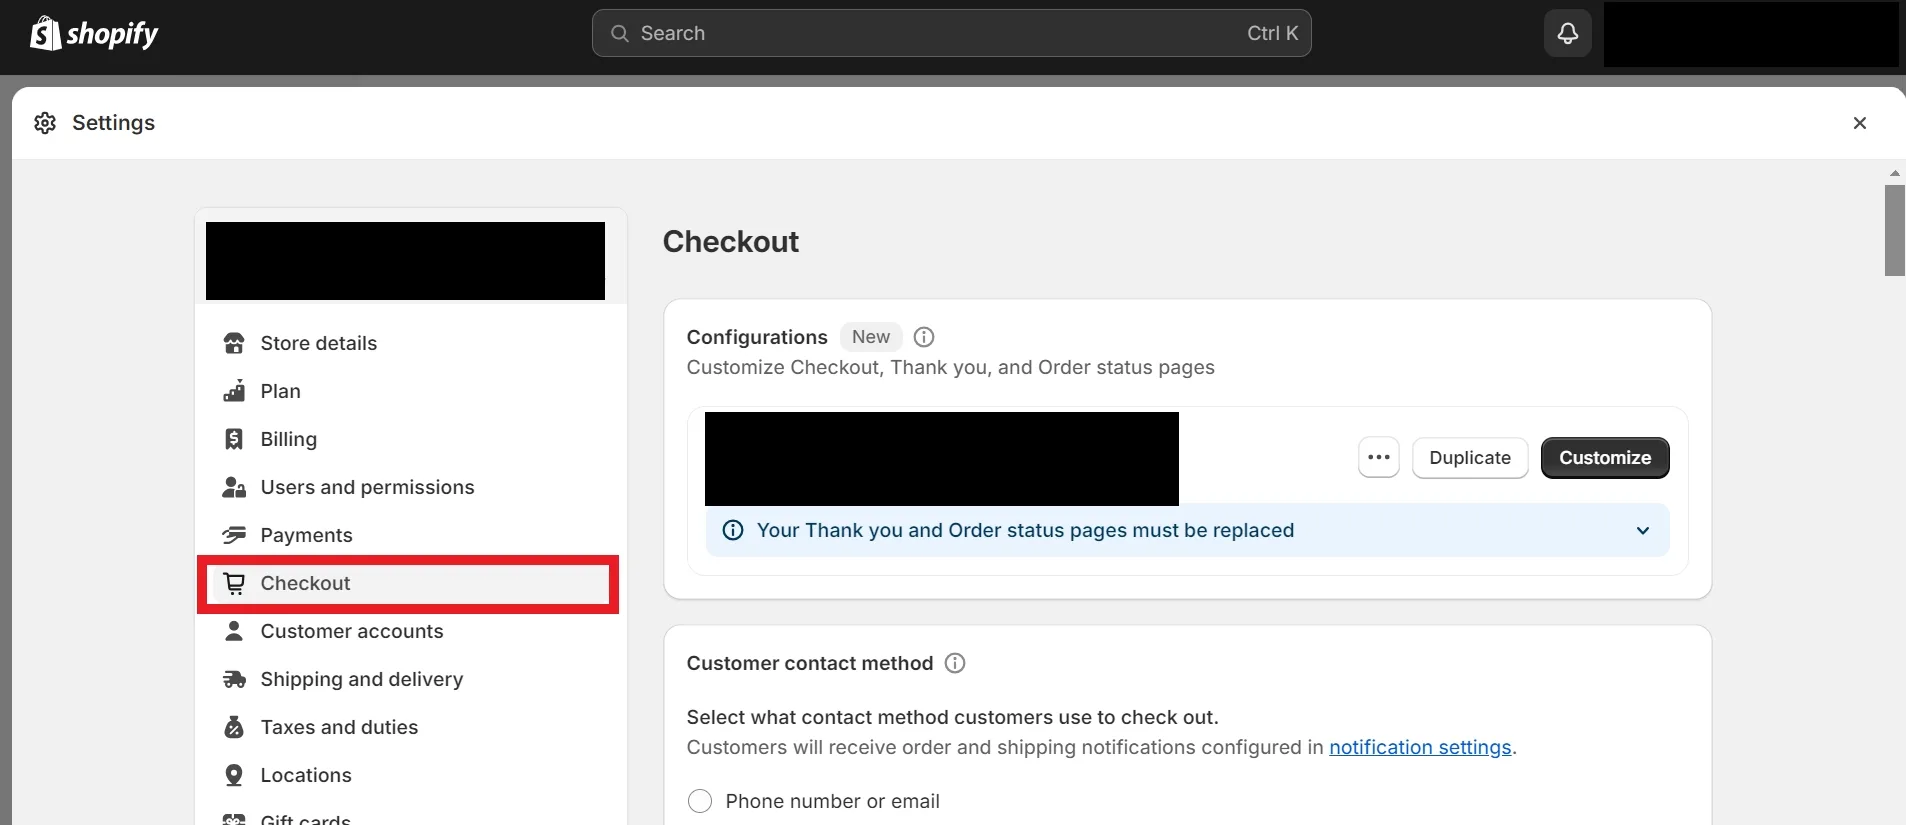
Step 11: Go to your Shopify admin panel, click ‘Settings’, click ‘Checkout’, then under ‘Shipping address phone number’, choose ‘Required’ to ensure your customer’s contact number is captured by EasyParcel’s Shopify app. Note: Failure to adhere to these steps may result in the buyer’s contact number not being captured by the EasyParcel app. Consequently, when the order is imported into EasyParcel, it may indicate a failed import due to an empty receiver_contact field. Additionally, for app versions, successful order fulfillment may occur, but no AWB (Air Waybill) will be generated or provided to the customer due to the receiver_contact field being empty.
Step-by-Step Tutorial: Integrate Shopify Store with EasyParcel (Import Version)
Step 2: Under “Integration” section, click on ‘Add Ecommerce App’, find ‘Shopify’ and click on ‘Install App’.
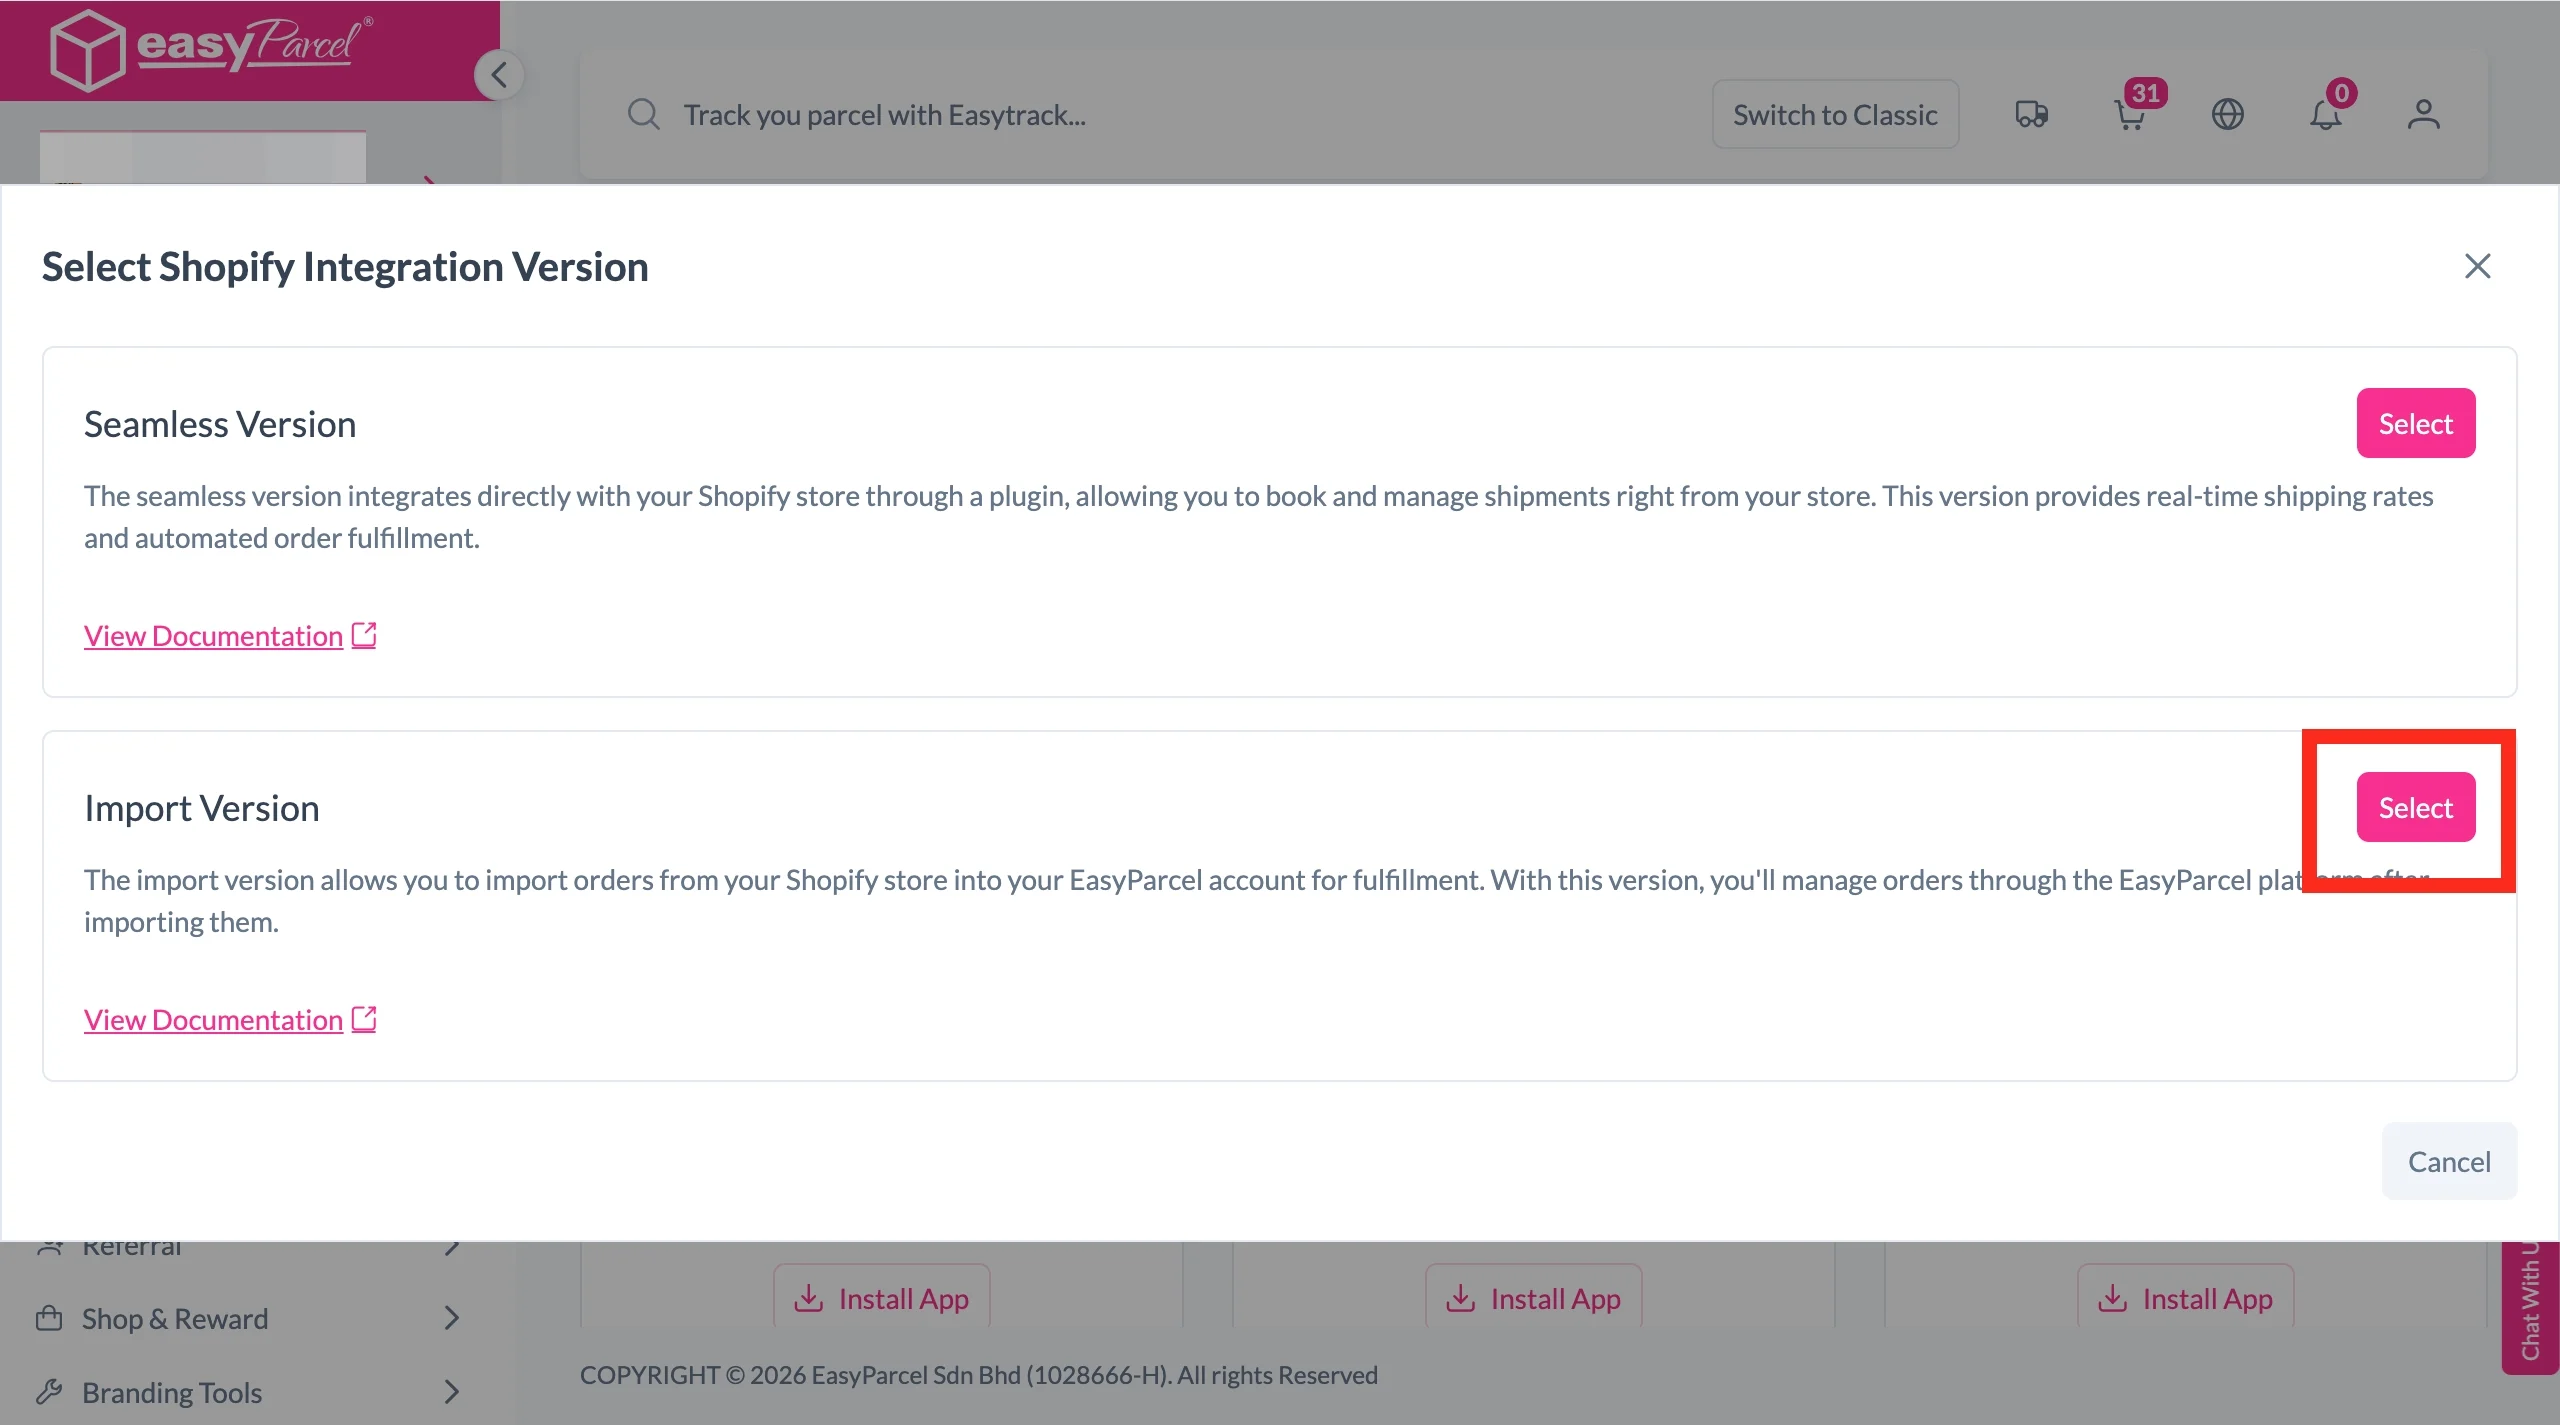
Step 3: Select ‘Import Version’.
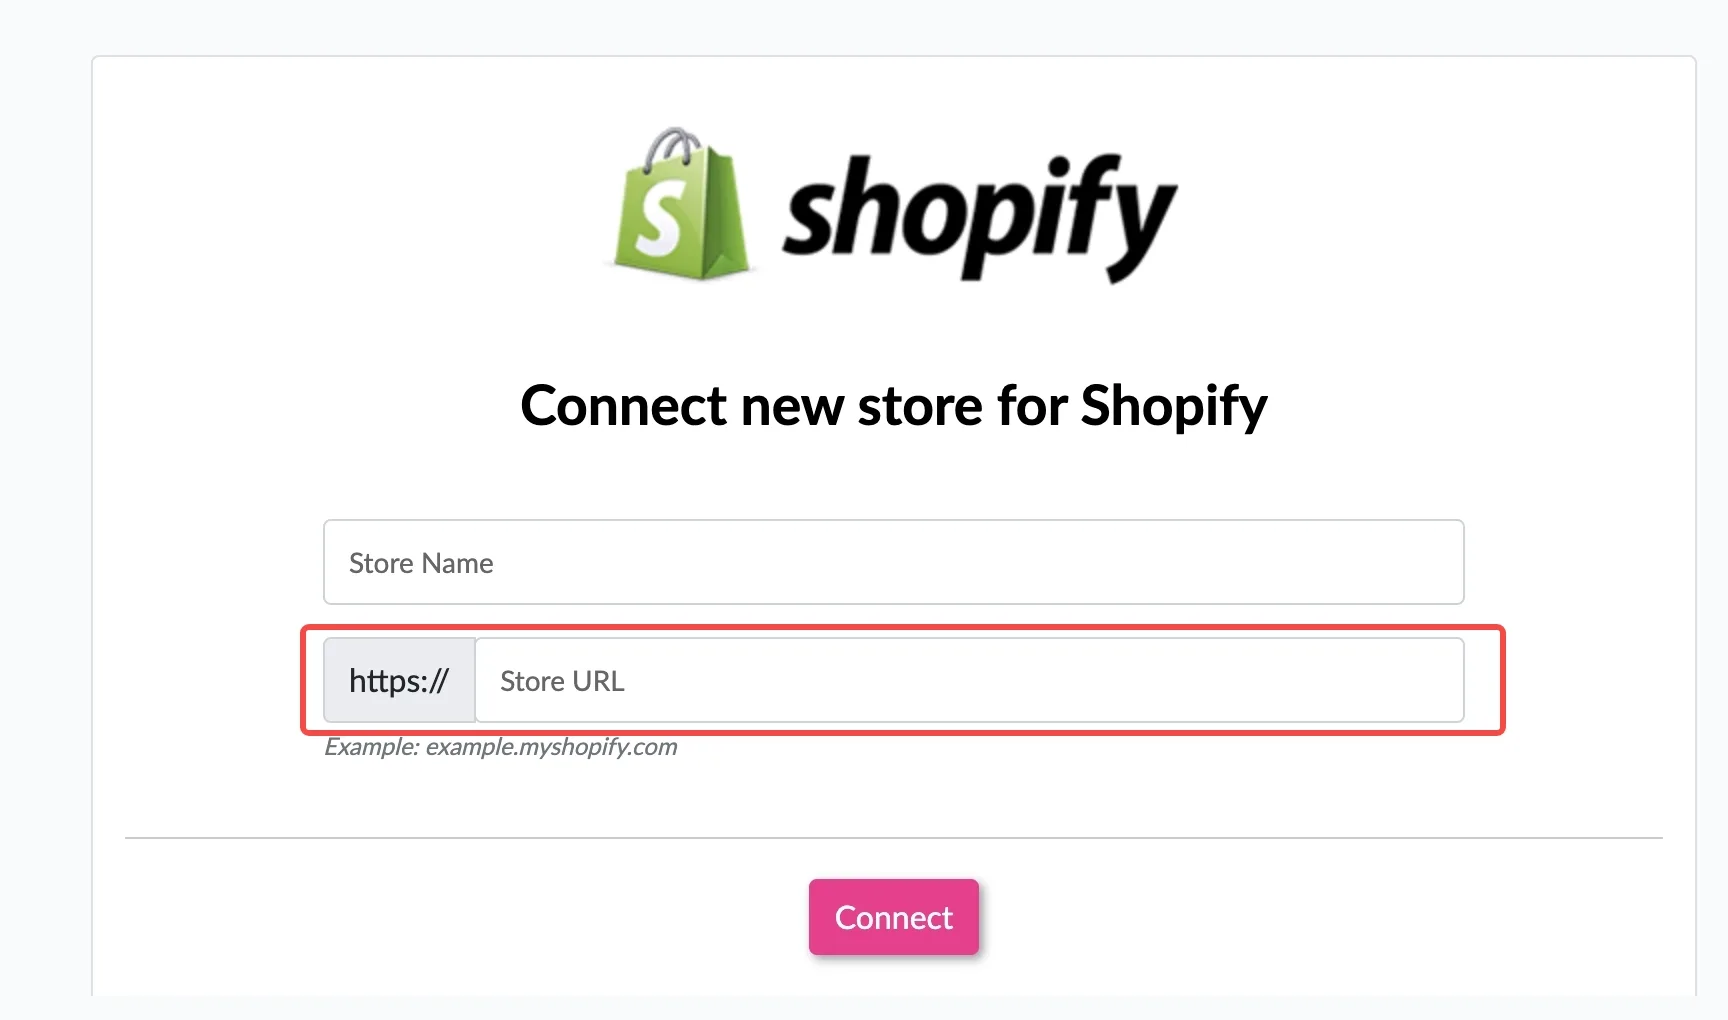
Step 4: Key in your ‘Store Name’ and ‘Store URL’ and click on the ‘Connect’ button. Kindly take note: Please Key in URL without https:// (Example: testing.myshopify.com)
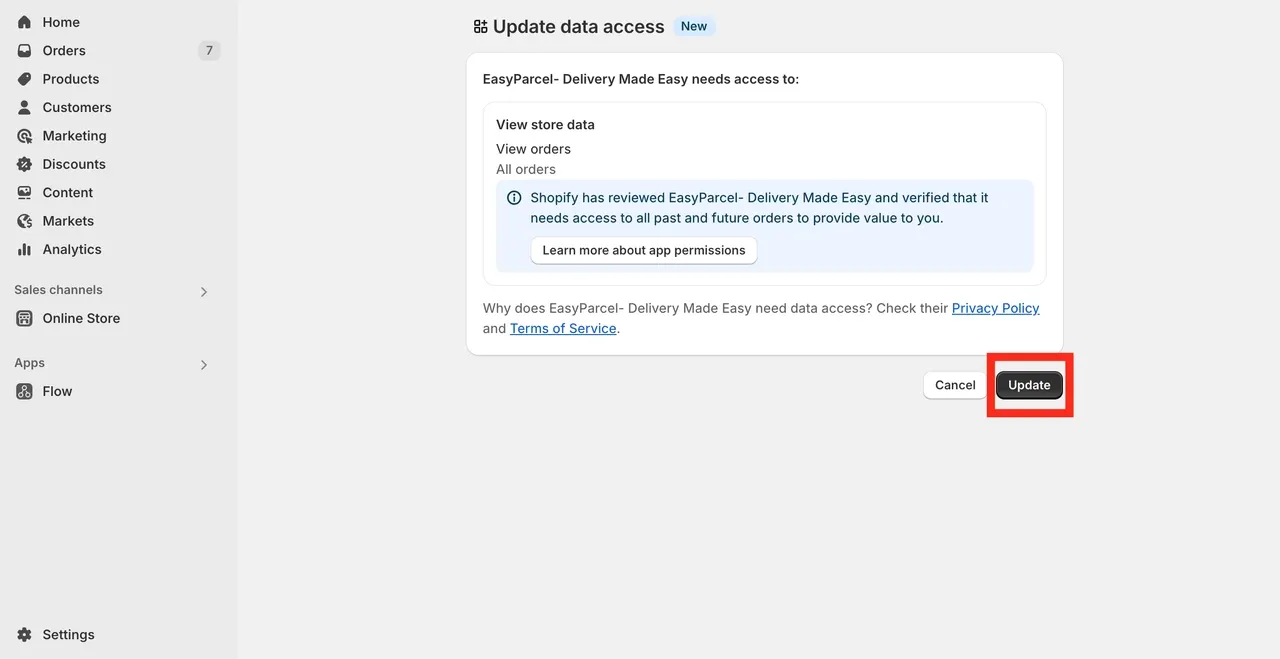
Step 5: You will then be redirected to your Shopify admin page and click on the ‘Update’ button.
Step 6: Under ‘Integration’, click on ‘Installed Ecommerce Apps’, find ‘Shopify Import’ and click on ‘Open App’ button.
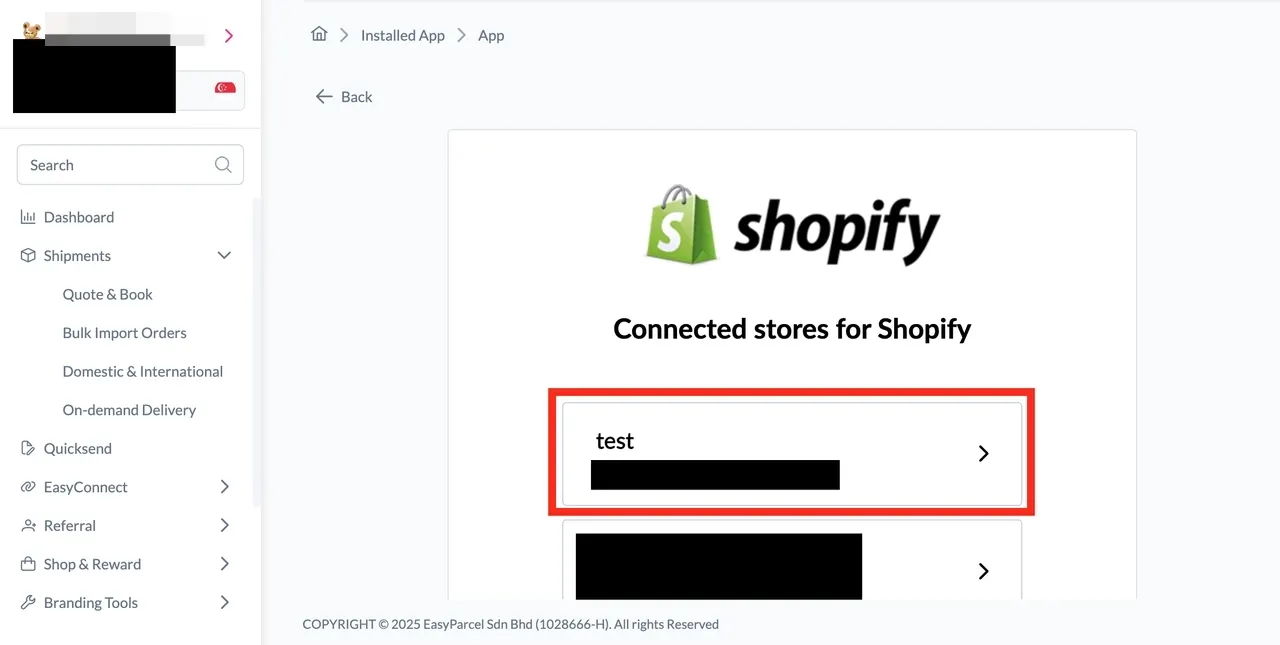
Step 7: Find your connected store on the store page, and click into the store.
Step 8: In the store, click ‘Sender Address’ and key in your sender details and click on the ‘Update’ button.
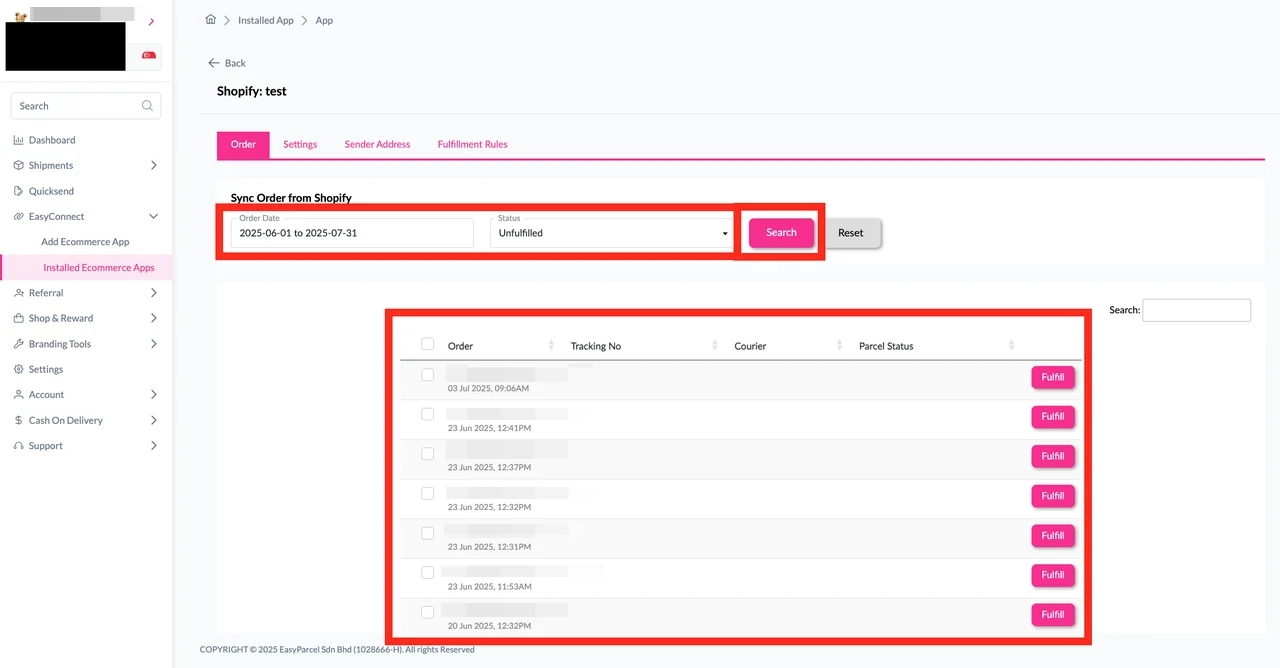
Step 9: Click on ‘Order’, select the order date and order status and click on the ‘Search’ button. The order will be imported and shown in the list below.
Step 2: In the “Settings” tab, scroll down to Settings section.
Step 3: Choose “Yes” from the “Auto order status update” select list.
Step 4: Click “Enable” to enable the setting.
Step 5: Finally, click “Update” to apply the changes.
Fulfillment
Step 1: Go to the “Order” tab, click the “Fulfill” button on the order you wish to fulfill. You will be redirected to the order details page.
Step 2: On the order details page, ensure product and fulfillment details are correct, then click “Get Quote” to quote list of available courier services for the order selected.
Step 3: A list of courier services will be displayed. Select your preferred courier services, apply coupons or add-on services if any. Then click “Proceed to Payment” to complete the fulfillment.
Step 4: After fulfilled successfully, the order status will be changed to Fulfilled, and the tracking number, URL and courier name will be updated back to the fulfilled order in the Shopify.
Frequently Asked Question (FAQs)
What is EasyParcel Shopify integration?
EasyParcel Shopify integration connects your Shopify store to EasyParcel so orders can be imported automatically and shipments can be booked from one dashboard.
Do Shopify orders sync automatically with EasyParcel?
Yes. Once the integration is activated, Shopify orders can be synced to your EasyParcel account, allowing you to import orders and fulfill shipments easily.
Create your free account today and receive S$6 shipping coupon to start saving from your very first parcel. Compare courier rates, book in minutes, and start saving immediately.