We are excited to announce that the EasyParcel WooCommerce Plugin is now live in the WordPress Plugin Directory! With just a few clicks, you can easily download EasyParcel – All-in-one Shipping Solution, Real-Time Shipping Rates and install it to streamline your shipping process. Click here to download it now!
Table of Contents
Why EasyParcel WooCommerce Plugin?
1. Enhance Customer Satisfaction
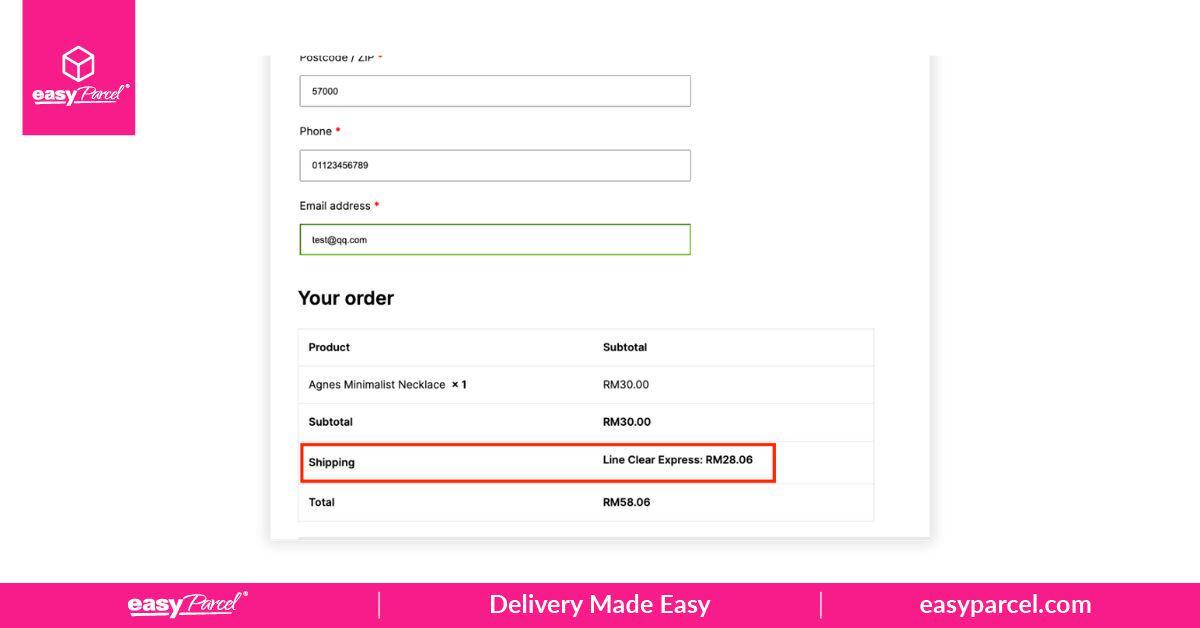
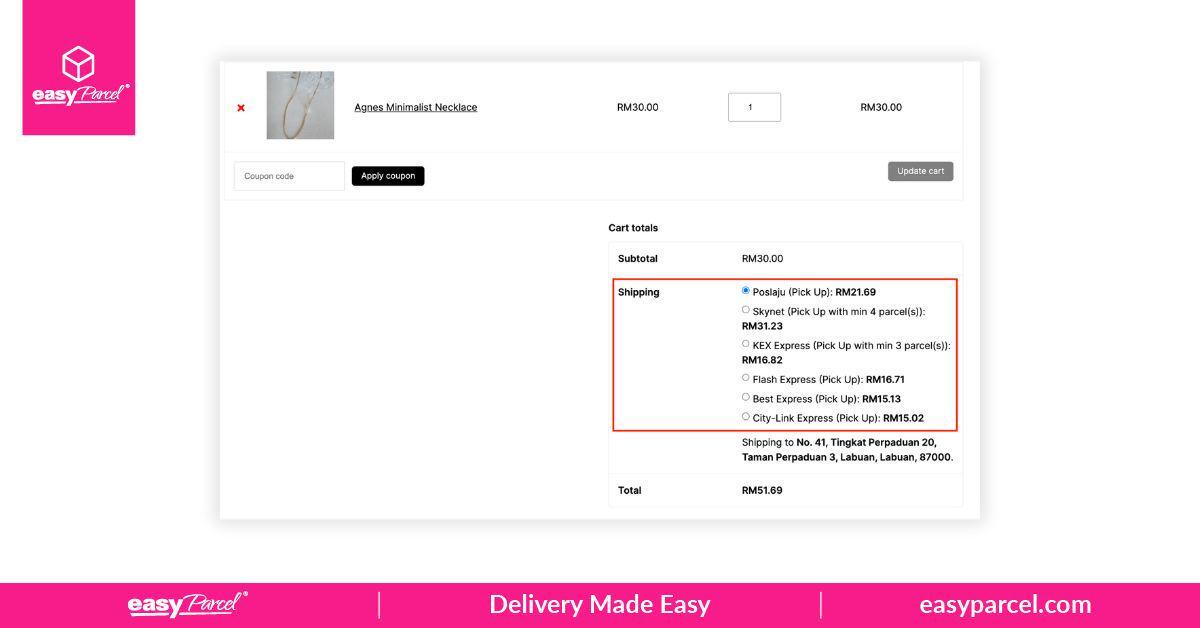
Offer the cheapest courier options and accurate real-time rates to build trust, improve transparency, and reduce cart abandonment.
2. Increases Flexibility
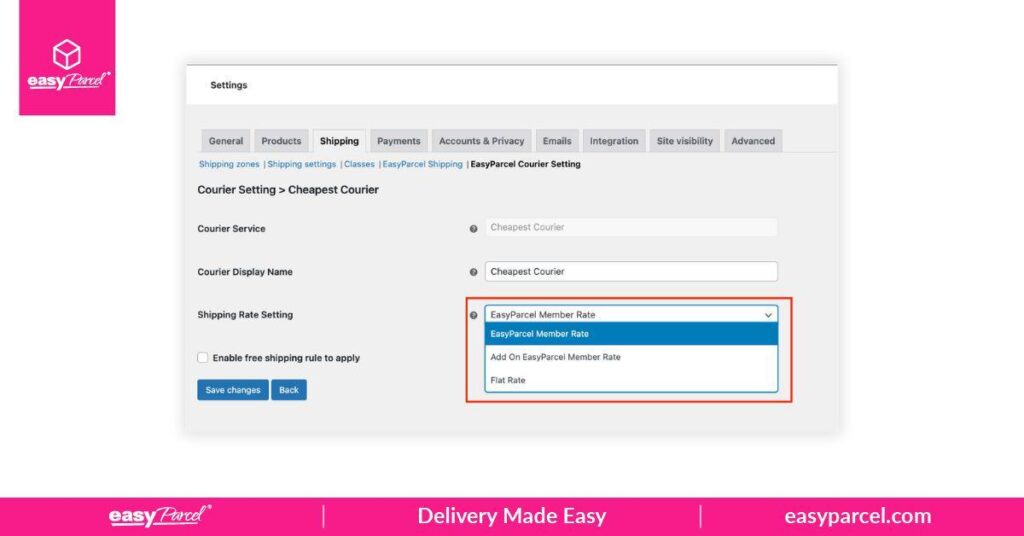
Set custom shipping rates to meet diverse customer needs and preferences.
3. Saves Time and Effort
Automate order fulfillment, allowing focus on business growth instead of manual processing.
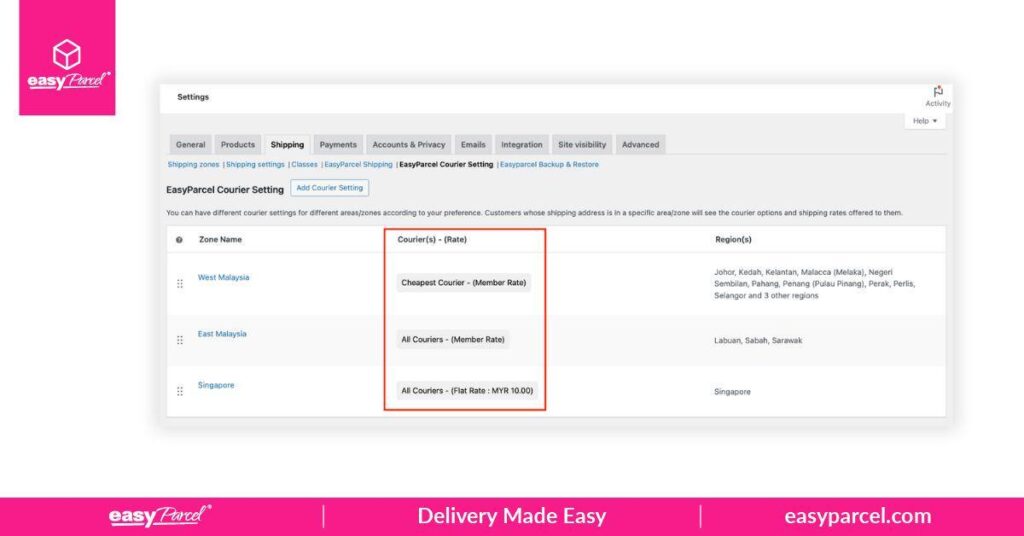
4. Optimizes Shipping Strategies
Customize shipping zone settings to offer competitive rates based on geographic locations.
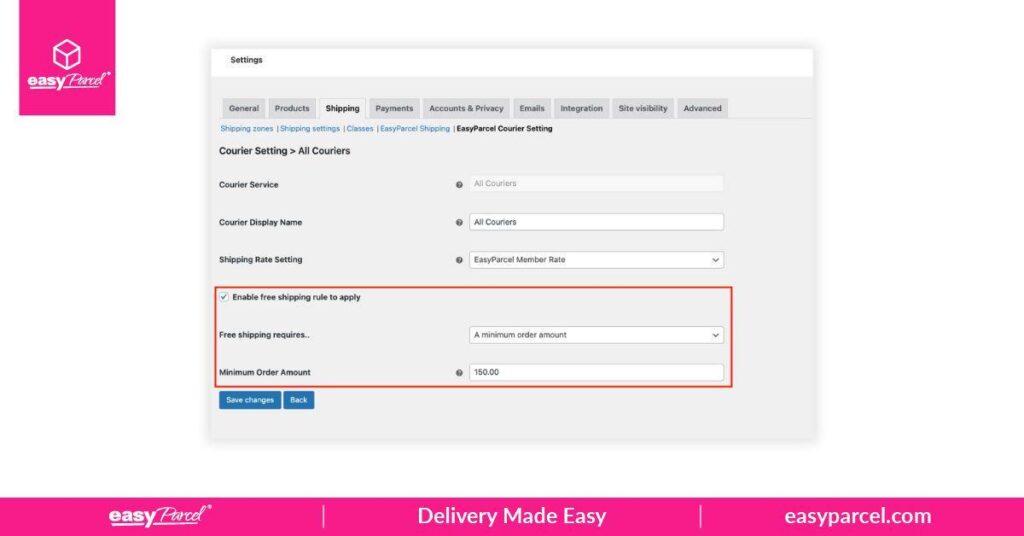
5. Encourages Larger Purchases
Set conditions for free shipping to boost average order value and foster customer loyalty.
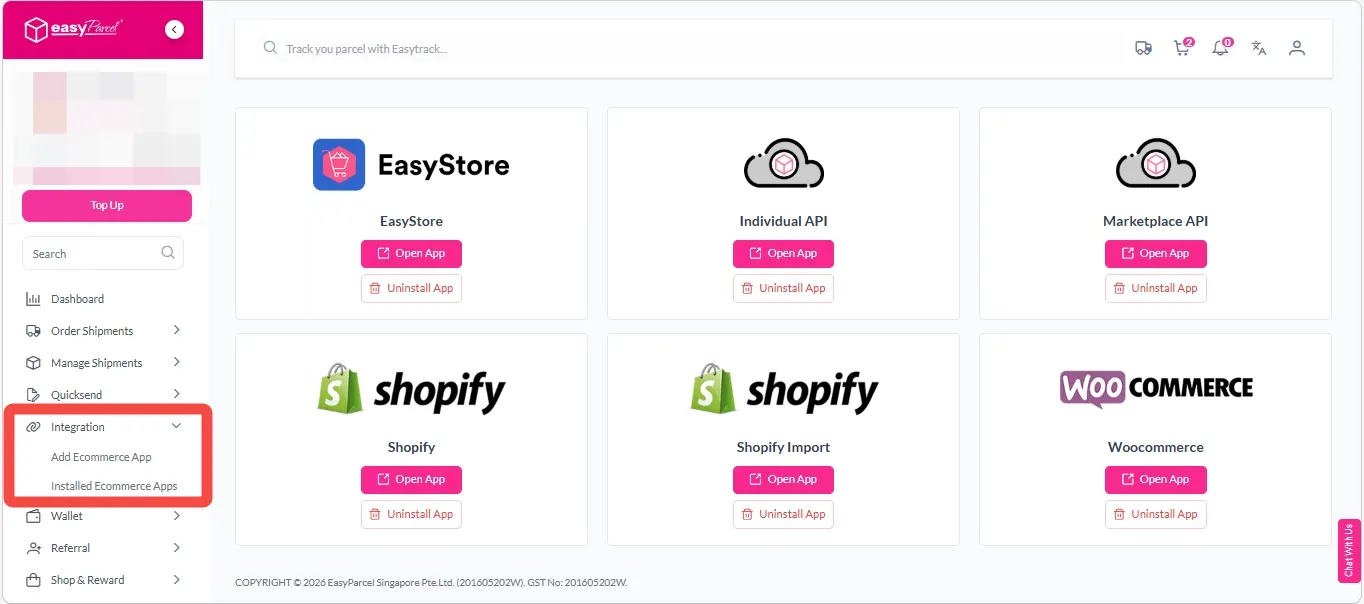
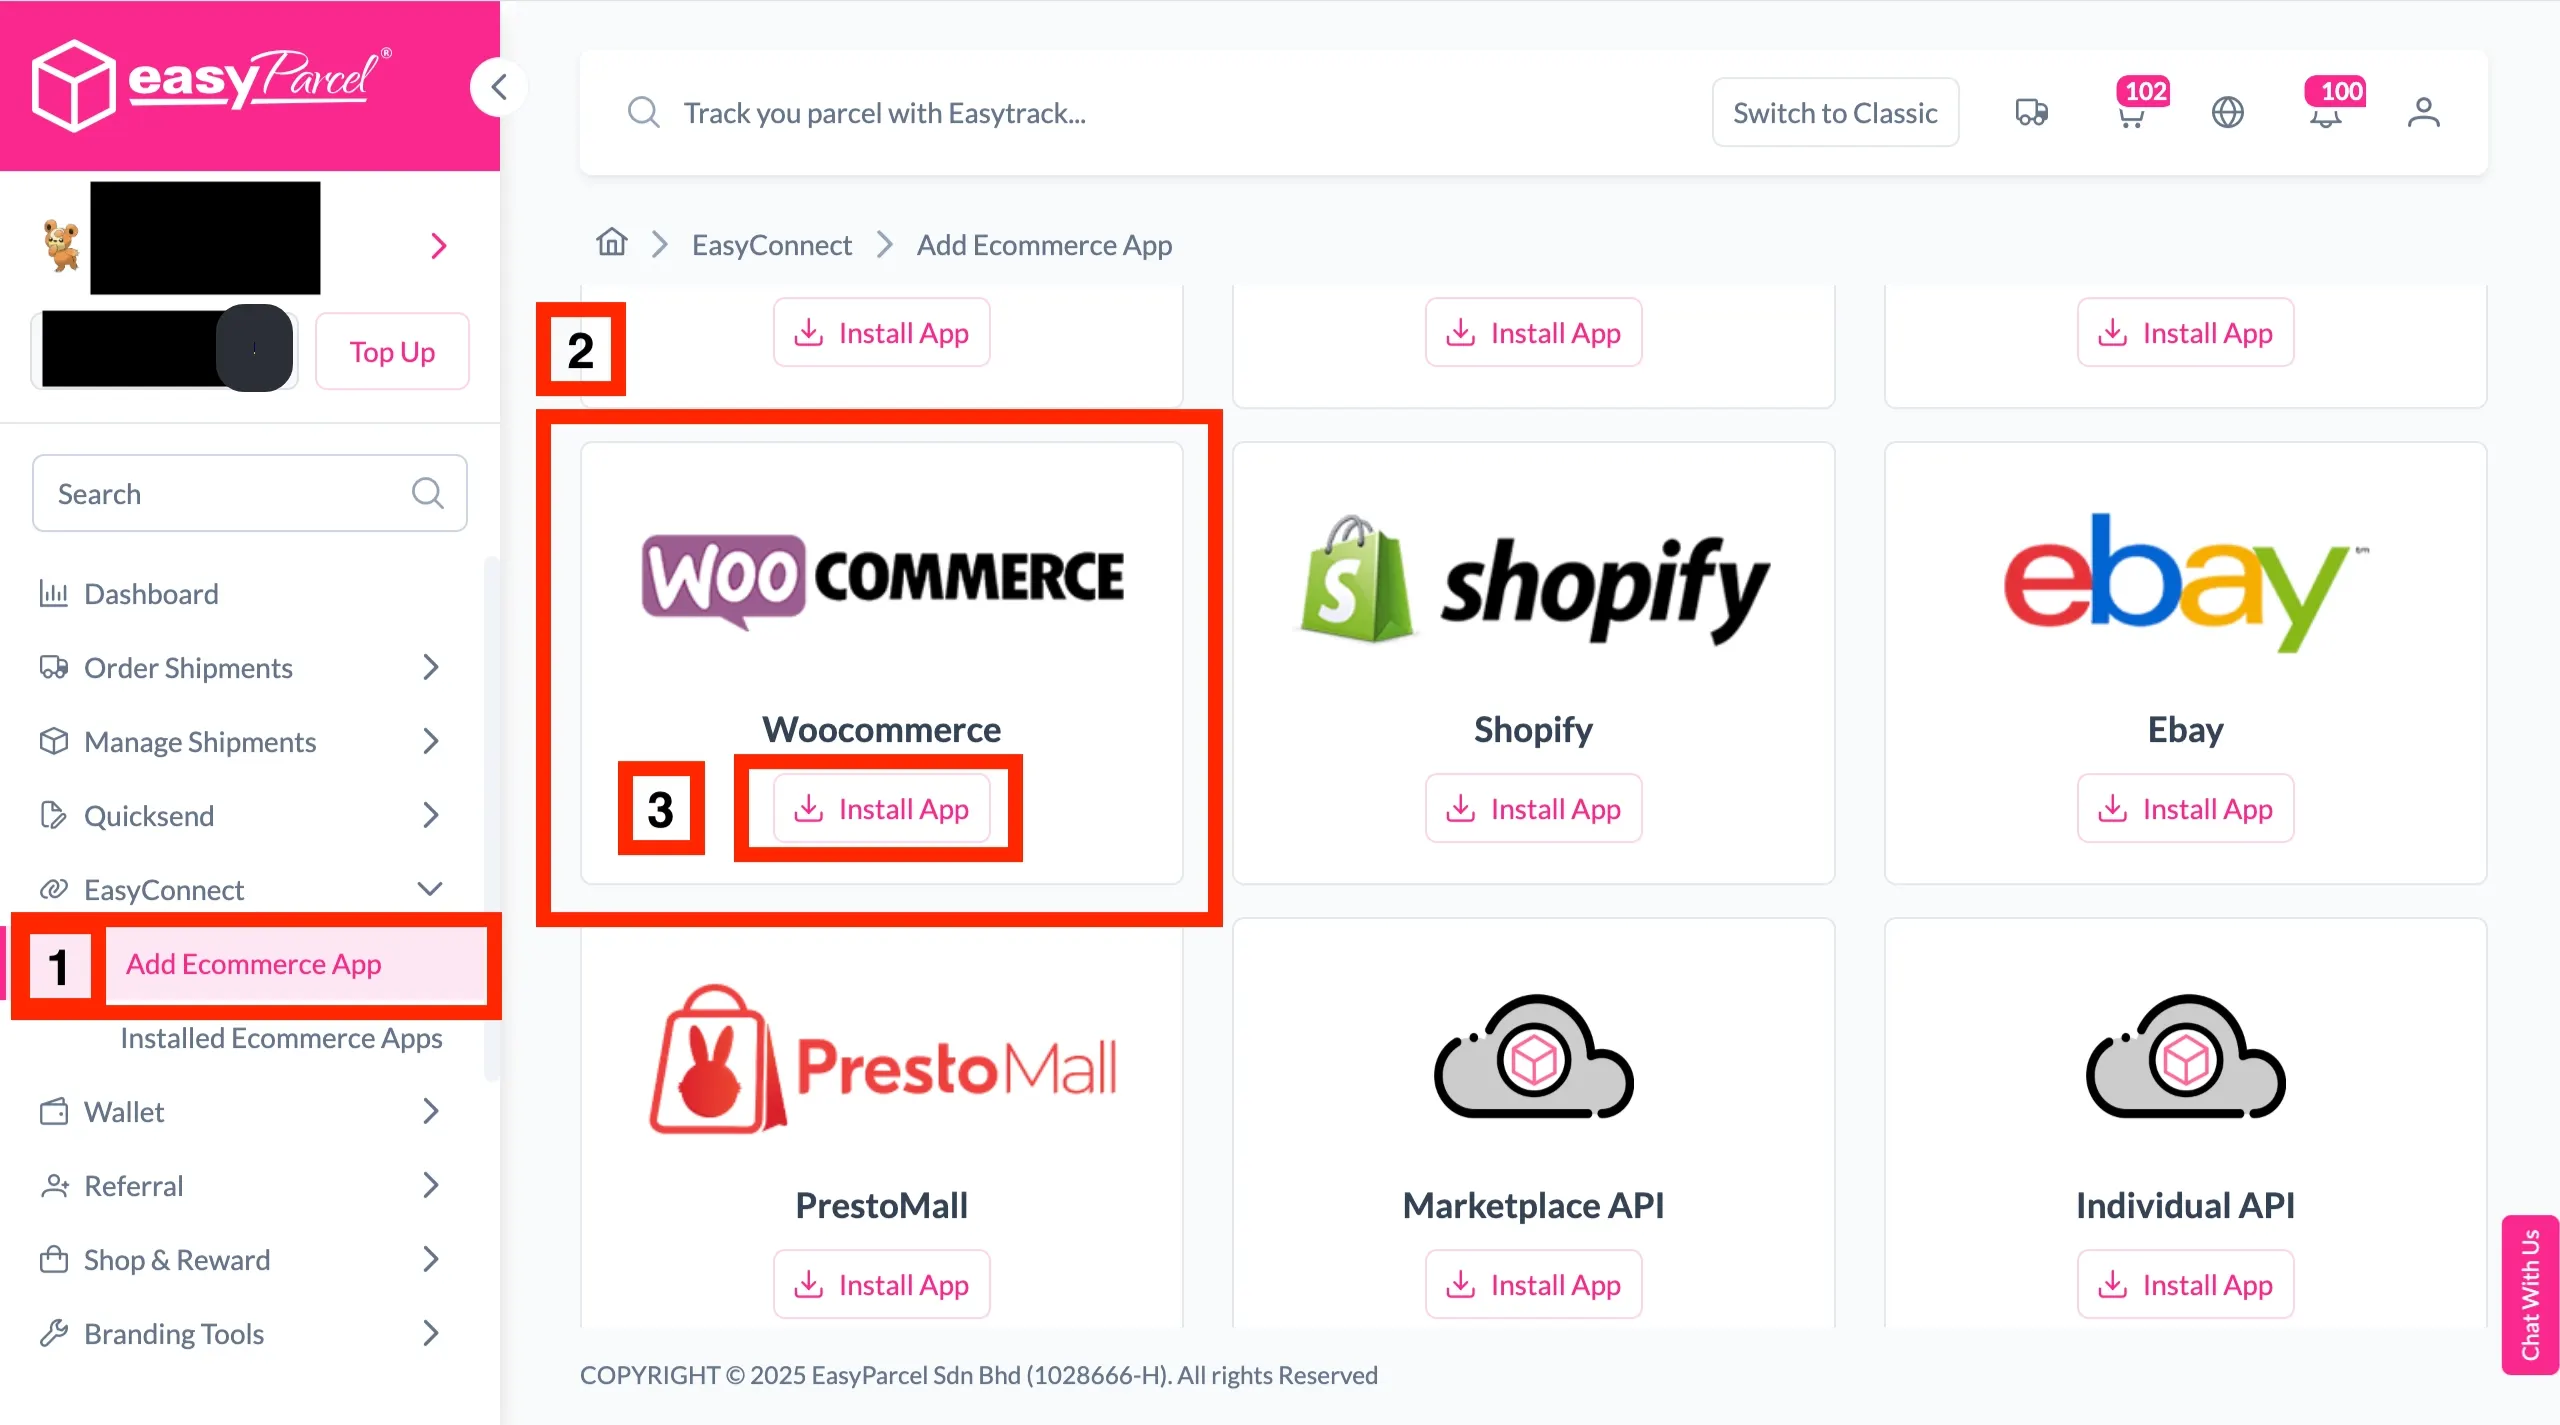
Step 3: Click ‘Add Ecommerce App’. Find the ‘Woocommerce’. After that, click ‘Install App’.
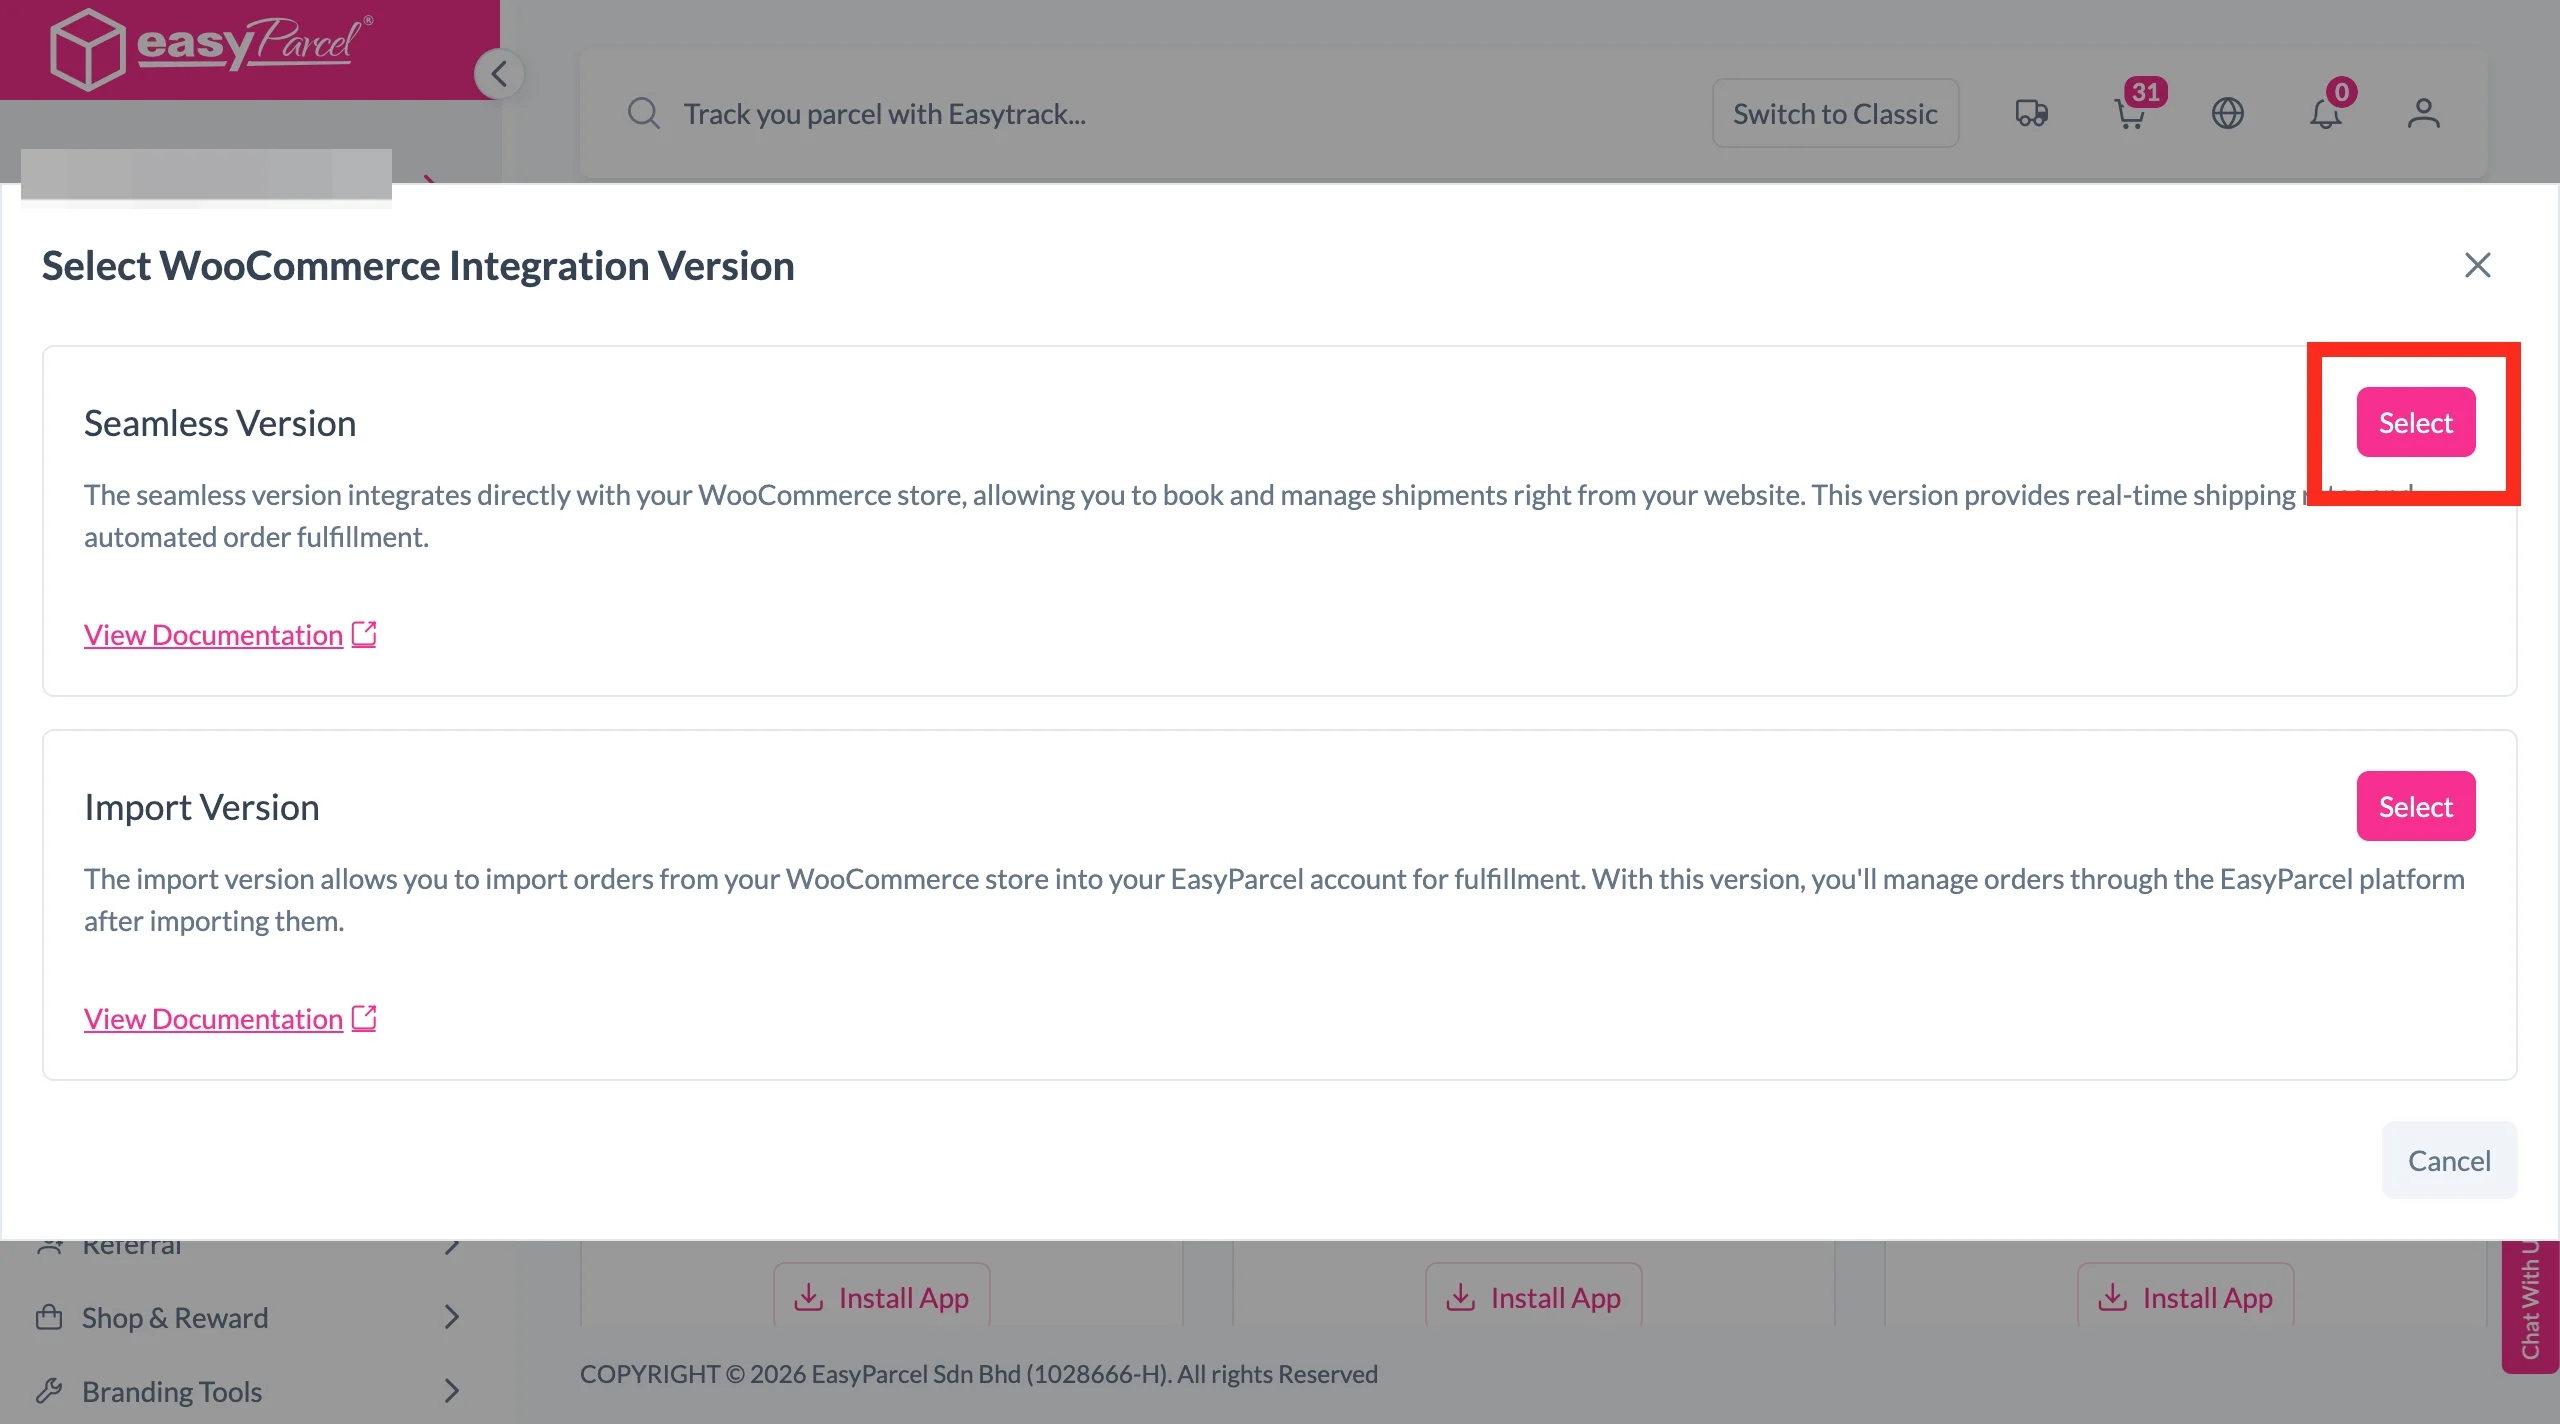
Step 4: Select ‘Seamless Version’.
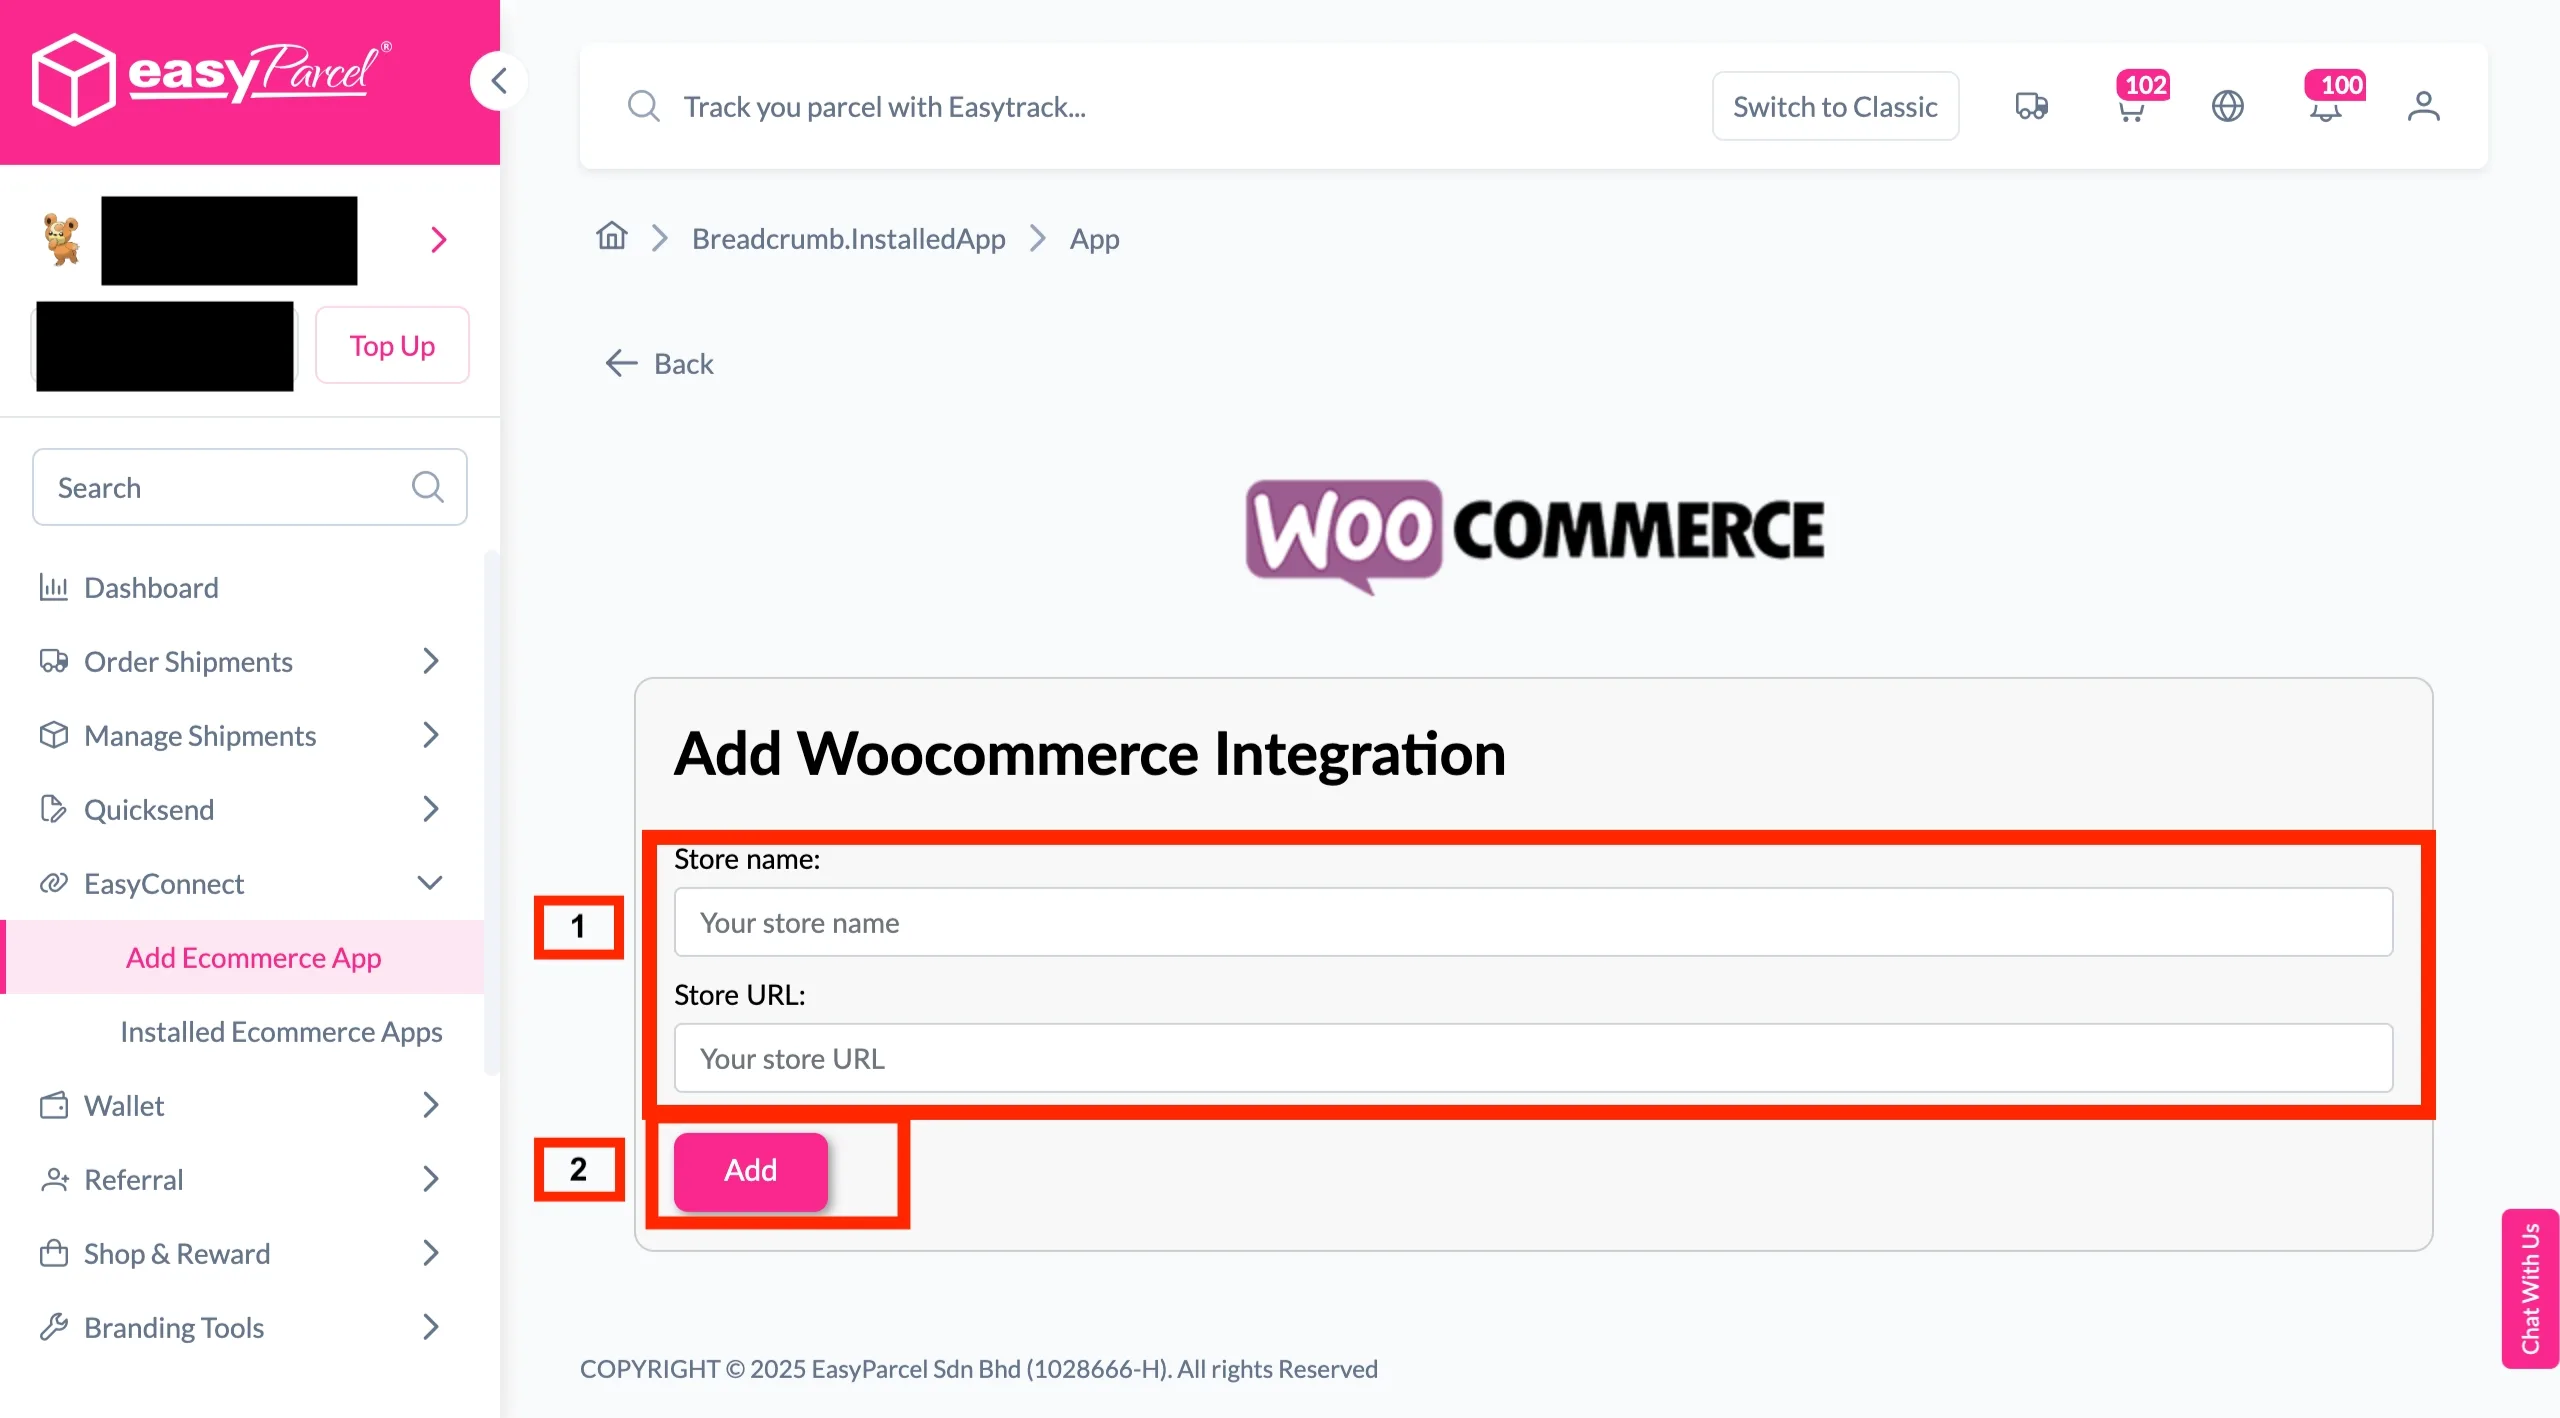
Step 5: Fill in the ‘Store name’ and ‘Store URL’. After that, click ‘Add‘.
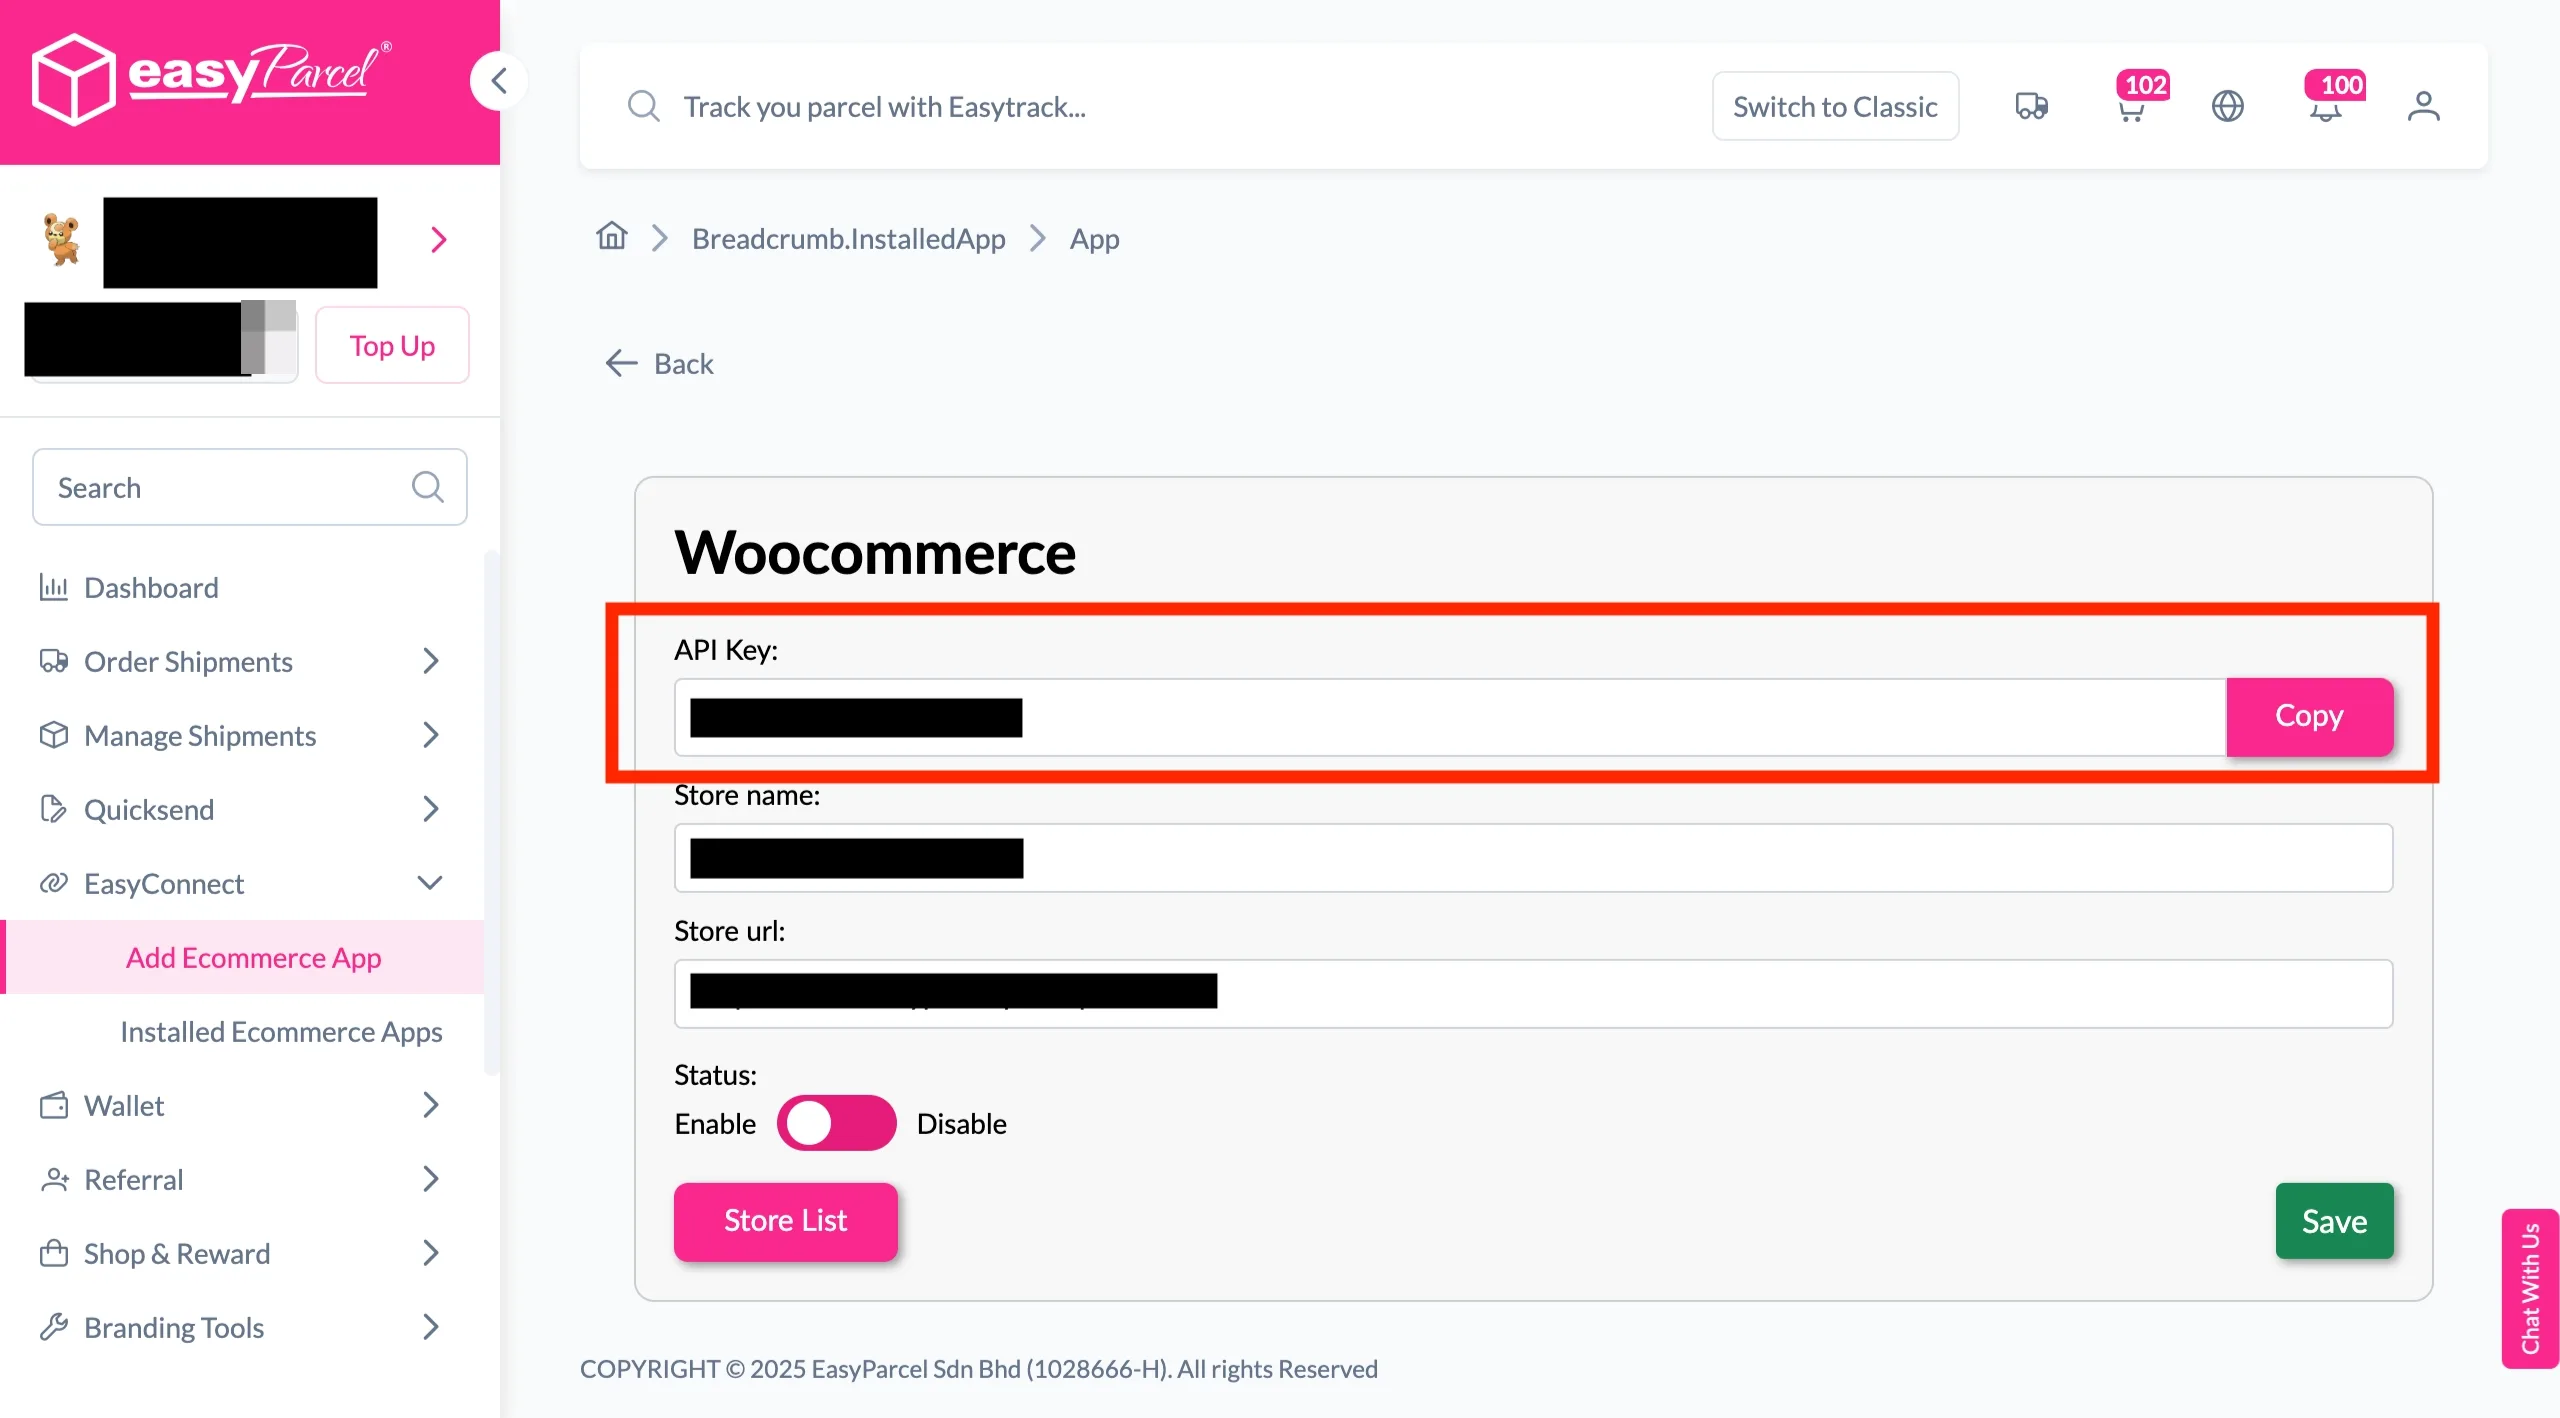
Step 6: Your store API key/Integration ID will be generated. Copy it to integrate with your store.
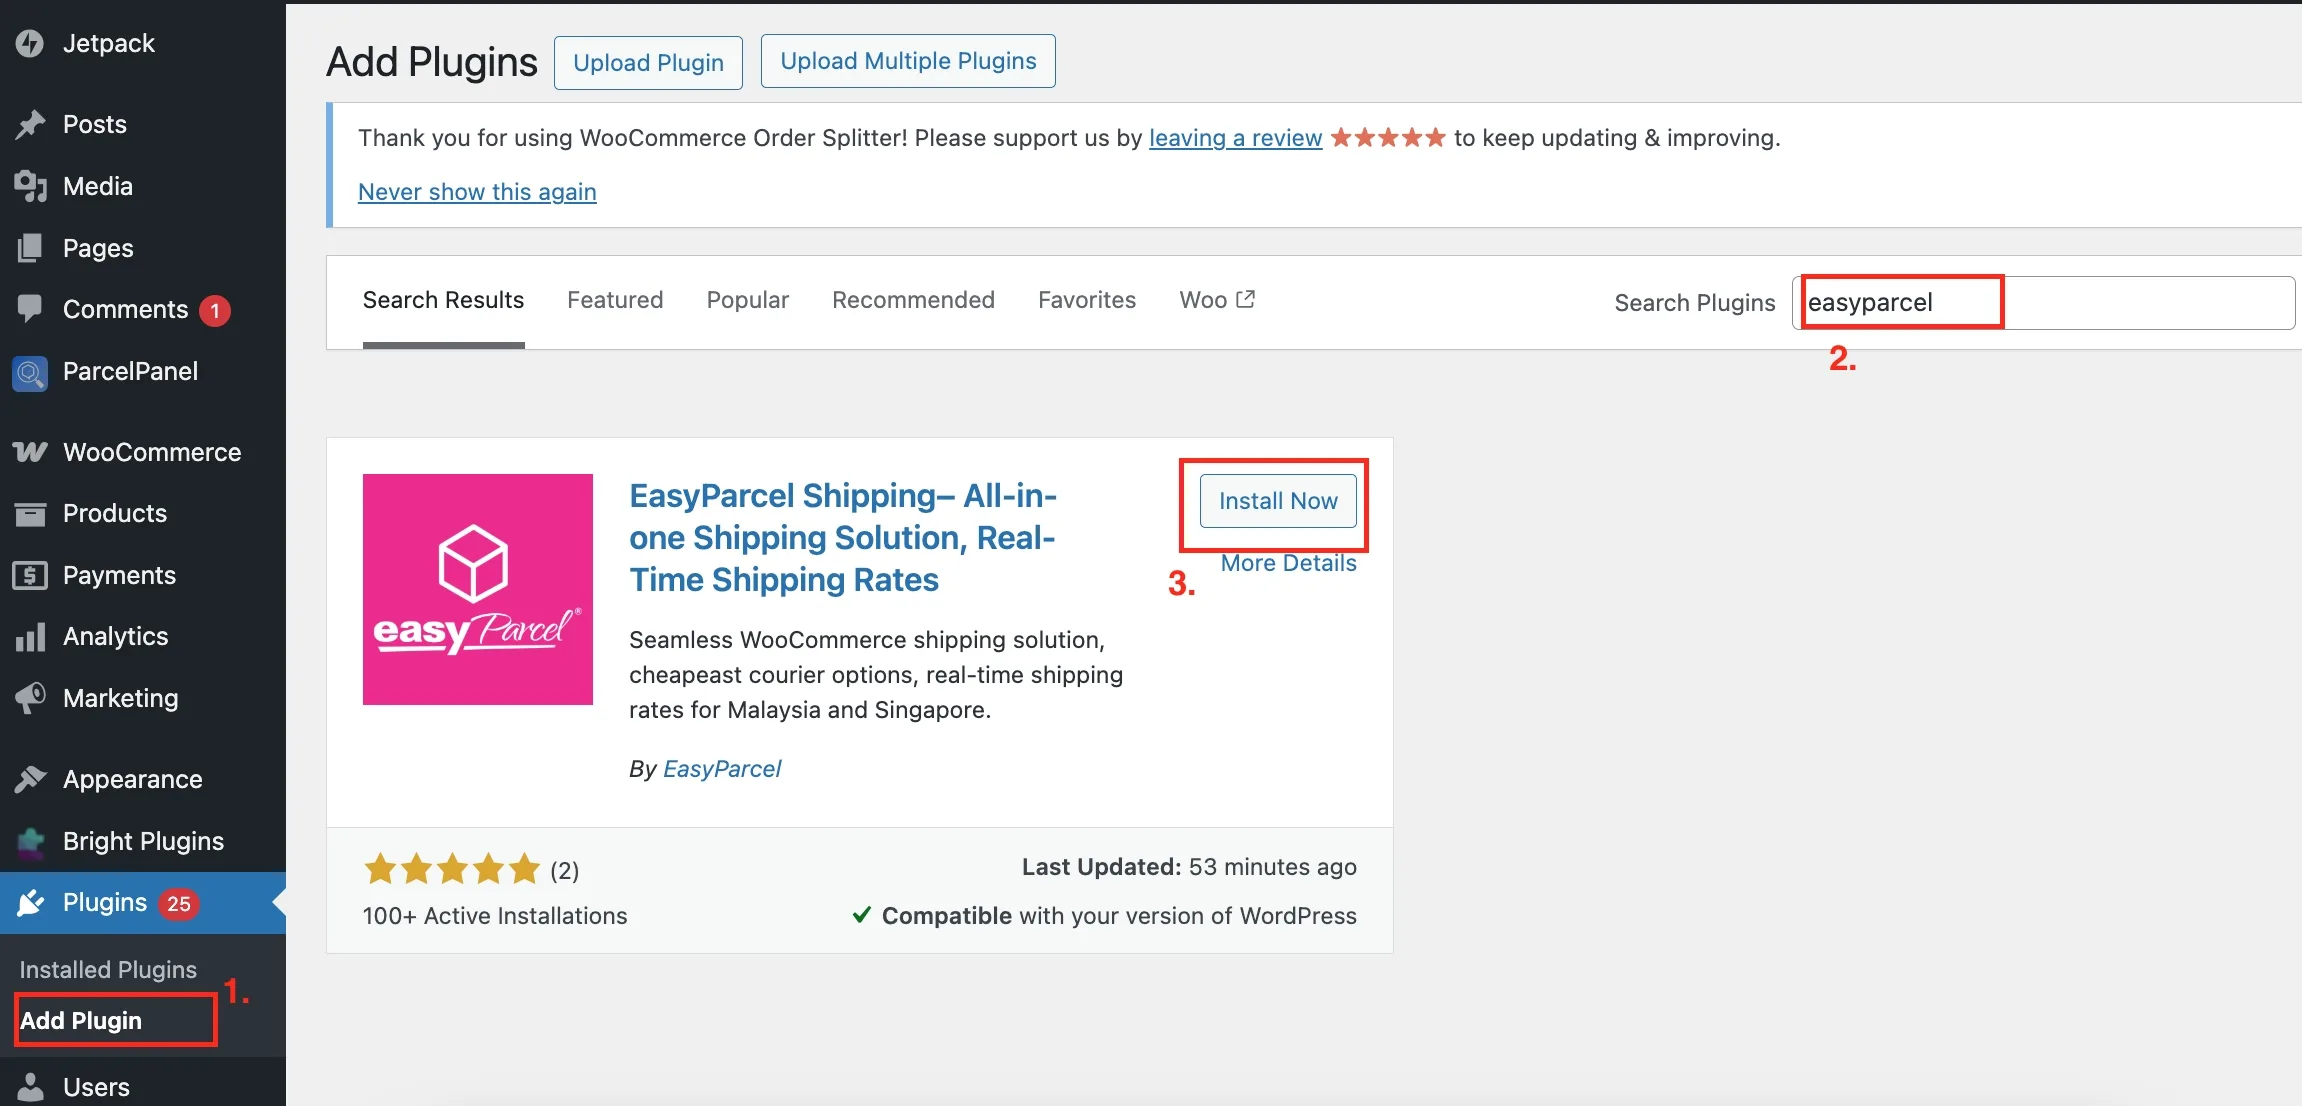
Step 7: Go to your WooCommerce admin panel, click ‘Plugin’. Search for EasyParcel in the ‘Search Plugins’ field. Click ‘Install Now’.
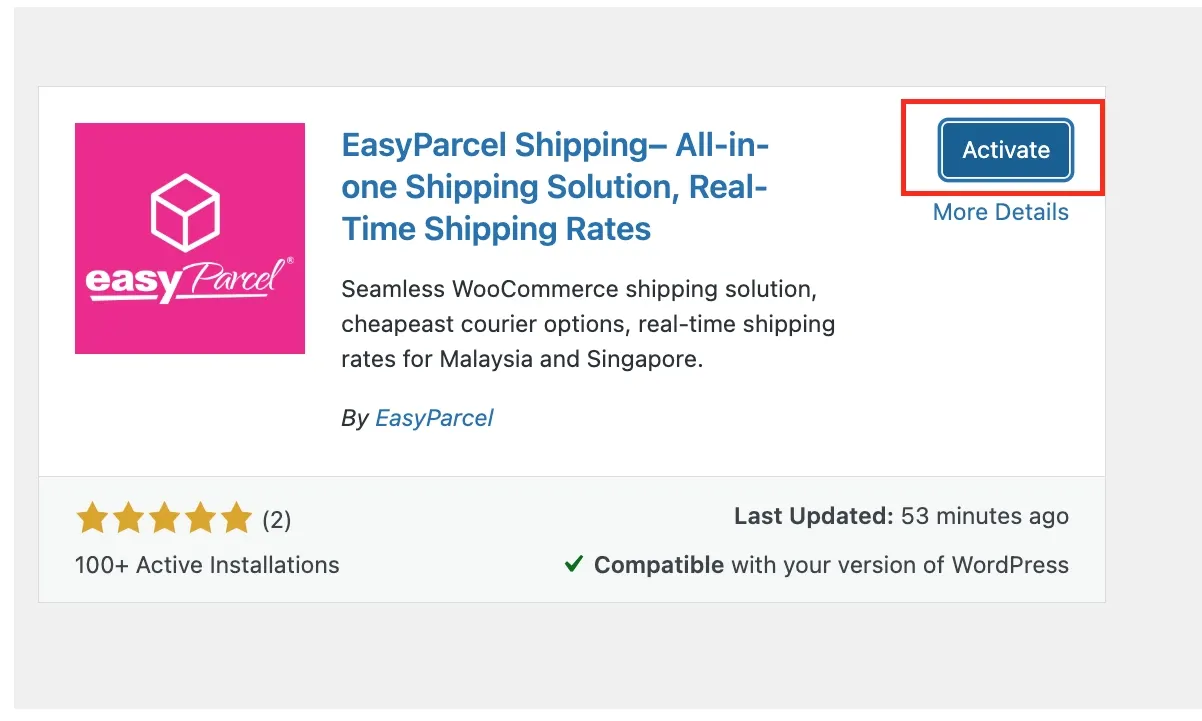
Step 8: Click ‘Activate Plugin’.
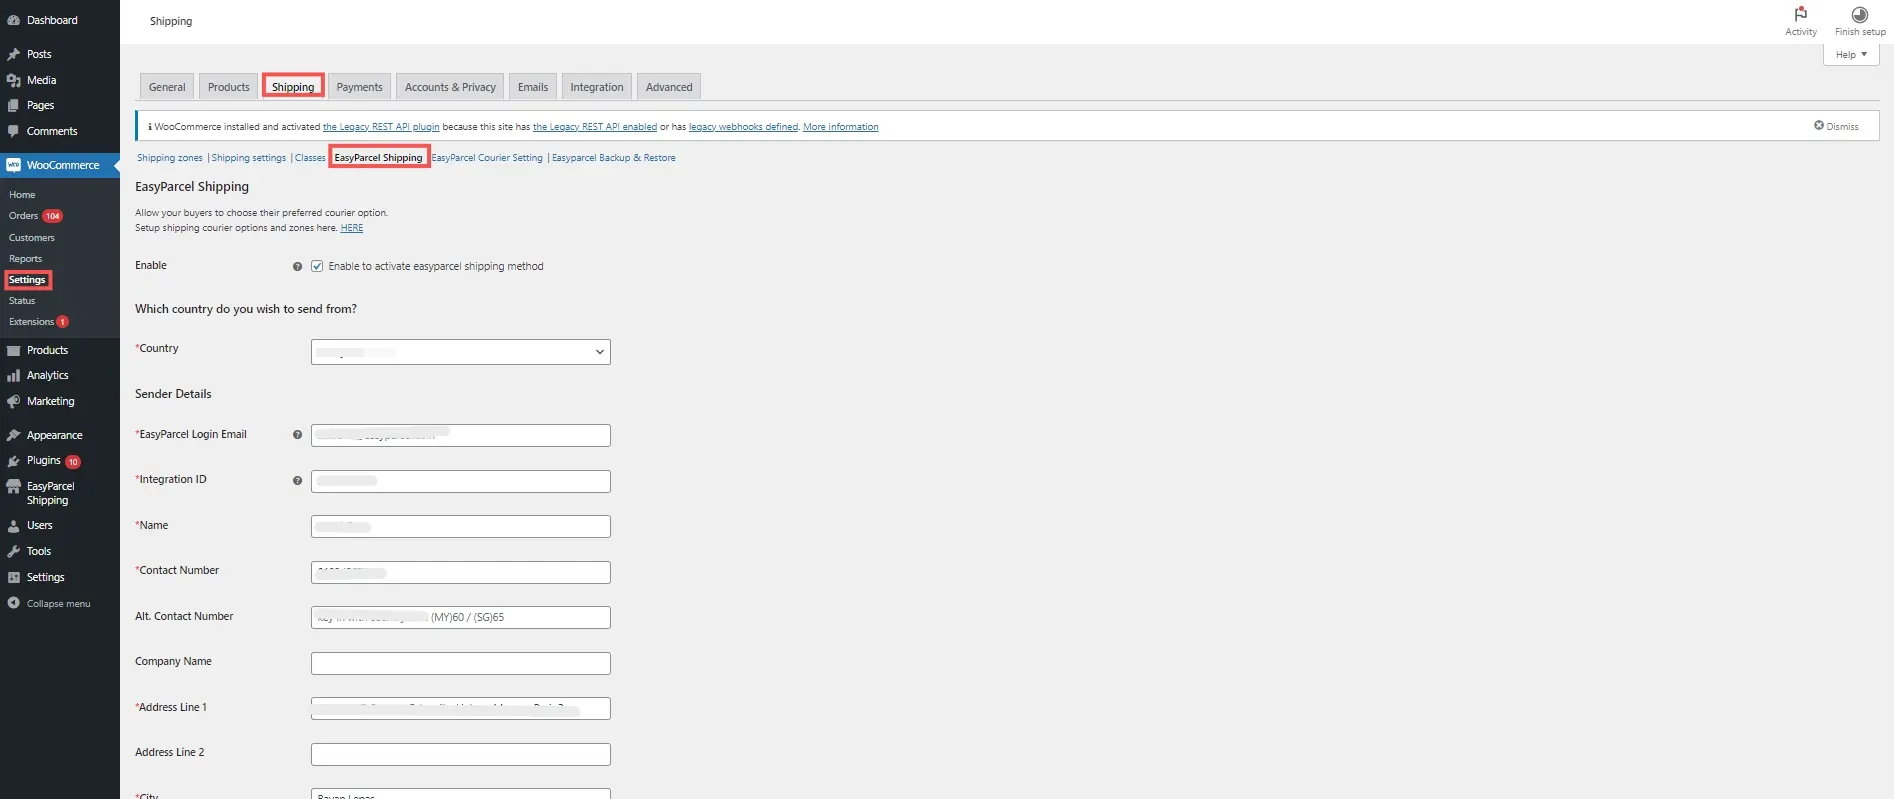
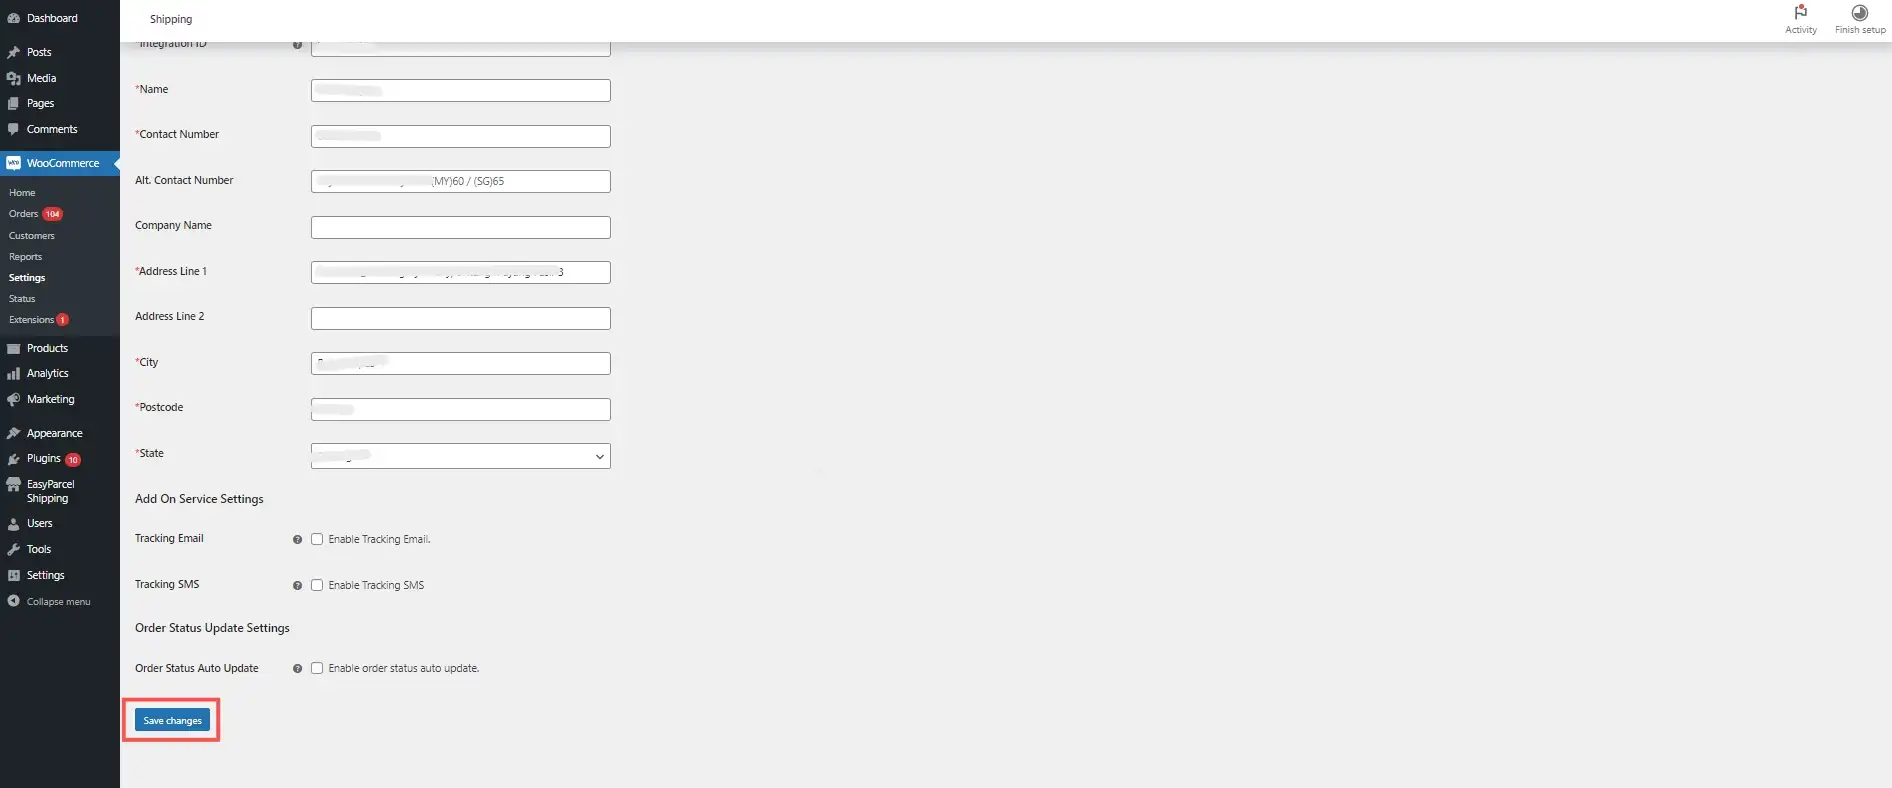
Step 9: Go to your WooCommerce settings, click the ‘Shipping’ tab, then click ‘EasyParcel Shipping’. Fill in your details and click ‘Save changes’. Note: After filling out your address details, you may want to recheck it again to confirm the information, as quote rates will be based on the address you provided here. Note: The API key copied from EasyParcel will be placed as the Integration ID here.
How to Enable Auto Update Order Status and Tracking Info After Fulfillment
Step 2: In the ‘Settings’ tab, scroll down to ‘Settings’ section.
Step 3: Choose ‘Yes’ from the ‘Auto order status update’ select list.
Step 4: A confirmation modal will be displayed. Click ‘Install Plugin Now’ to install Easyparcel Shipping plugin if your woocommerce still has not installed and activate it. Then, click ‘Enable’ to enable the setting
Easyparcel Shipping plugin needs to be installed and activated for the update tracking details and order status to take effect
Step 5: Finally, click ‘Update’ to apply the changes.
Fulfillment
Step 1: Go to the ‘Order’ tab, click the ‘Fulfill’ button on the order you wish to fulfill. You will be redirected to the order details page.
Step 2: On the order details page, ensure product and fulfillment details are correct, then click ‘Get Quote’ to quote list of available courier services for the order selected.
Step 3: A list of courier services will be displayed. Select your preferred courier services, apply coupons or add-on services if any. Then click ‘Proceed to Payment’ to complete the fulfillment.
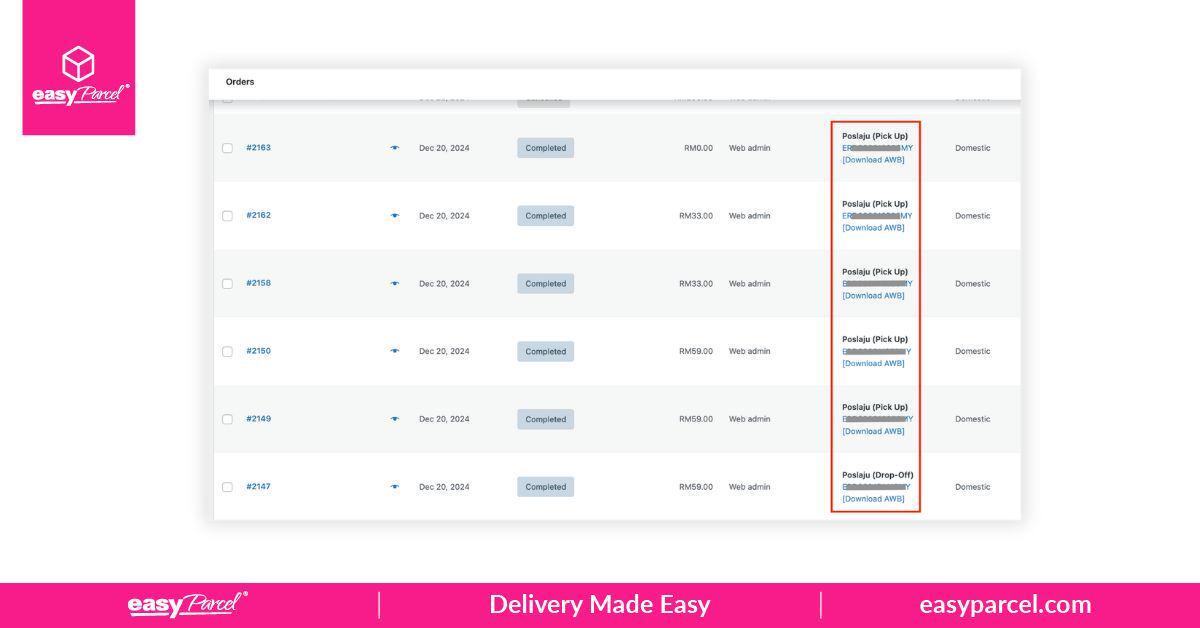
Step 4: After fulfilled successfully, the order status will be changed to Completed, and the tracking number, url and courier name will be updated back to the fulfilled order in the woocommerce.
Get Started Today!
Unlock seamless shipping solutions tailored for your online store! Download the EasyParcel WooCommerce Plugin now and take your business to the next level with effortless integration!
Absolutely! The EasyParcel plugin provides a comprehensive WooCommerce shipping solution, enablong a hassle-free and automated shipping experience. We made delivery EASY!
Boost Your Rezeki with up to 500,000 Reward Points + S$2,888 Bonus Credits!
Celebrate the festive season with rewards designed to help your business grow stronger and bigger this Raya! 💚✨ With the Raya Power Boost, when you top up, you’ll earn up to S$2,888 Bonus Credits and 500,000 Reward Points, depending on your top-up amount. Don’t miss out — this exclusive Raya Power Boost runs only until 31st March 2026, 11:59PM!
Create your free account today and receive S$6 shipping coupon to start saving from your very first parcel. Compare courier rates, book in minutes, and start saving immediately.