How Integration with EasyParcel Transforms Your Shipping Workflow

Table of Contents

What Integration Really Means for Your Business

Integration connects your e-commerce platform—Shopify, WooCommerce, Magento, or custom store—to EasyParcel’s logistics engine. Instead of toggling between systems or filling forms manually, integration lets you automate shipping tasks directly from your storefront. That means real-time rates, streamlined order import, auto-generated labels, and pickup booking—all activated with a single click.

Benefits of EasyParcel Integration

⚙️ Auto Order Fulfillment

Once you integrate and activate this feature, all orders will be automatically fulfilled in your EasyParcel account as soon as your customers place them. No clicks needed from you, so you can save time and focus on what matters most.

🚚 Live Shipping Rates at Checkout

Your store can display accurate courier rates in real time. This empowers buyers to choose based on speed, cost, or carrier preference—directly at checkout.

📦 Bulk Fulfillment Made Easy

Integration supports batch processing: import multiple orders at once, generate labels in bulk, and schedule pickups without the repetitive clicks.

📍 Real-Time Tracking & Notifications

Your customers will receive automated tracking number updates via SMS, WhatsApp, or email. Keeping everyone looped in, with zero manual follow-ups.

Supported Integration Platforms

How to Integrate with EasyParcel

Step 1: Click “Integrations”.

Step 2: Click “Add New Stores”.


Step 3: Choose “Shopify”


Step 4: Fill in details.

Step 5: “Fill Up Details” and click “Submit”.


Step 6: Login into your Shopify account.

Step 7:Click “Install unlisted App”  and your integration is completed.


USING INTEGRATED PLATFORM

Step 8:  Click “Your Stores” and make sure your Shopify is “Activated”.


Step 9:  Click “Action” > “Import” to import your orders. Your Shopify order must be in “Paid” status in your store for the “Import Item(s)” function to work. Orders under Paid status will be imported to your EasyParcel account automatically every 4 hours. Your shopify order must be in “paid” and “unfulfilled” status.

Step 10: Select your desired order or all order using the check box given and key in your “collection date”.

Step 11:  Click “Merge Orders” to merge your order if the orders have the same address and you will be directed to payment process. 

OR

Step 12:  Click “Add to Cart” and you will be directed to payment process. 

Step 1: Click “Integrations”.


Step 2: Click Add New Store


Step 3: Choose “WooCommerce”.

Step 4:  Fill up the details.

Step 5: Fill up the details. You can choose either the Plugin Version or Simple Version. Both the “Simple Version” and  “Plugin Version” will enabled you to automatically import your orders straight to EasyParcel when you change your order status to Processing/Processed. If you use the “Plugin Version”, your customer can see the shipping method and the shipping fee directly at the “Checkout” page (currently this feature is only available for local shipments).

Step 6:“Fill Up Details” and click “Submit” and your integration is completed.

Setting Up Plugin Version at Your WordPress

Step A: Login to your WordPress > Plugins > Add New

Step B: Click on Upload Plugin > Choose File

Step C: Upload EasyParcel Plugin.zip file you’ve downloaded just now.

Step D: Next to activate the plugin, go to Plugins > Installed Plugins > Activate EasyParcel Plugin

Step E: Go to WooCommerce > Settings > Shipping > EasyParcel Shipping

Step F: Kindly go Advanced > legacy REST API and tick “Enable the legacy REST API”

Step G: Fill up the settings that you prefer and click “Save Changes”. The plugin is activated and your user may now see courier options on check out page. You can also choose whether to display shipping rates on your website.

USING INTEGRATED PLATFORM

Step 7:  Click “Your Stores” and make sure your WooCommerce is “Activated”. 

Step 8: Click “Action” > “Import” to import your orders. Your WooCommerce order must be in “Processing” status in your store for the “Import Item(s)” function to work. Orders under processing status will be imported to your EasyParcel account automatically every 4 hours.

Step 9: Select your desired order or all order using the check box given and key in your “collection date” 

Step 10: Click “Merge Orders” to merge your order if the orders have the same address and you will be directed to payment process.

OR

Step 11: Click “Add to Cart” and you will be directed to payment process. 

Step 1: Click on “Integrations”.

Step 2: Click “Add New Store”.

Step 3: Choose “99%SME”.

Step 4: Fill Up Details and click “Submit” and your integration is completed. Remember to copy the “Integration ID” as well. (Integration ID will be pasted on 99%SME end)

Step 5: Sign in to 99%SME Seller Centre.

Step 6: At 99%SME seller centre’s dashboard, click on ‘Administration’ > ‘Shipping methods’

USING INTEGRATED PLATFORM

Step 7: At “Shipping methods” page, fill in the “Integration ID” that you’ve obtained previously on EasyParcel’s Integration page and tick on the checkbox to enable EasyParcel service.

Step 8: When there is new order, click on the respective Order ID to go to the order details page.

Step 9: At EasyParcel section at right bottom side, select the collect date, dropoff point (if you’ve chosen Park N Parcel service) and then click on the ‘Create Shipment’ button.

Step 10: Under ‘Track on Website’ text, you’ll be able to see the tracking number and you can click on it to track the shipment status. You may also send the tracking link to recipient. Click on view shipping label button to get the air waybill file.

Step 11: Download, print and attach the air waybill file to your parcel and that’s it! Drop off the parcel at nearby point if you’ve chosen drop-off service such as Park N Parcel or wait for courier partner to collect it from you if you’ve chosen pick-up service such as Qxpress.

Step 1: Click on “Integrations”.

Step 2: Click “Add New Store”.

Step 3: Choose “EasyStore”.


Step 4: Click “Integrate”.

Step 5: Click “Install this app”.

Step 6: Log in to your account if you haven’t or skip this step if you are already logged in.

Step 7: Click “Manage this store” to select your store or click “Create a new store” to create a new one

Step 8: Click “Save”.

Fulfilling EasyStore Order

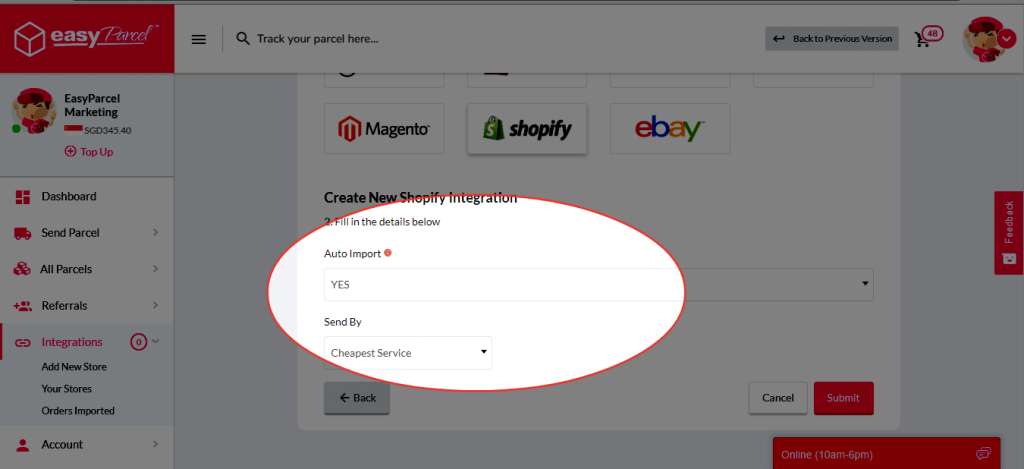
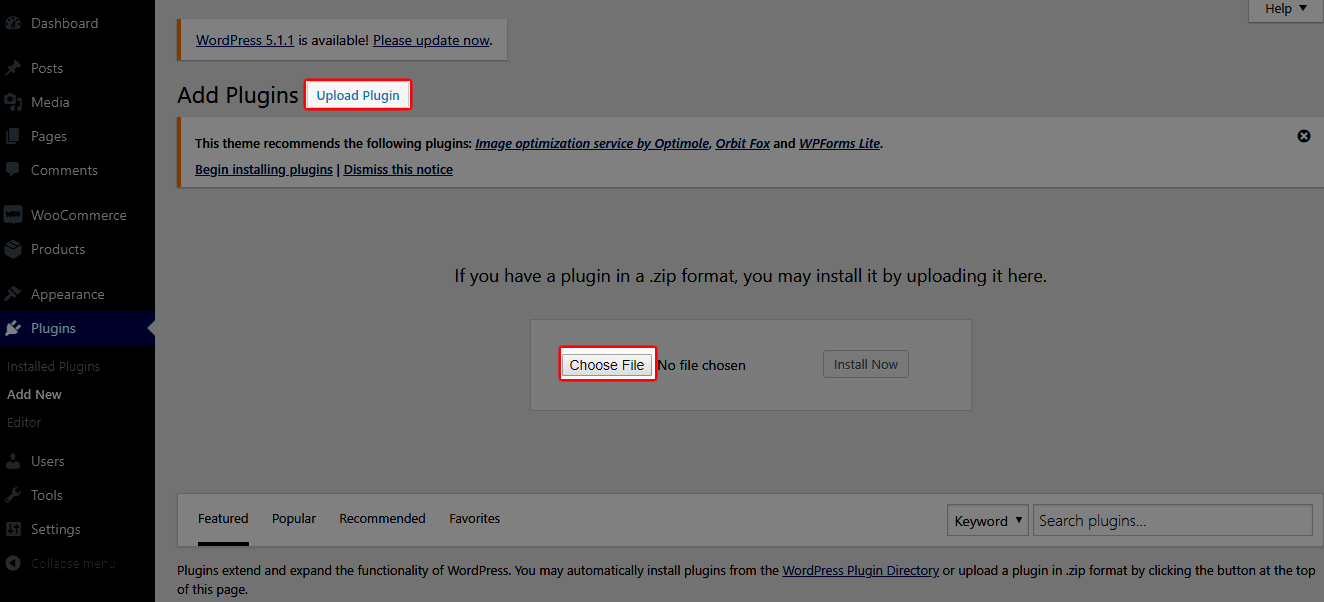
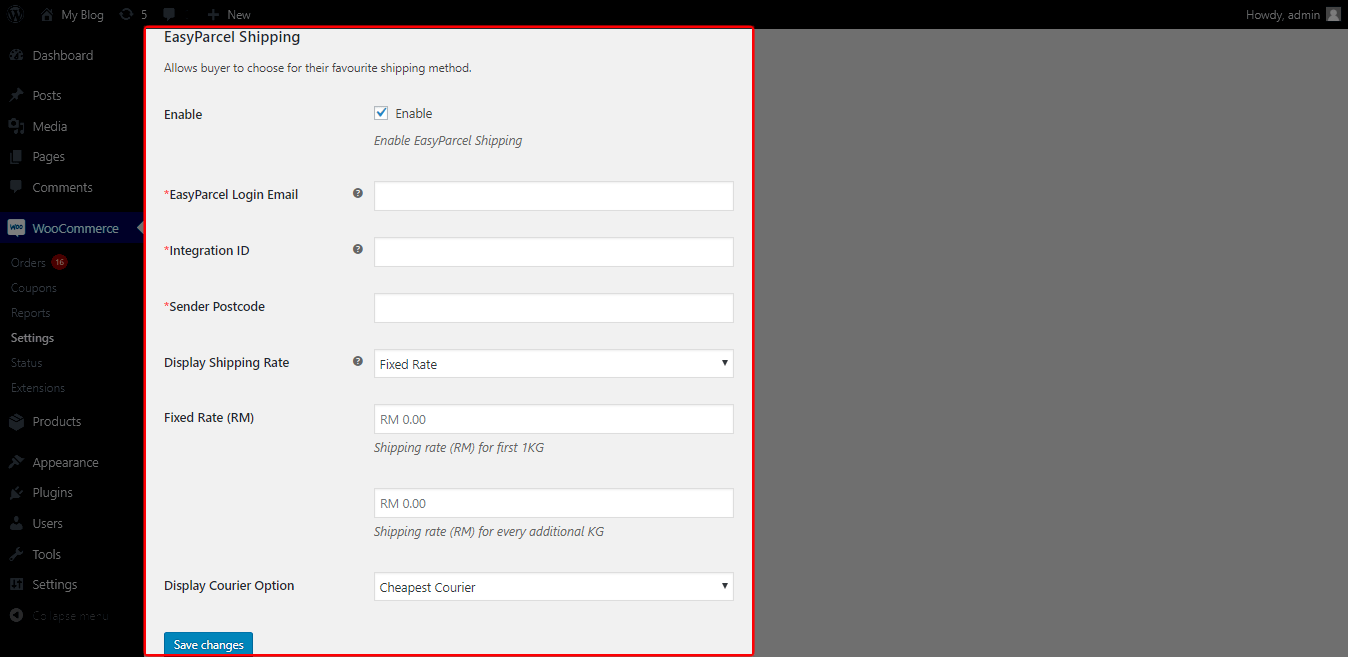
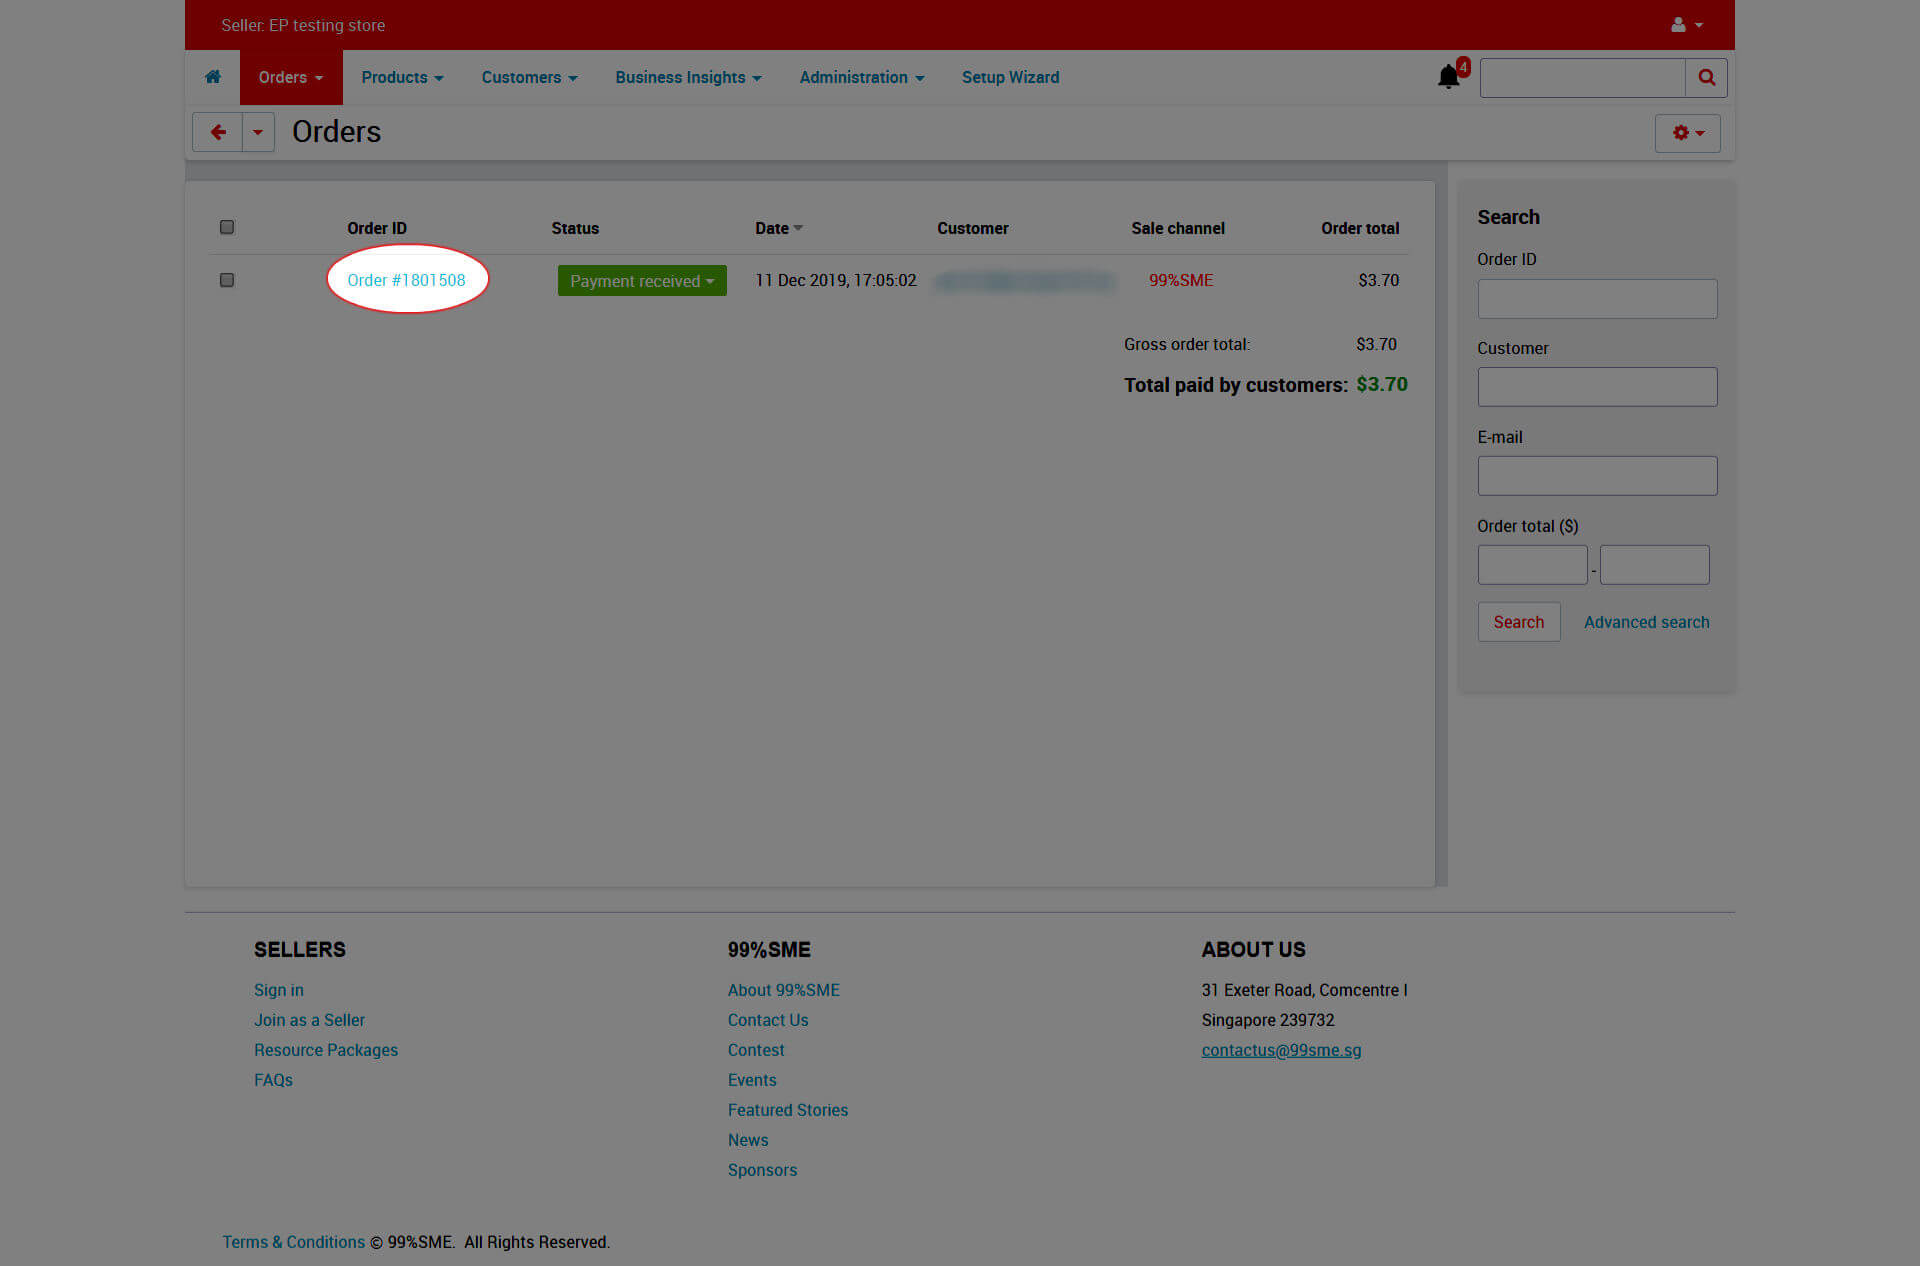
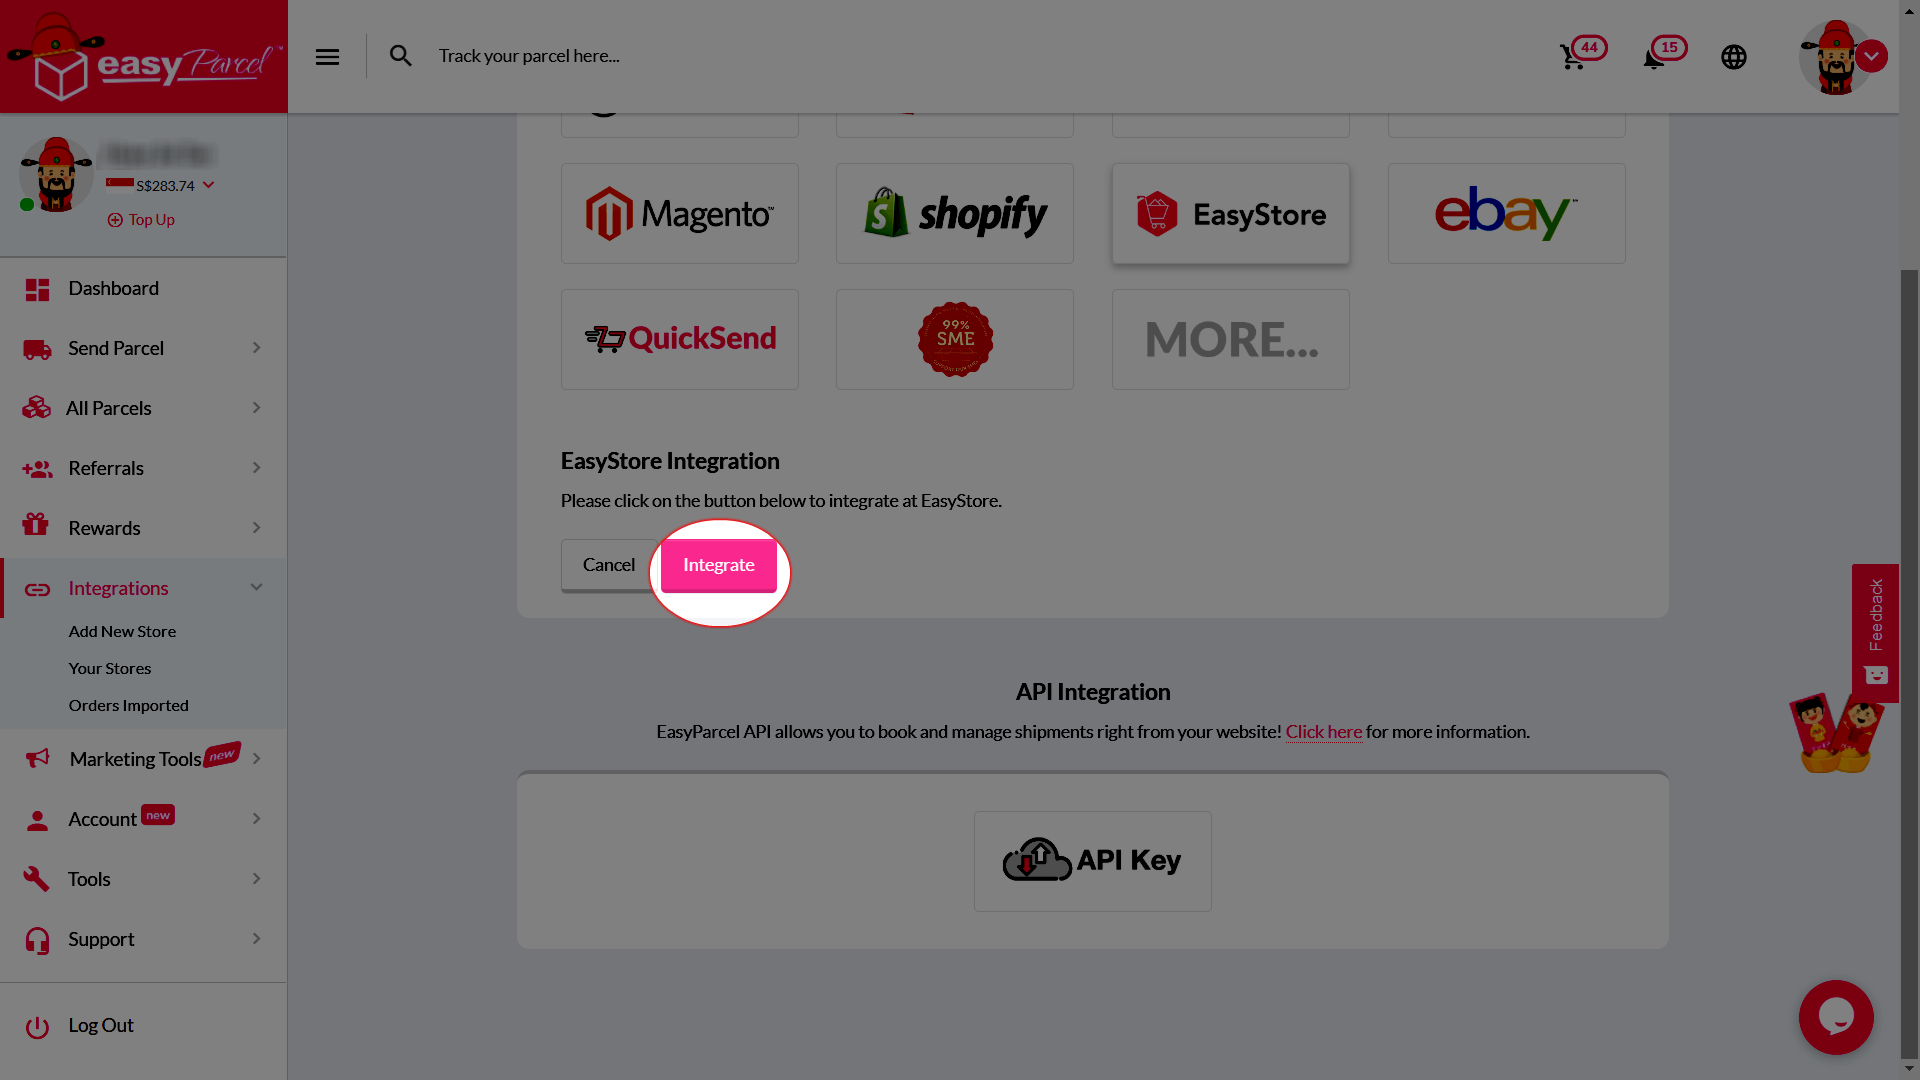
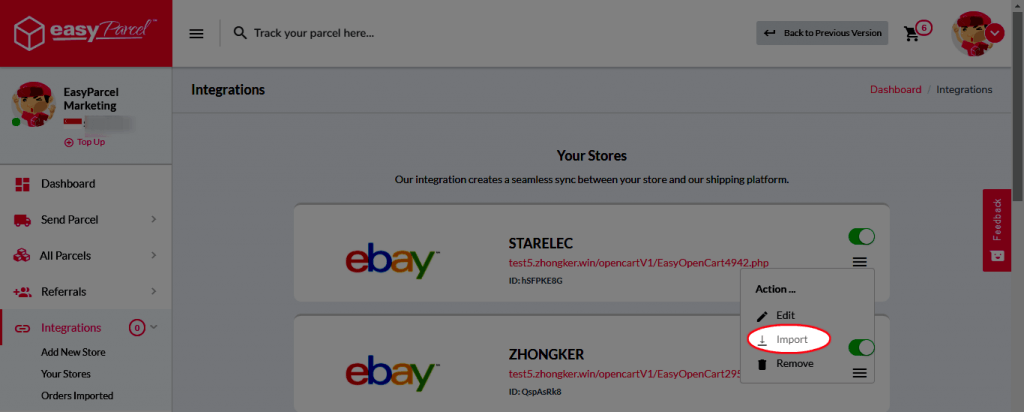
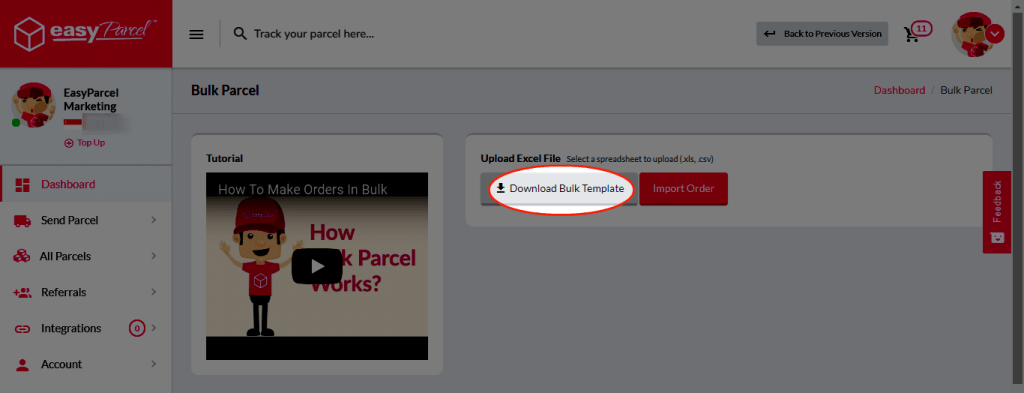
Step 1: Go to your EasyStore orders page and click on the order number. 

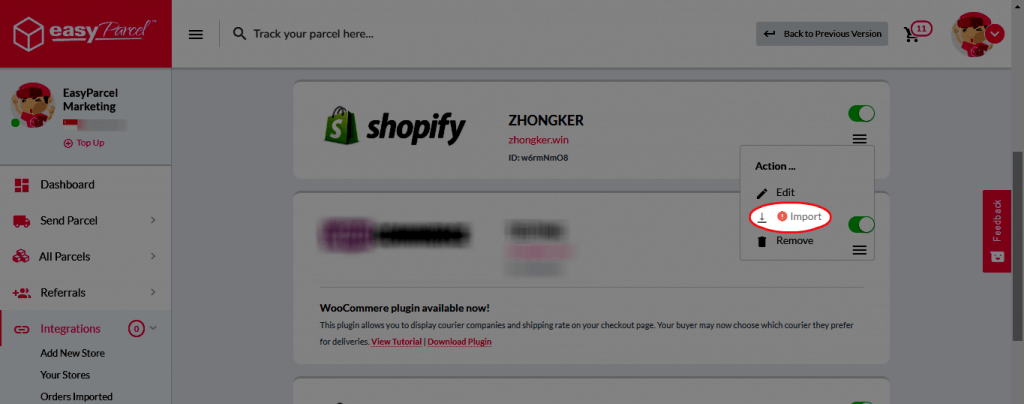
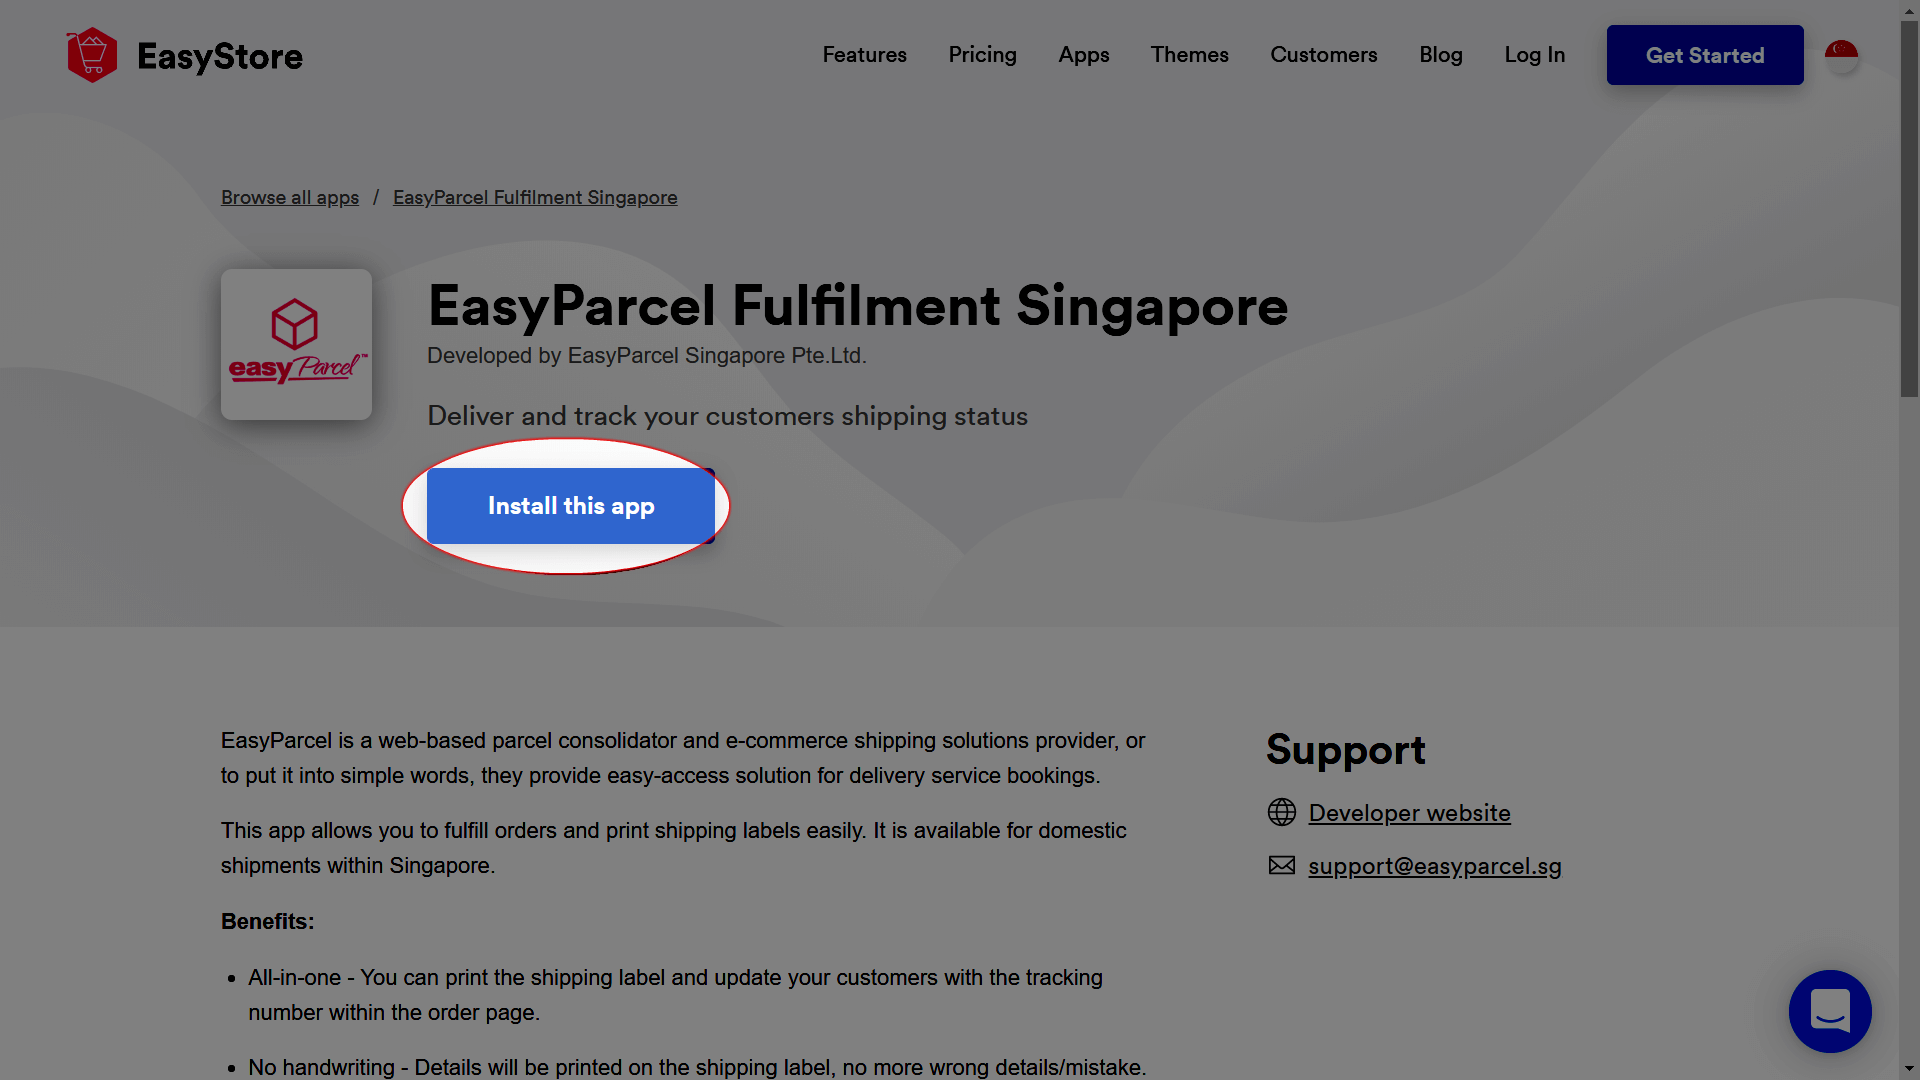
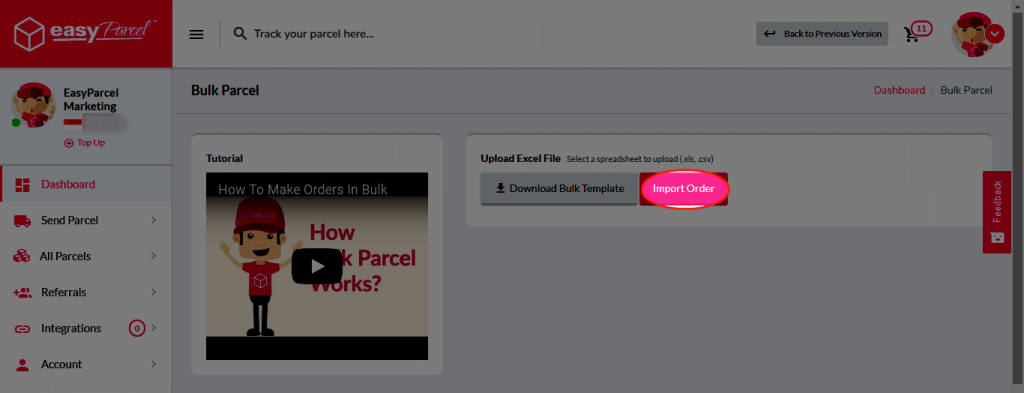
Step 2: Click on the ‘Fulfill’ button and then click on “EasyParcel Fulfillment Singapore”.

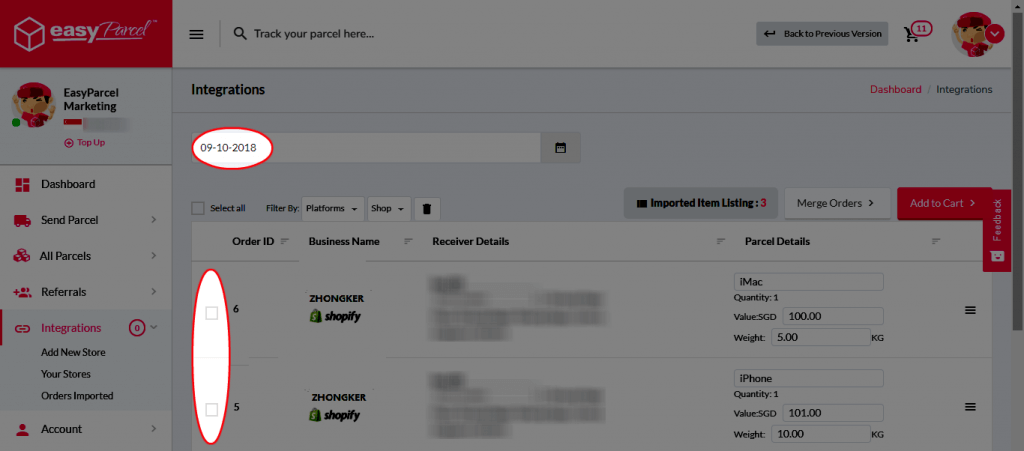
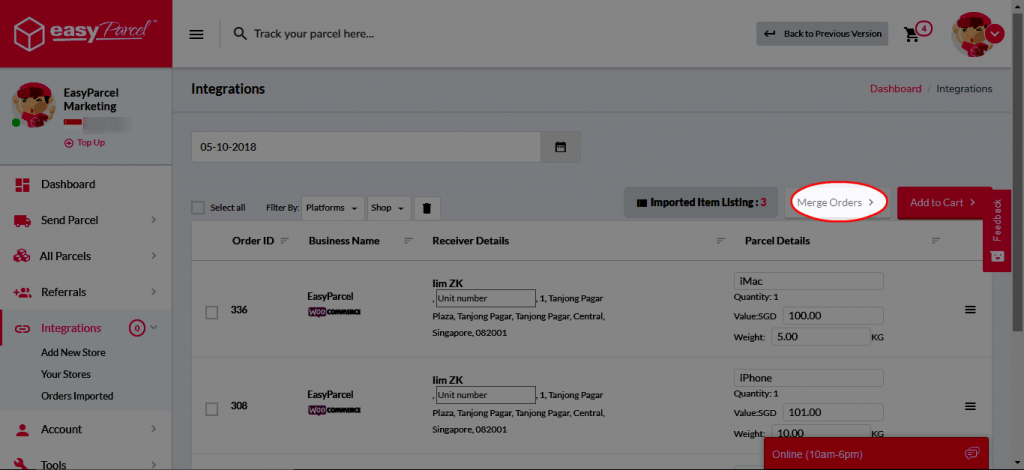
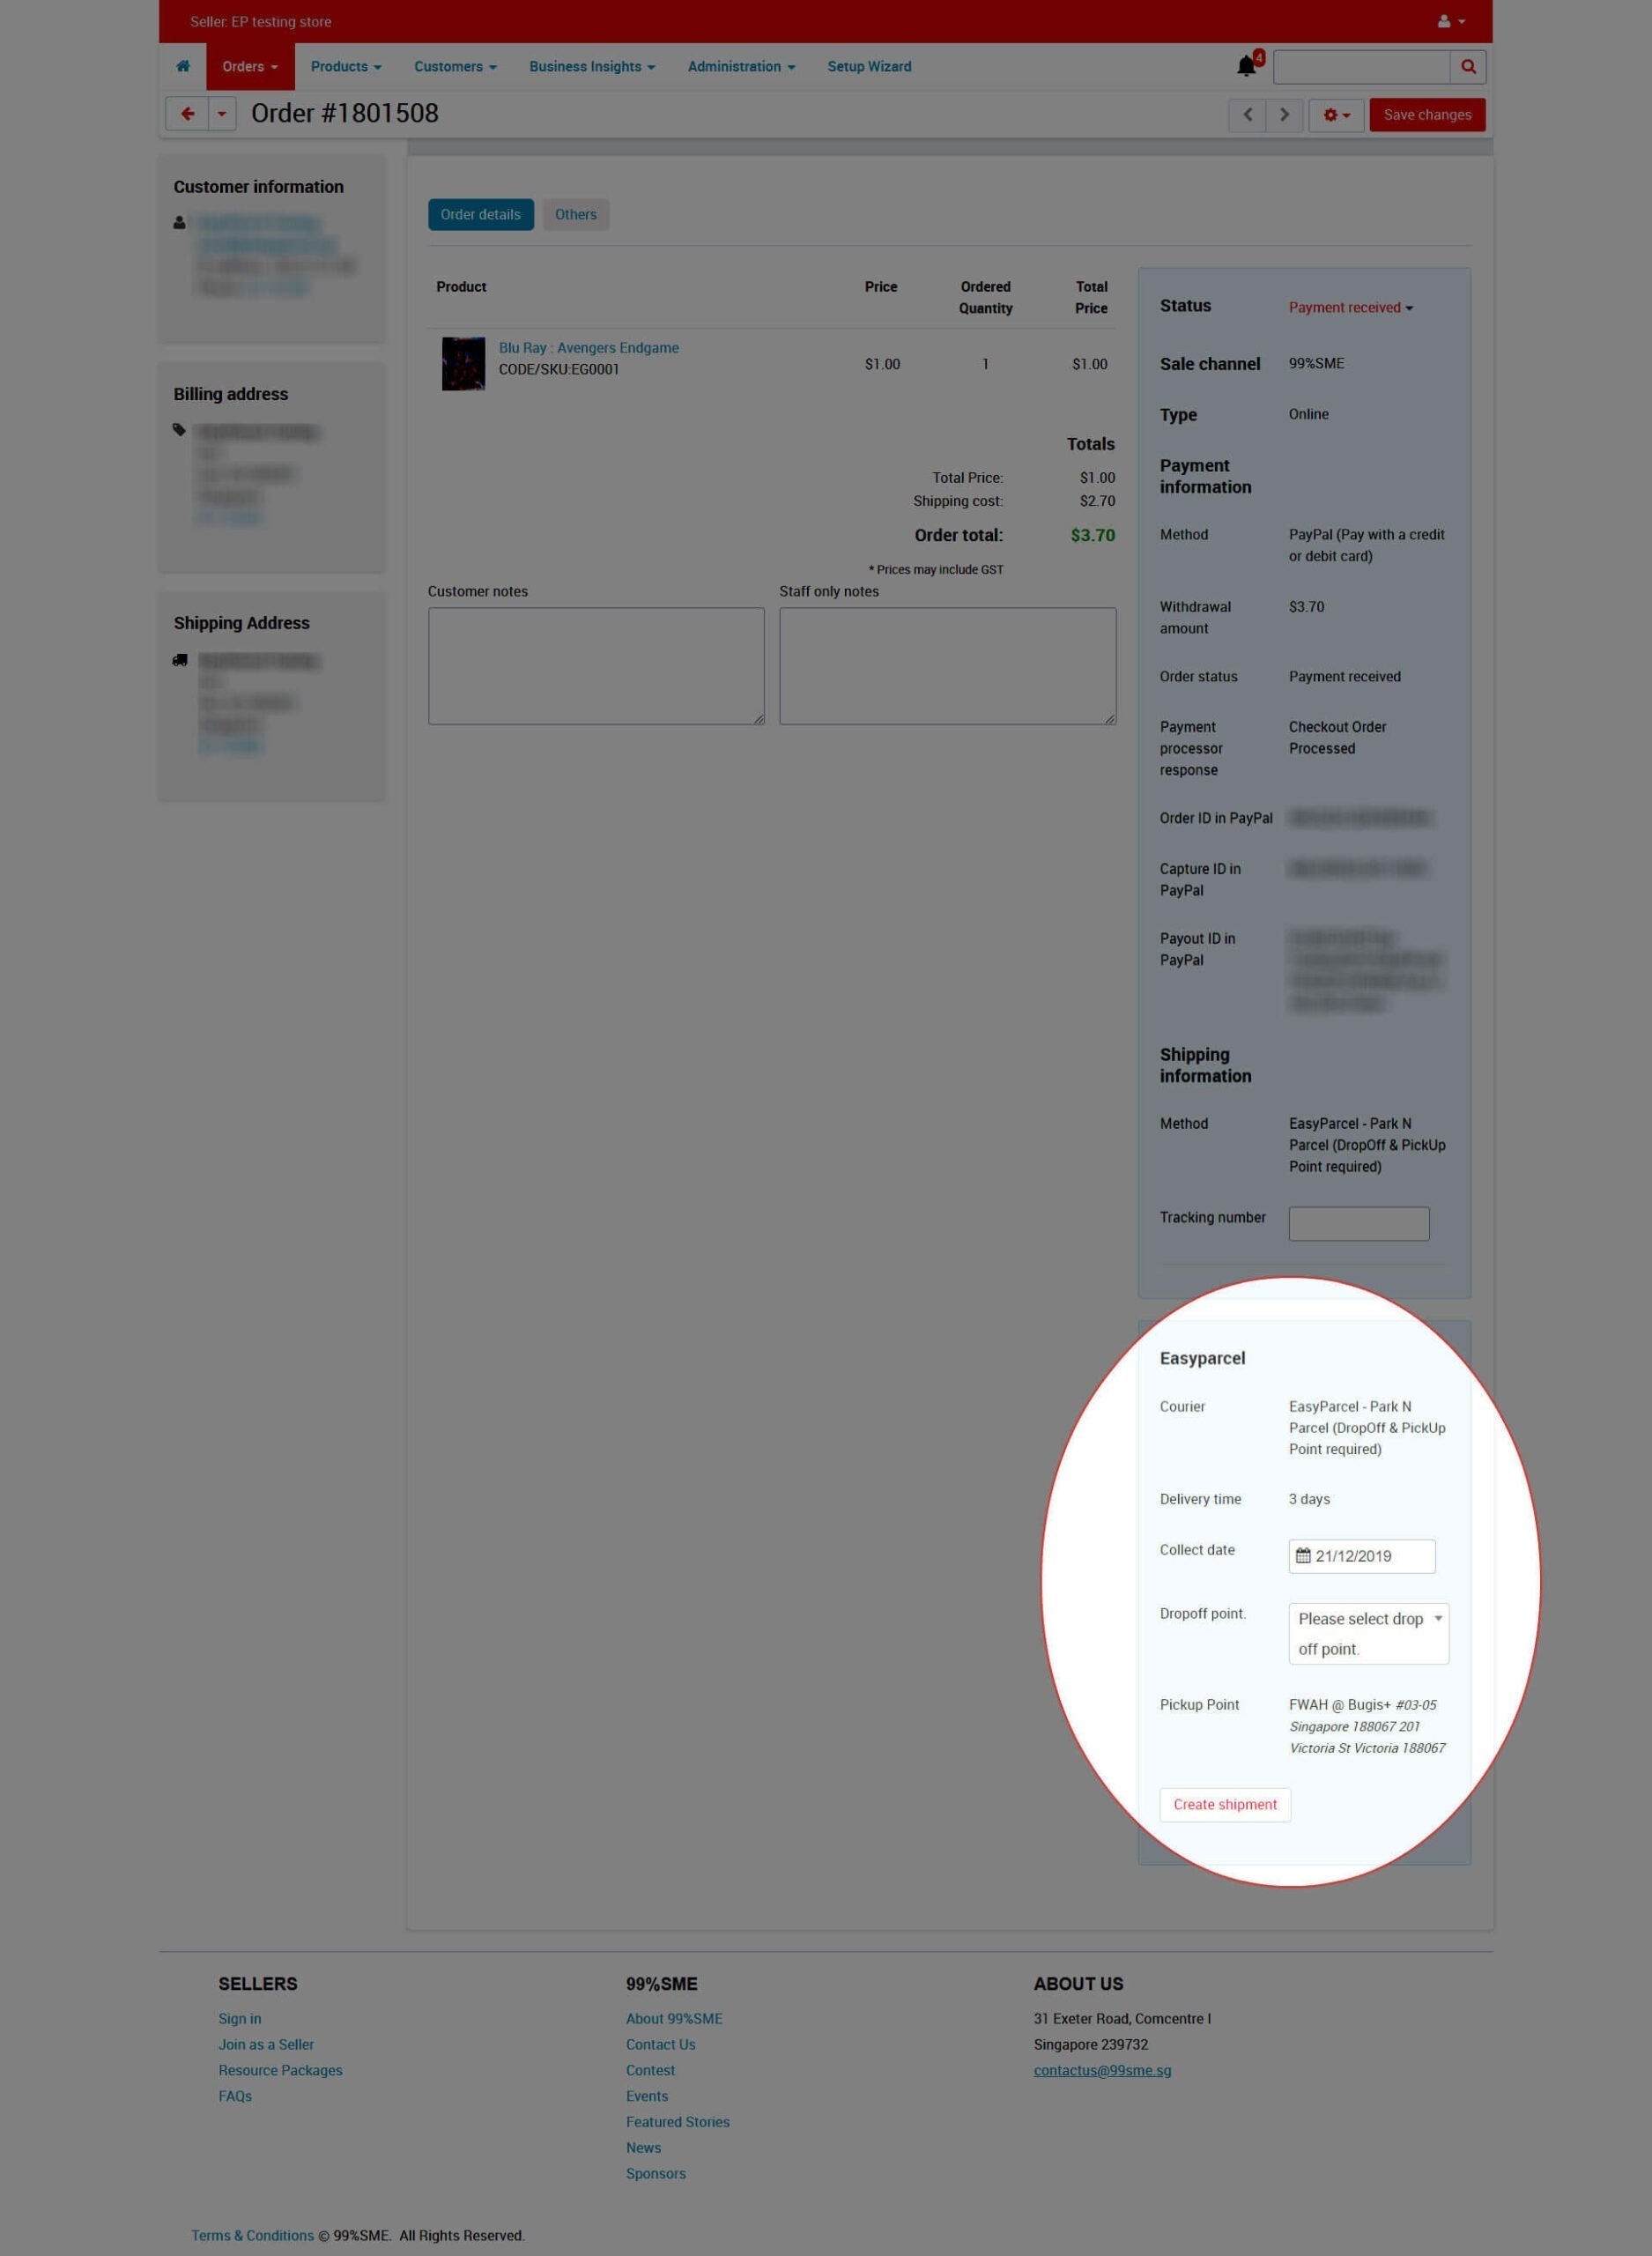
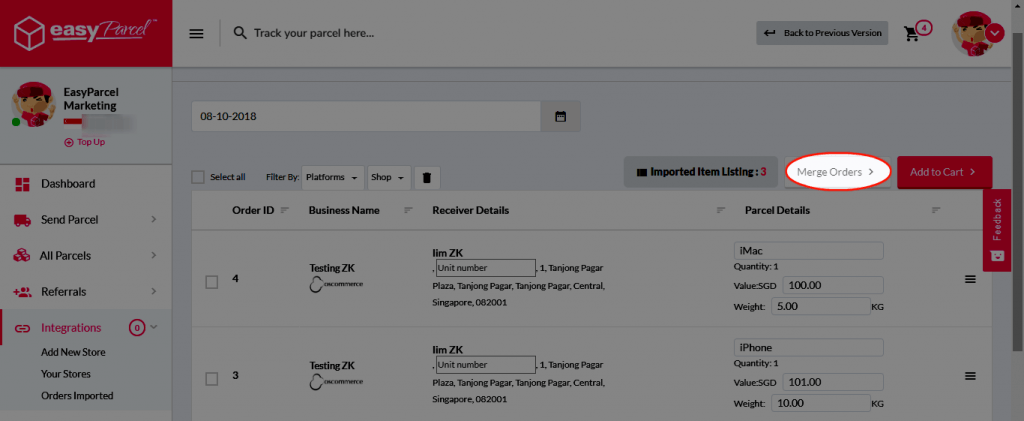
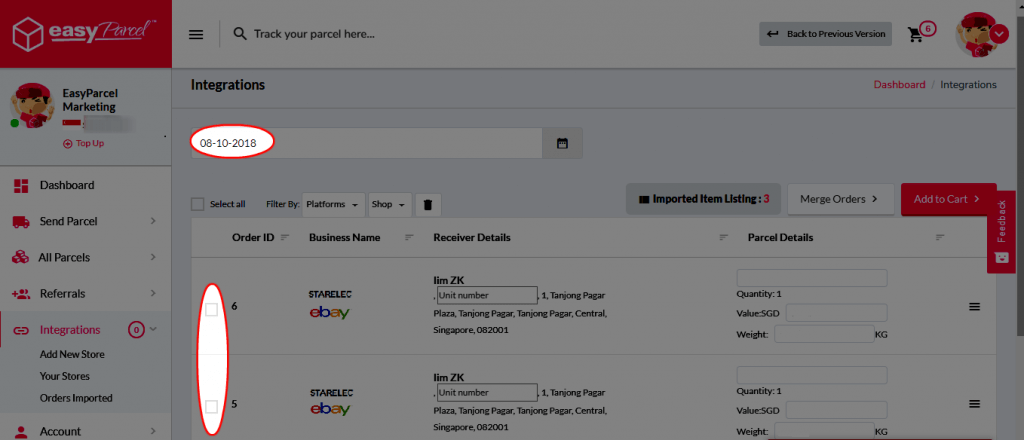
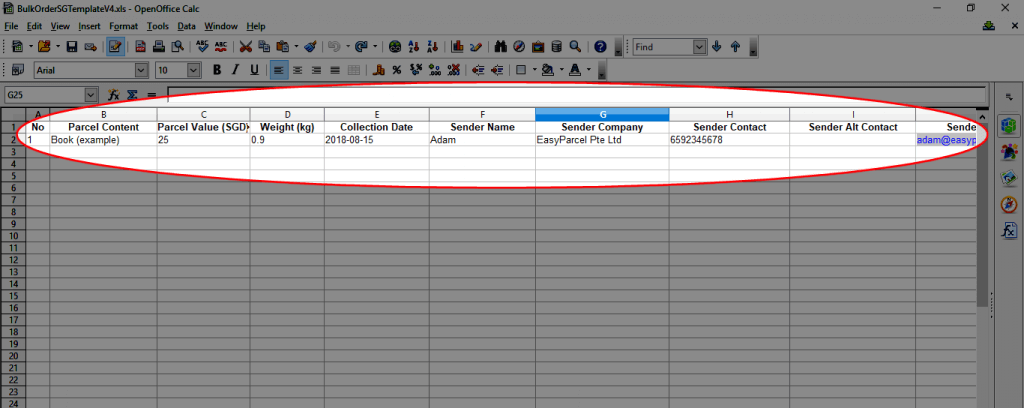
Step 3: Check if the item weight is correct. If it’s wrong, click on the pencil button to edit it.

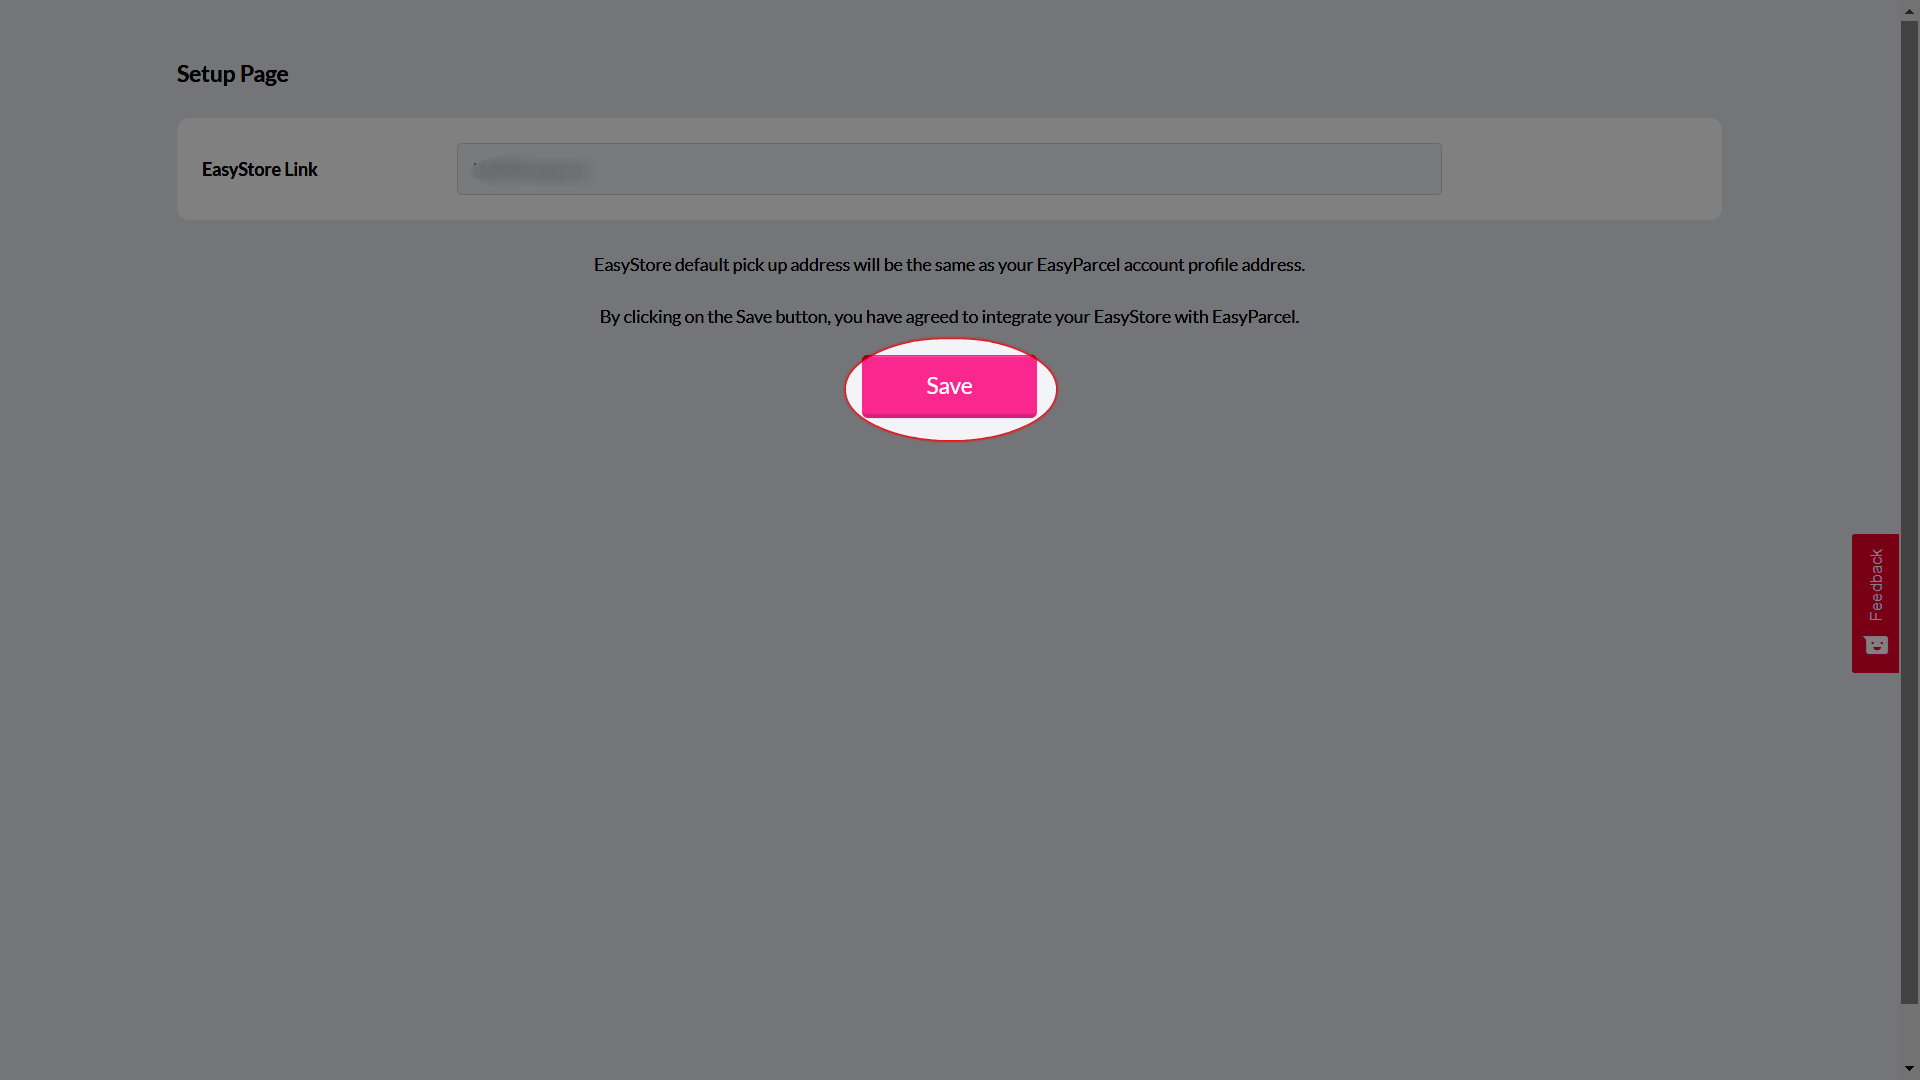
Step 4: Choose a pickup date if you wish to choose a different date from the date shown.
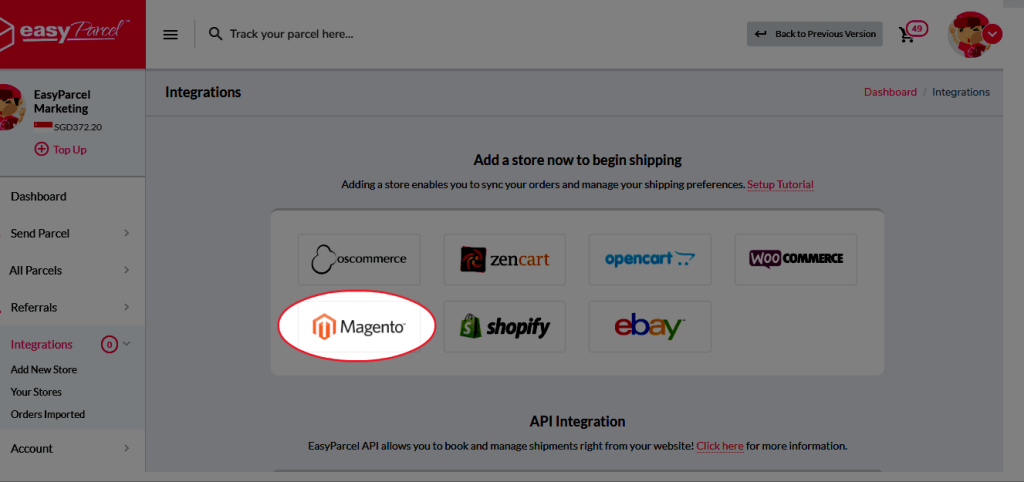
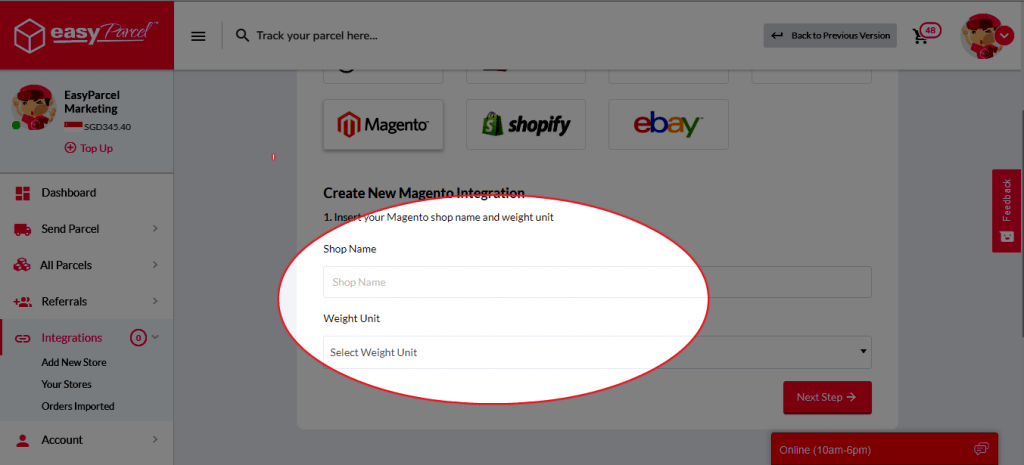
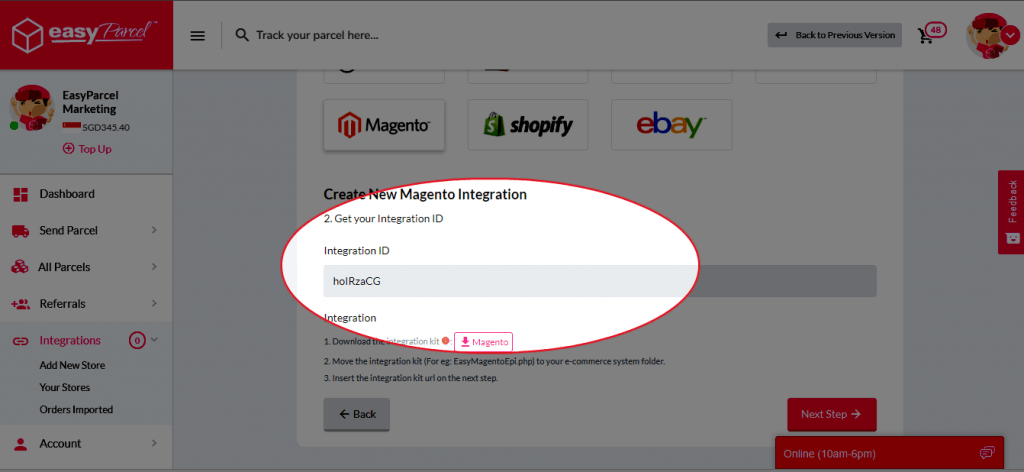
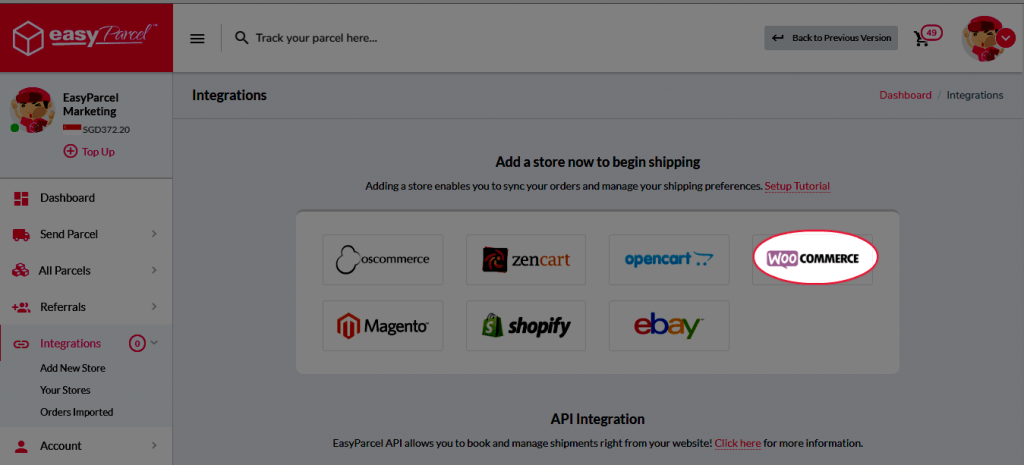
Step 1: Click “Integrations”.

Step 2: Click “Add New Stores”.

Step 3: Choose “Magento”


Step 4:  Fill Up Details.


Step 5:Download the integration kit and place it to your e-commerce file manager.

Step 6: “Fill Up Details” and click “Submit” and your integration is completed.

USING INTEGRATED PLATFORM

Step 7: Click “Your Stores” and make sure your Magento is “Activated”.


Step 8: Click “Action” > “Import” to import your orders. Your Magento order must be in “Processing” status in your store for the “Import Item(s)” function to work. Orders under processing status will be imported to your EasyParcel account.

Step 9: Select your desired order or all order using the check box given and key in your “collection date”.

Step 10:  Click “Merge Orders” to merge your order if the orders have the same address and you will be directed to payment process.

OR

Step 11: Click “Add to Cart” and you will be directed to payment process. 


Step 1: Click “Integrations”.

Step 2: Click Add New Store

Step 3: Choose “OpenCart”.

Step 4:  Fill up the details.


Step 5: You can choose either the Plugin Version or Simple Version. Both the “Simple Version” and  “Plugin Version” will enabled you to automatically import your order straight to EasyParcel when you change your order status to Processing/Processed. If you use “Plugin Version”, your customer can see the shipping method and the shipping fee directly at the “CheckOut” page.

Step 6:“Fill Up Details” and click “Submit” and your integration is completed.


USING INTEGRATED PLATFORM

Step 7:  Click “Your Stores” and make sure your OpenCart is “Activated”. 


Step 8: Click “Action” > “Import” to import your orders. Your OpenCart order must be in “Processing” status in your store for the “Import Item(s)” function to work. Orders under processing status will be imported to your EasyParcel account. 

Step 9: Select your desired order or all order using the check box given and key in your “collection date” 

Step 10: Click “Merge Orders” to merge your order if the orders have the same address and you will be directed to payment process.
 

OR

Step 11: Click “Add to Cart” and you will be directed to payment process. 

Step 1: Click “Integrations”.


Step 2: Click “Add New Stores”.


Step 3: Choose “ZenCart”


Step 4: Fill in details.

Step 5:  Download the integration kit and place it to your e-commerce file manager.

Step 6: “Fill Up Details” and click “Submit” and your integration is completed.

USING INTEGRATED PLATFORM

Step 7: Click “Your Stores” and make sure your ZenCart is “Activated”.


Step 8: Click “Action” > “Import” to import your orders. Your ZenCart order must be in “Processing” status in your store for the “Import Item(s)” function to work. Orders under processing status will be imported to your EasyParcel account.

Step 9: Select your desired order or all order using the check box given and key in your “collection date” 

Step 10: Click “Merge Orders” to merge your order if the orders have the same address and you will be directed to payment process. 

OR

Step 11: Click “Add to Cart” and you will be directed to payment process.

Step 1: Click “Integrations”.


Step 2: Click “Add New Store”.


Step 3: Choose “OsCommerce”

Step 4:  Fill up the details.


Step 5:  Download the integration kit and place it to your e-commerce file manager.

Step 6:“Fill Up Details” and click “Submit” and your integration is completed.

USING INTEGRATED PLATFORM

Step 7:  Click “Your Stores” and make sure your OsCommerce is “Activated”. 

Step 8: Click “Action” > “Import” to import your orders. Your OsCommerce order must be in “Processing” status in your store for the “Import Item(s)” function to work. Orders under processing status will be imported to your EasyParcel account.

Step 9: Select your desired order or all order using the check box given and key in your “collection date” 

Step 10: Click “Merge Orders” to merge your order if the orders have the same address and you will be directed to payment process. 

OR

Step 11: Click “Add to Cart” and you will be directed to payment process. 

STEP 1: Click on “Integrations”.

Step 2: Then, click on “Add New Store ”.


Step 3: Choose “eBay”.

Step 4: Click “Link ebay Seller Account”

Step 5: Login into your eBay account.


Step 6: Click “Agree”.

Step 7 :  Key in “eBay UserName”.


Step 8: Your integration is completed.

USING INTEGRATED PLATFORM

Step 9: Click “Your Stores” and make sure your eBay is “Activated”.

Step 10: Click “Action” > “Import” to import your orders. Your eBay order must be in “Processing” status in your store for the “Import Item(s)” function to work. Orders under processing status will be imported to your EasyParcel account.

Step 11: Select your desired order or all order using the check box given and select your “collection date”

Step 12:  Click “Merge Orders” to merge your order if the orders have the same address and you will be directed to payment process.

OR

Step 13: Click “Add to Cart” and you will be directed to payment process.

Step 1: Login and Click “Bulk Parcel”.

Step 2: Download the bulk upload template.

Step 3:  Fill in the details in the template.


Step 4: Once fill in, click “Import Order”.


Step 5: Choose the template you have fill in.


Step 6: Click “Next” after upload bulk template successfully .


Step 7:  Confirm your order and click “Check Out”.


Step 8:Click “Pay with Credits” to proceed to payment.


Step 9: Click on “Download All AWB”, then it is done!

Frequently Asked Questions (FAQs)​

What is EasyParcel integration?
Integration connects your store directly to EasyParcel to automate shipping, including live shipping rates, automatic order fulfillment, shipping status updates, and more.
What platforms are supported?
EasyParcel integrates seamlessly with Shopify, WooCommerce, Magento, and over 40 other platforms, and also offers a full REST API for custom integrations.
How does integration speed up my fulfillment?
Automatically fulfill your customers’ orders in EasyParcel without a single click from you. Reduce manual work by bulk uploading all your orders yourself.
Can integration handle real-time rates at checkout?
Yes! You’ll offer accurate, live shipping quotes across multiple courier options directly to customers.
Is there an extra cost for integration?
No. EasyParcel doesn’t charge for integration. You only pay for the actual courier delivery fees.

Integration with EasyParcel is more than just syncing software—it transforms your shipping into a speedy, reliable, and error-free workflow. From displaying live rates and fulfill orders automatically to send tracking number notifications and auto generate shipping labels, integration reduces logistic headaches and enhances customer satisfaction.

If you’re scaling your e-commerce operations, this integration is a must-have tool—boosting efficiency, cutting costs, and enabling growth.

Related Blogs

🚨 Campaign Spotlight 🚨
mid-year-mega-sales-12hrs-left-booking

Final 12 Hours: Last Chance to Earn Big Rewards!

Time is running out! You have just 12 hours left to top up and earn up to 5x reward points during Mid-Year Mega Sales 2025. Don’t miss your final chance to stack up to 250,000 points and supercharge your shipping savings.

Ends on: 30th June 2025, 11:59PM

Haven’t Join EasyParcel?​

Shipping newbie? No worries! EasyParcel welcomes you with a sweet FREE S$6 for your first shipment. And that’s just the beginning! Sign up today and join the fun!