Why EasyParcel WooCommerce Plugin?
1. Enhance Customer Satisfaction
2. Increases Flexibility
Set custom shipping rates to meet diverse customer needs and preferences.
3. Saves Time and Effort
Automate order fulfillment, allowing focus on business growth instead of manual processing.
4. Optimizes Shipping Strategies
Customize shipping zone settings to offer competitive rates based on geographic locations.
5. Encourages Larger Purchases
Set conditions for free shipping to boost average order value and foster customer loyalty.
6. Provides Accurate Pricing
Real-time shipping rates eliminate manual updates, enhancing trust and reducing cart abandonment.
🗝 Key Features
1. Cheapest Courier Options
Showcase affordable courier options at checkout, reducing shipping costs and enhancing customer satisfaction.
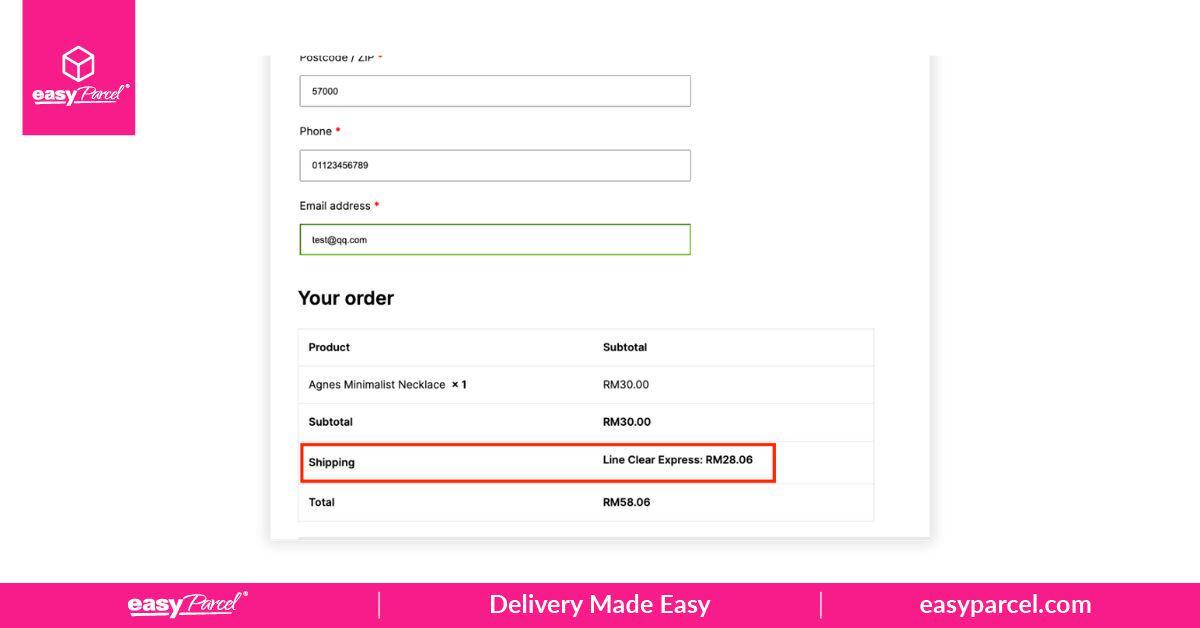
2. Real-Time Shipping Rates
Provide accurate pricing at checkout with live shipping rates, eliminating the need for manual updates.
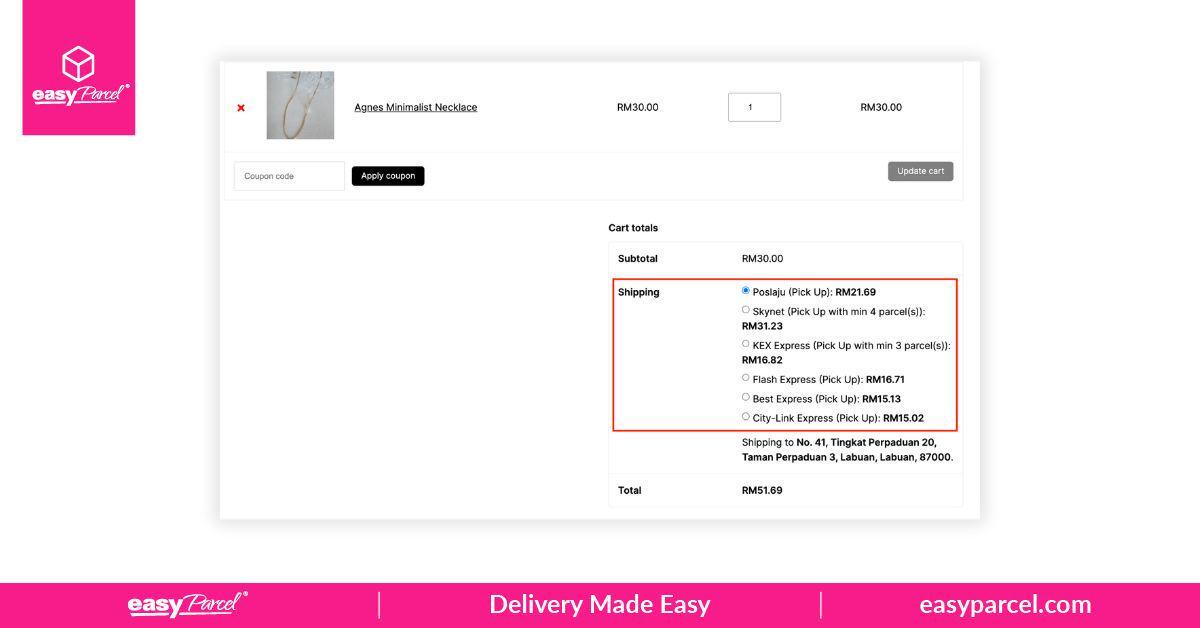
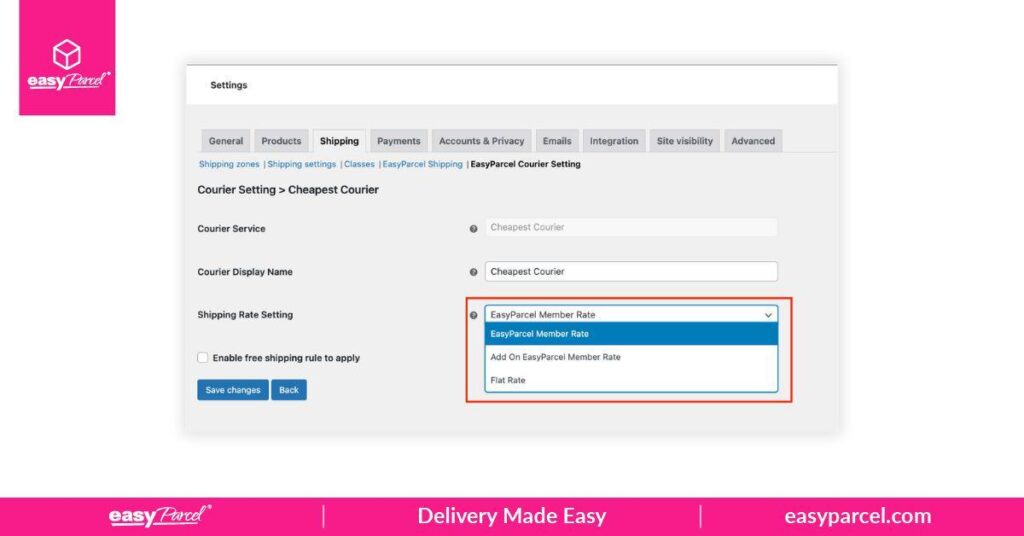
3. Custom Shipping Rates
Set tailored rates to offer flexibility and control over costs.
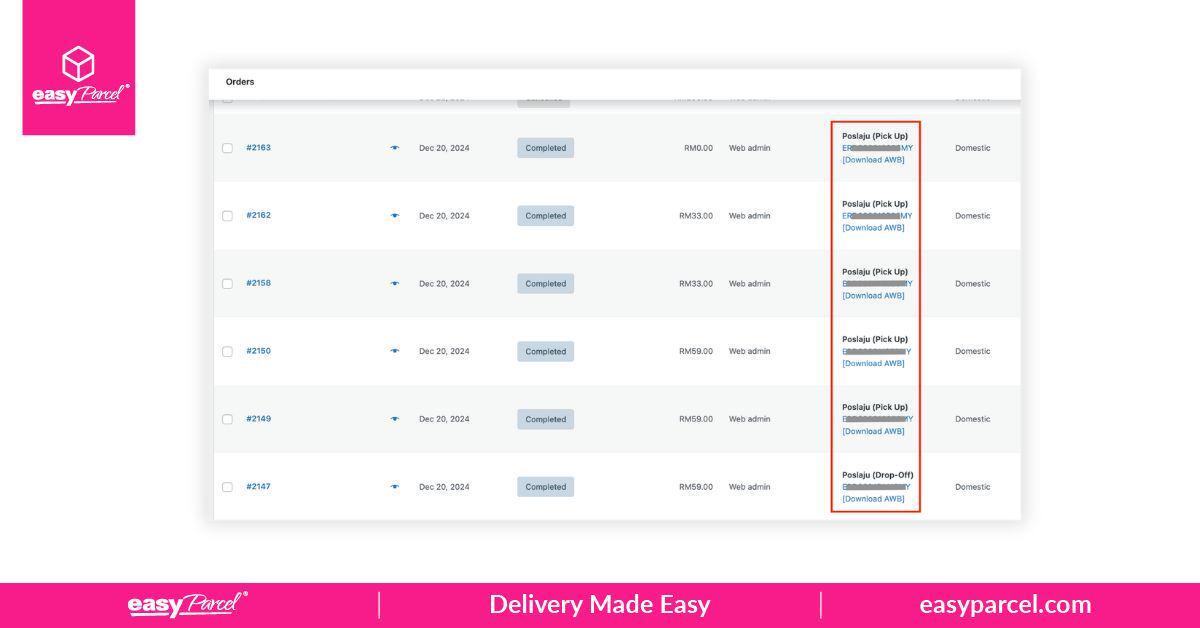
4. Auto Bulk Order Fulfillment
Streamline bulk order processing with your preferred couriers, saving valuable time and effort.
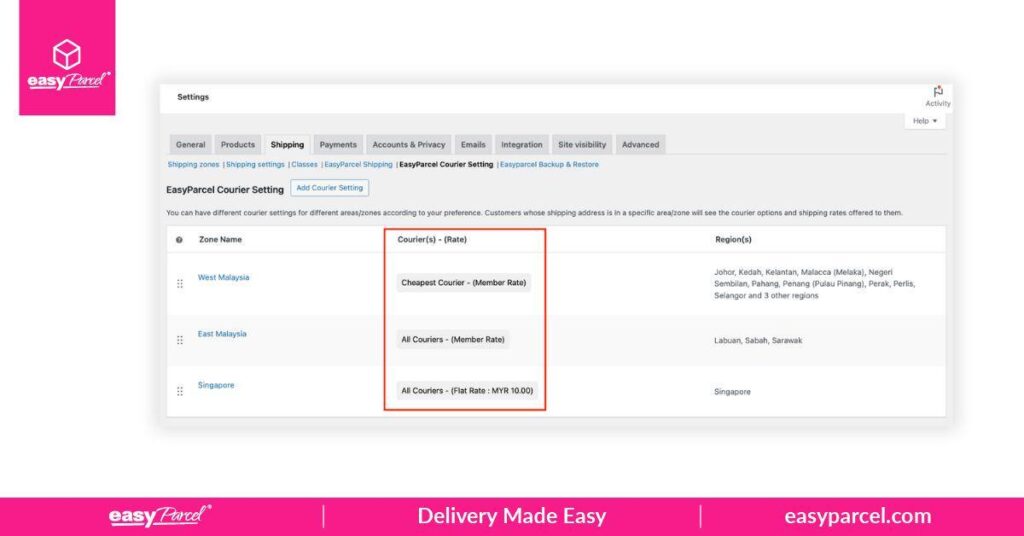
5. Custom Shipping Zone Settings
Optimize shipping strategies with unique settings for different regions, ensuring competitive and efficient delivery options.
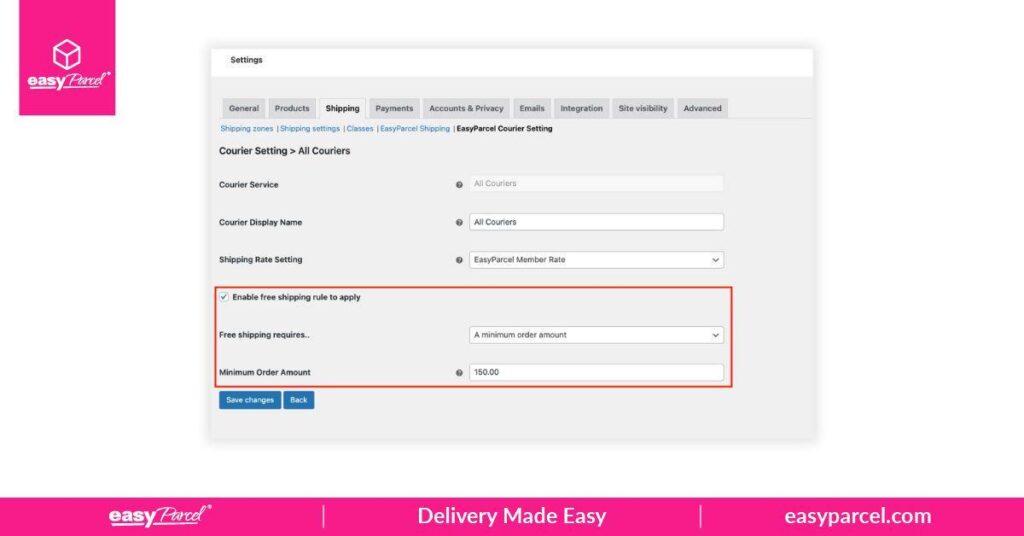
6. Free Shipping Conditions
Encourage larger purchases by enabling free shipping based on specific conditions, such as order value or location.
How to Setup
Step 1: Login to your WordPress account.

Step 2: Navigate to Dashboard > Plugin. Look for existing plugin “EasyParcel Shipping Extension” > Click “Deactivate”.
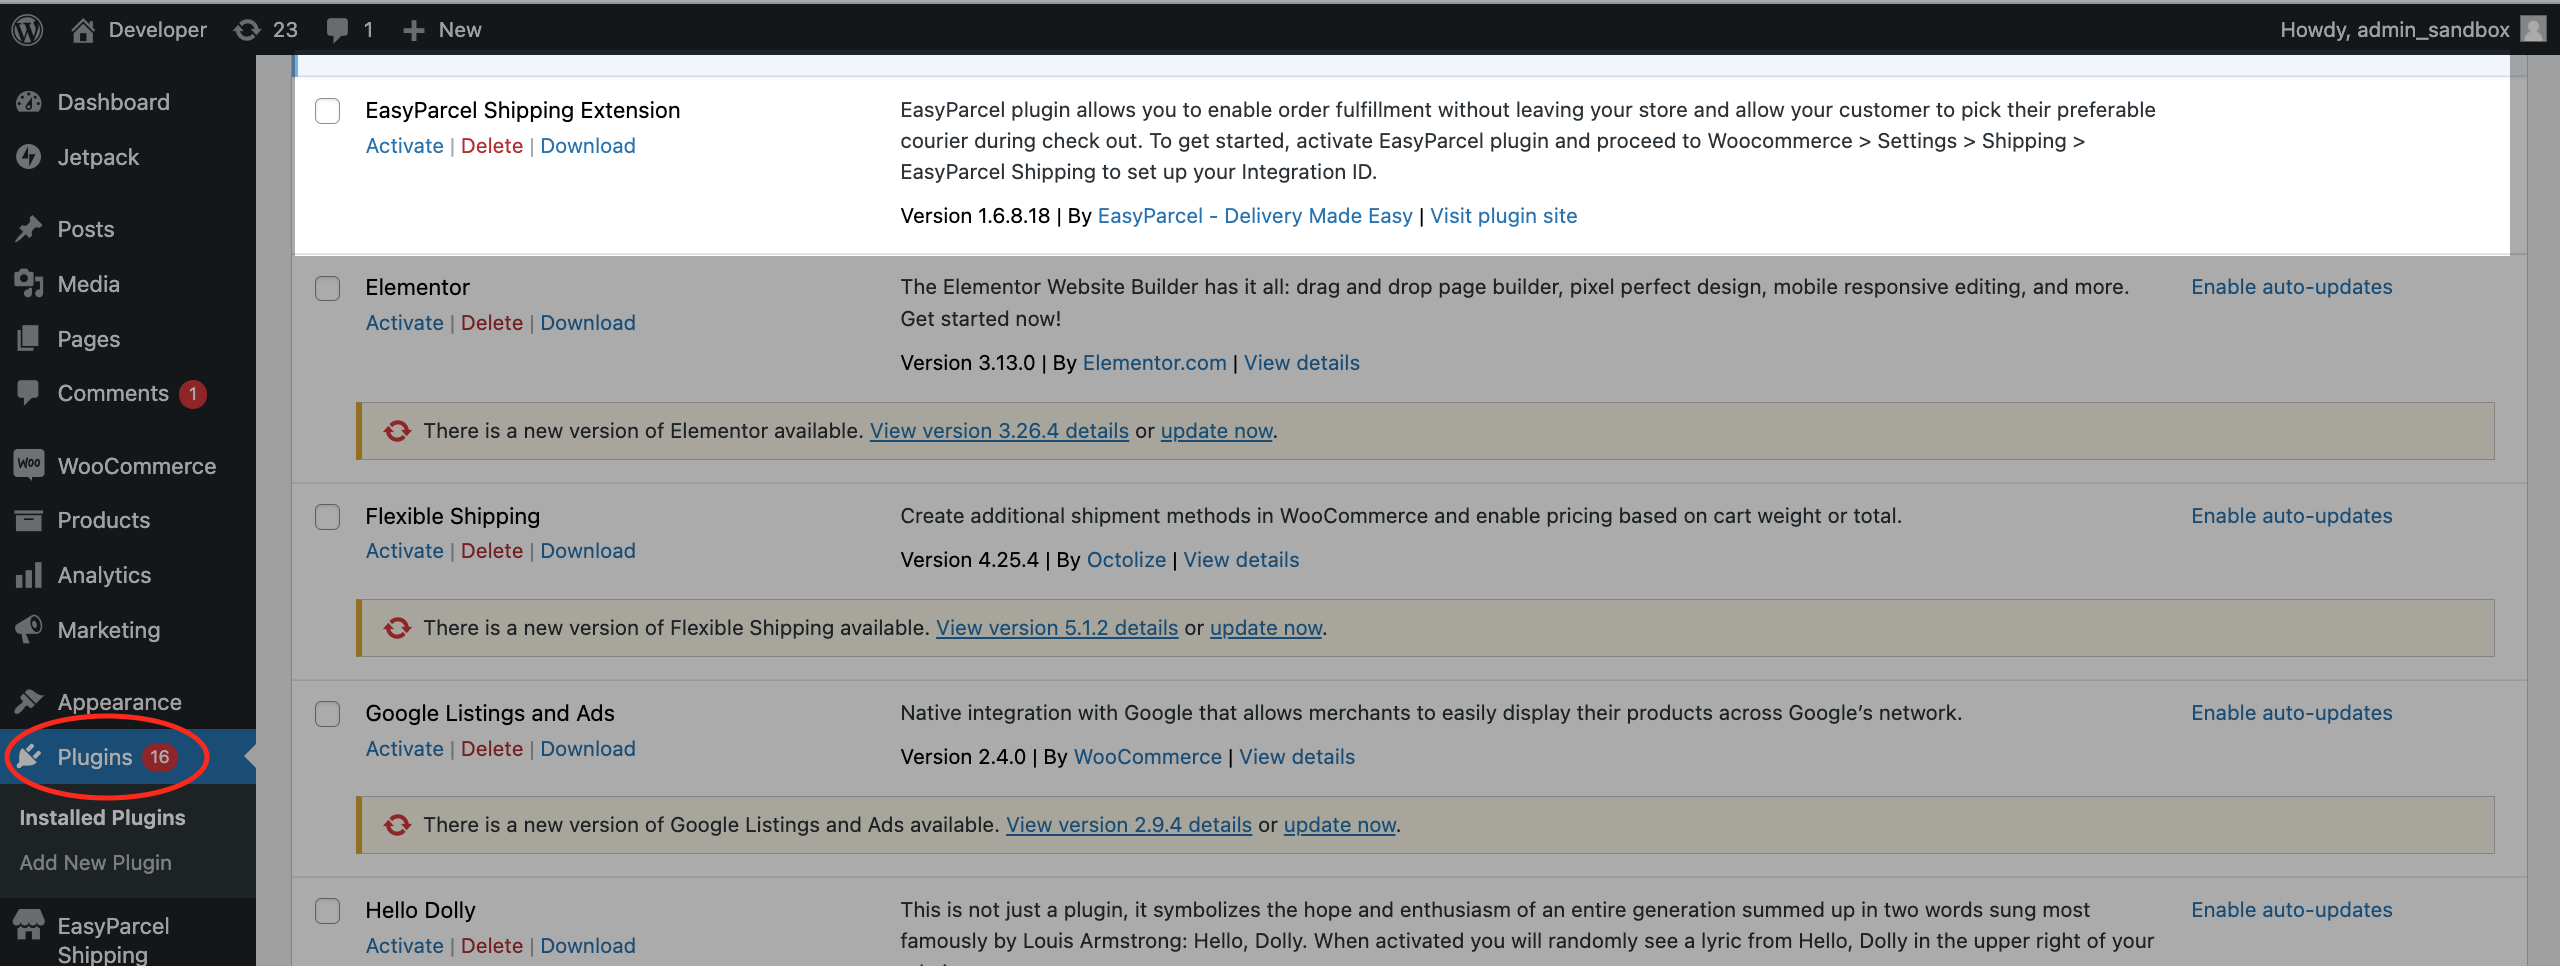
Step 3: Click “Add New Plugin” button.

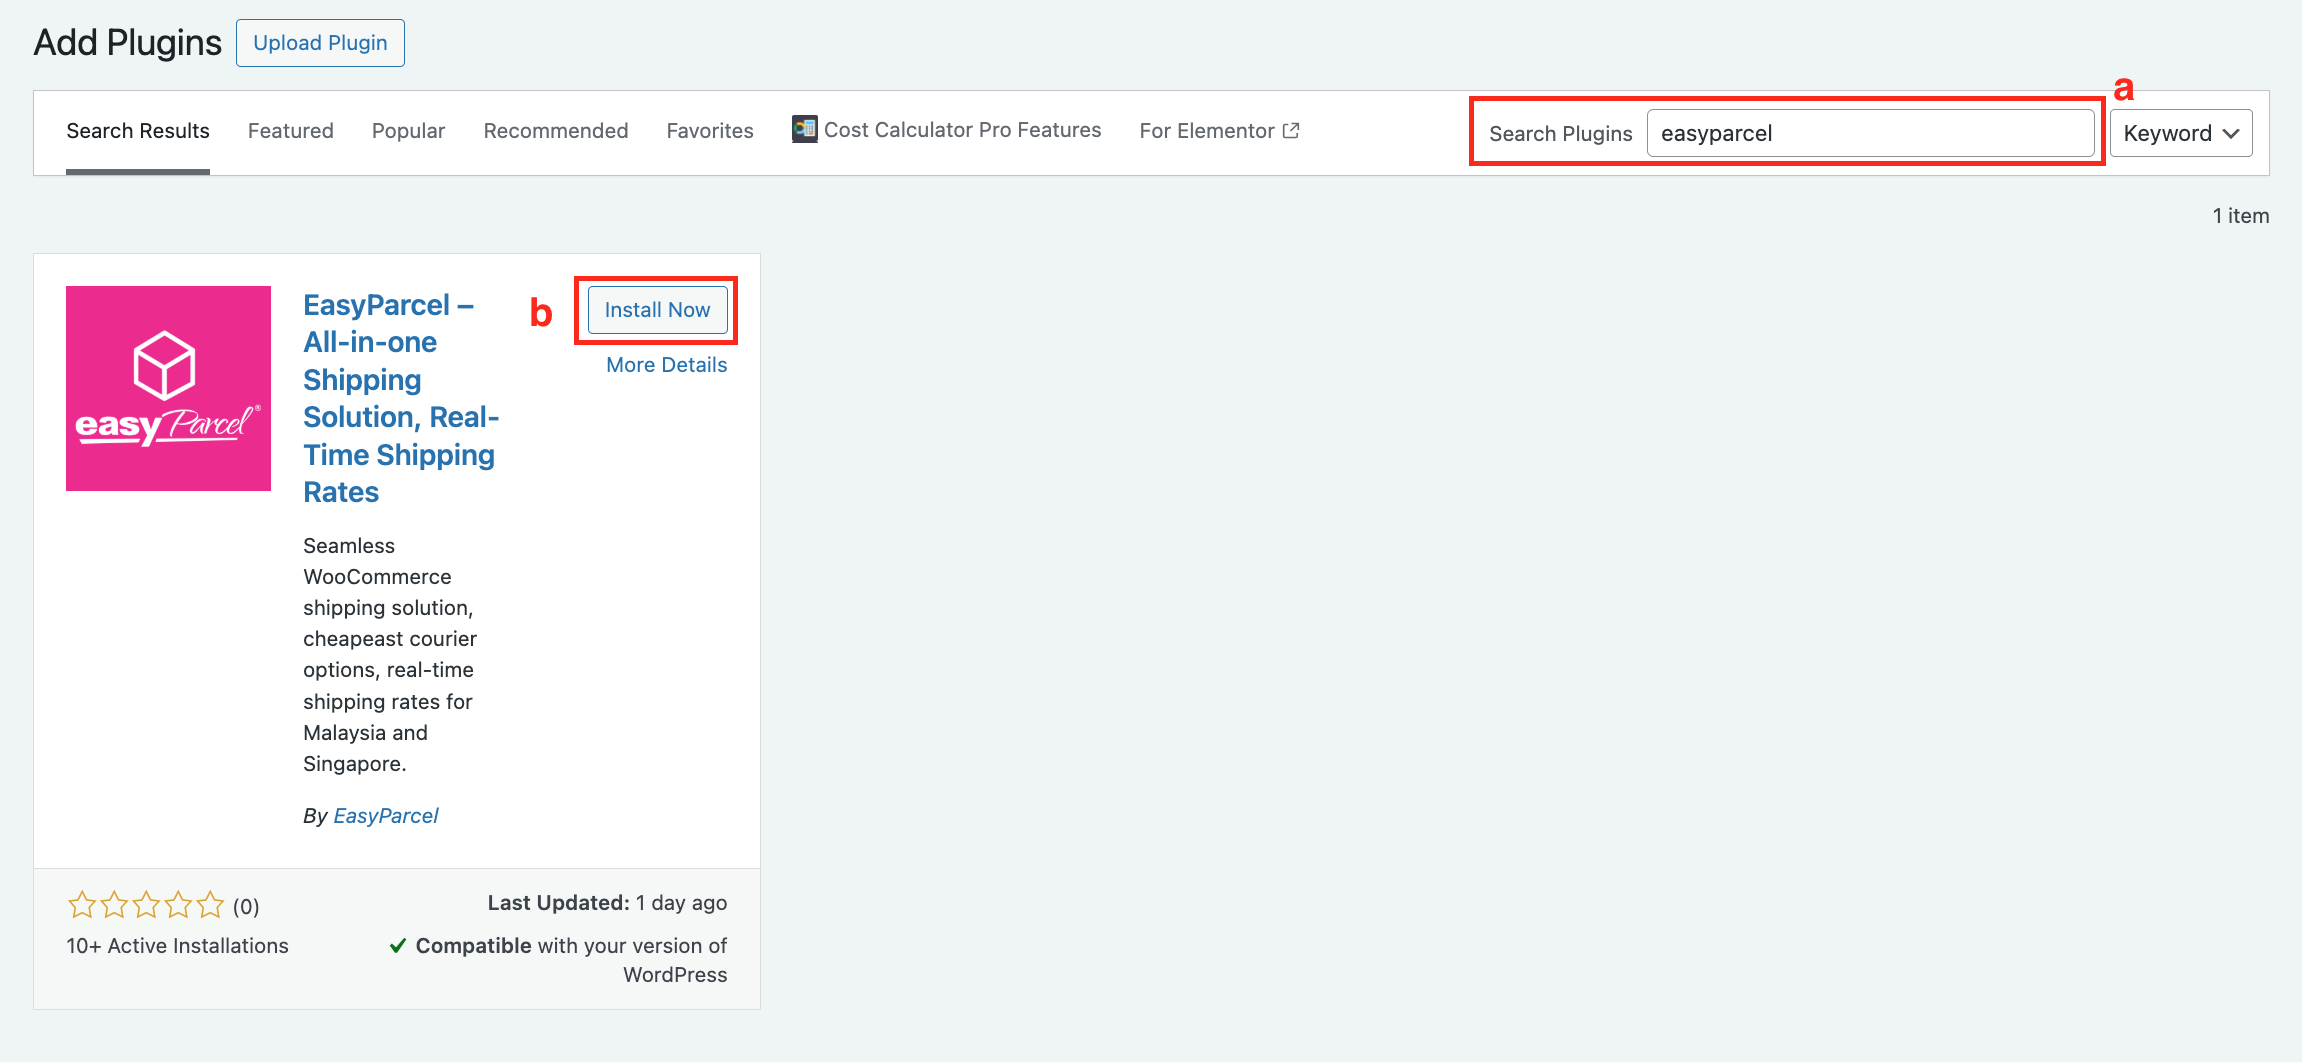
Step 4: Search “easyparcel” > Click “Install Now” button > Click “Active” button to activate the plugin.
Step 5: Navigate to “EasyParcel Shipping” > Fill in all the required information. **How to get Integration ID?
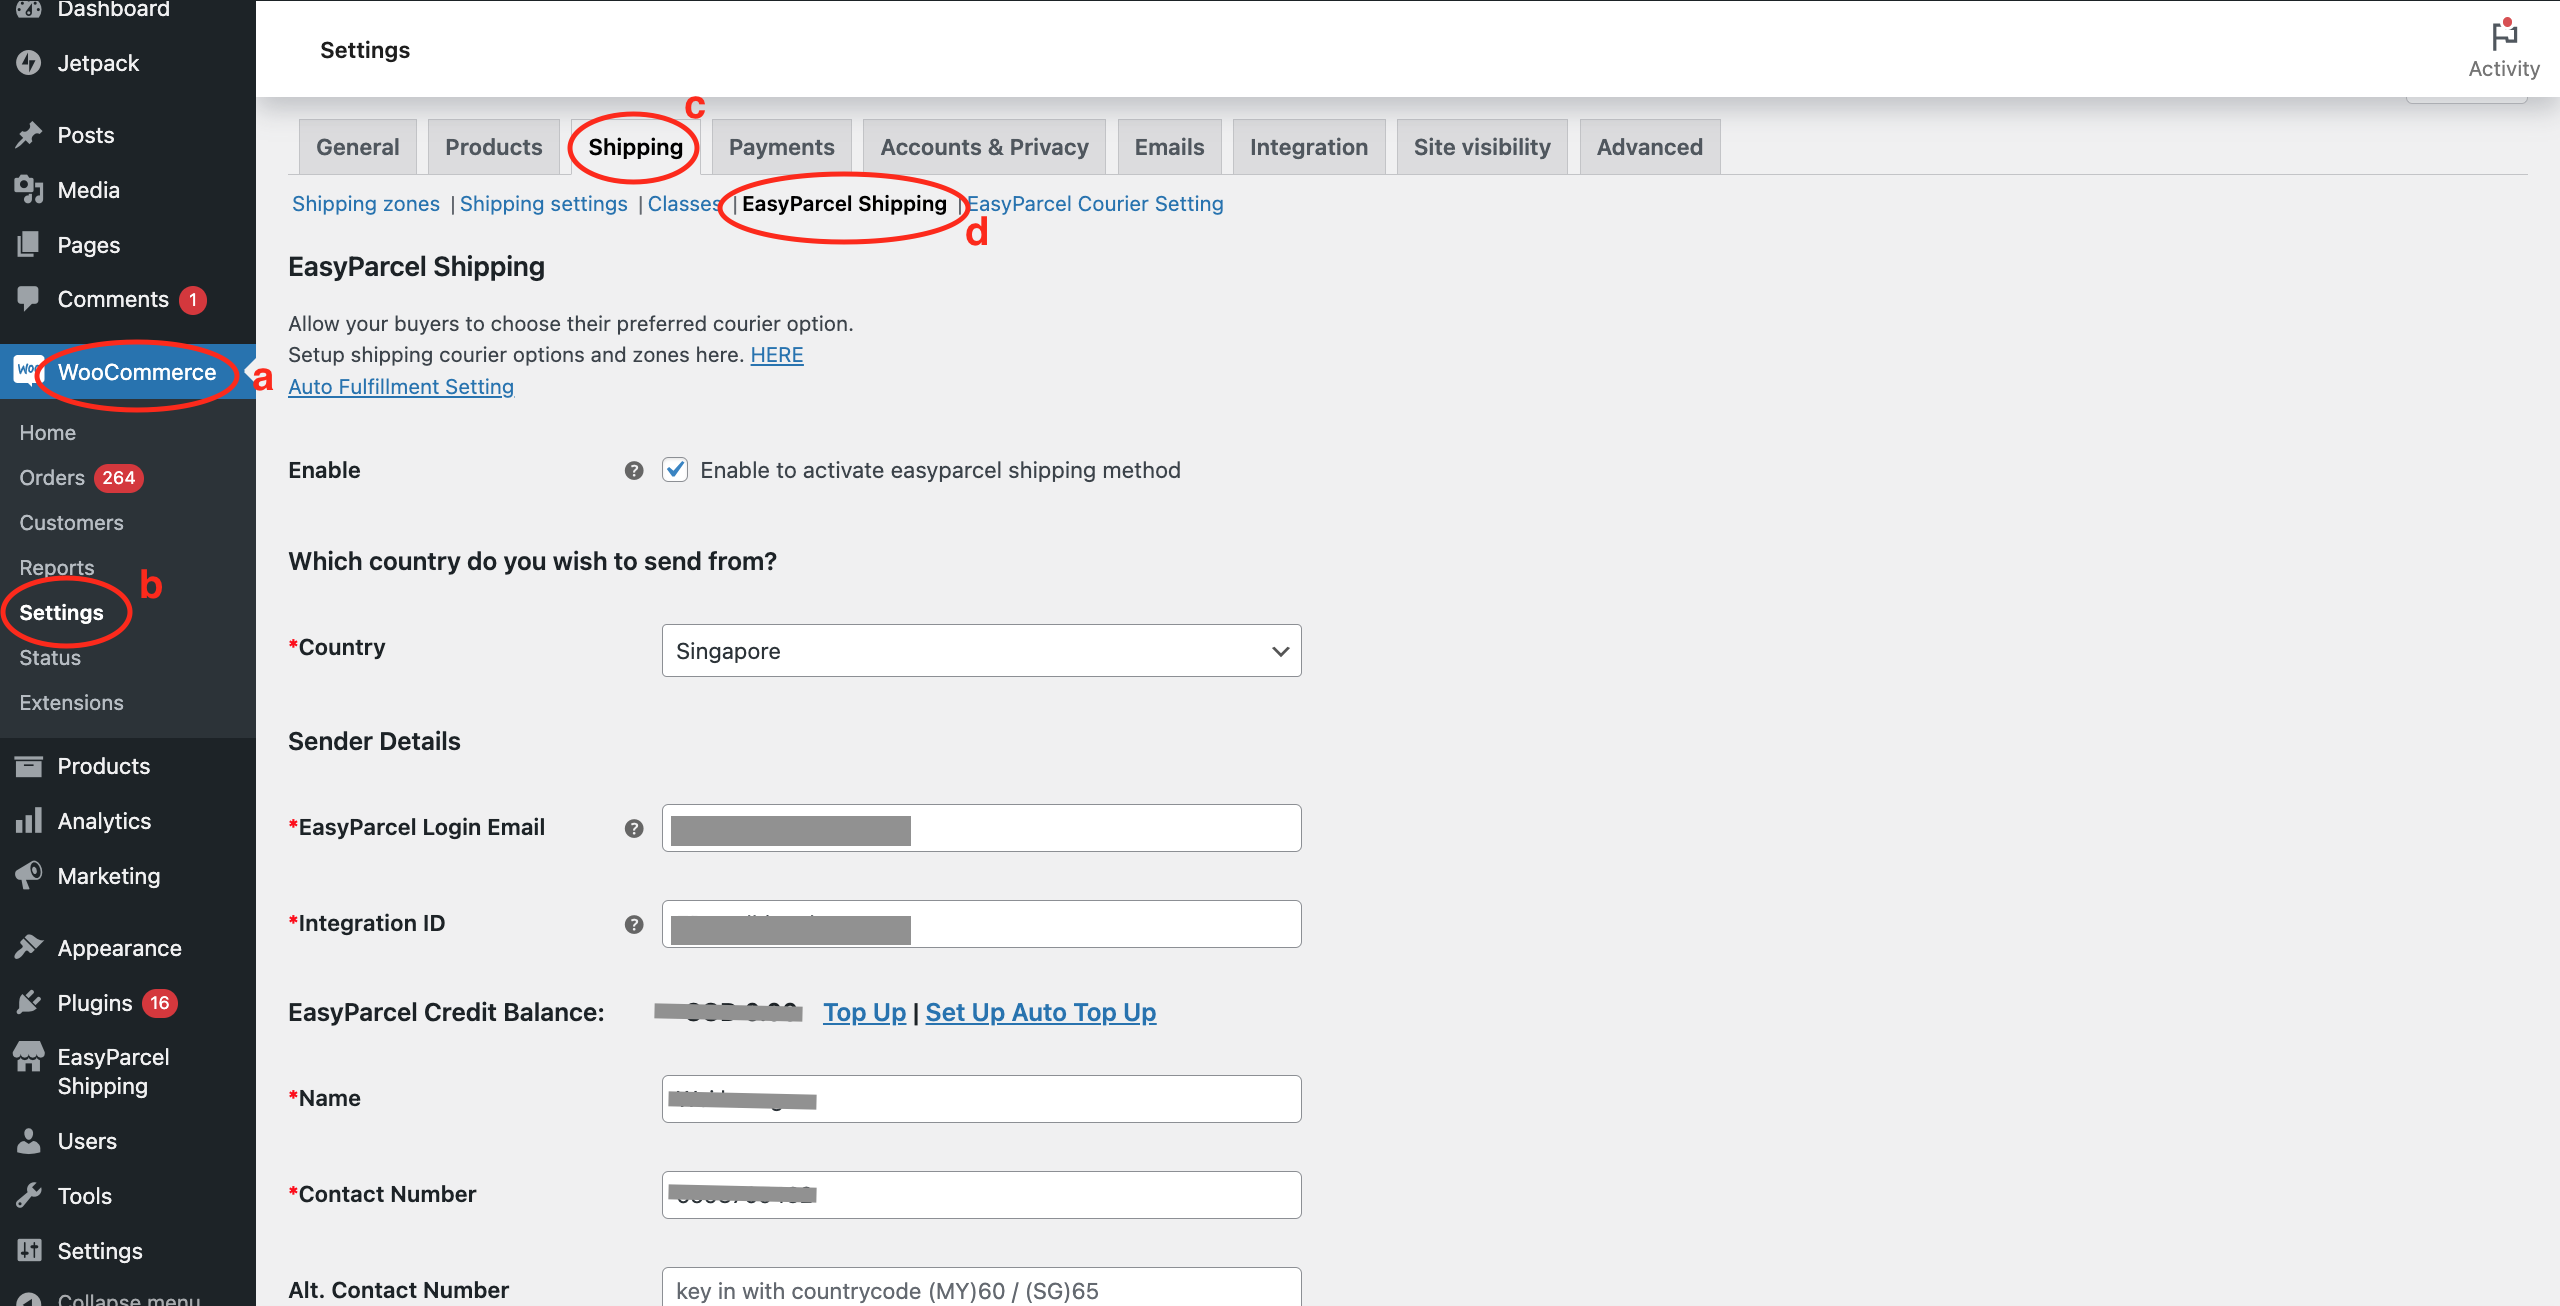
Step 6: Click “Save changes” after done.

Step 7: Click “EasyParcel Courier Setting” > Then, click “Add Courier Setting”.

Step 8: Fill in the zone name, destination, and click “Add courier service”.
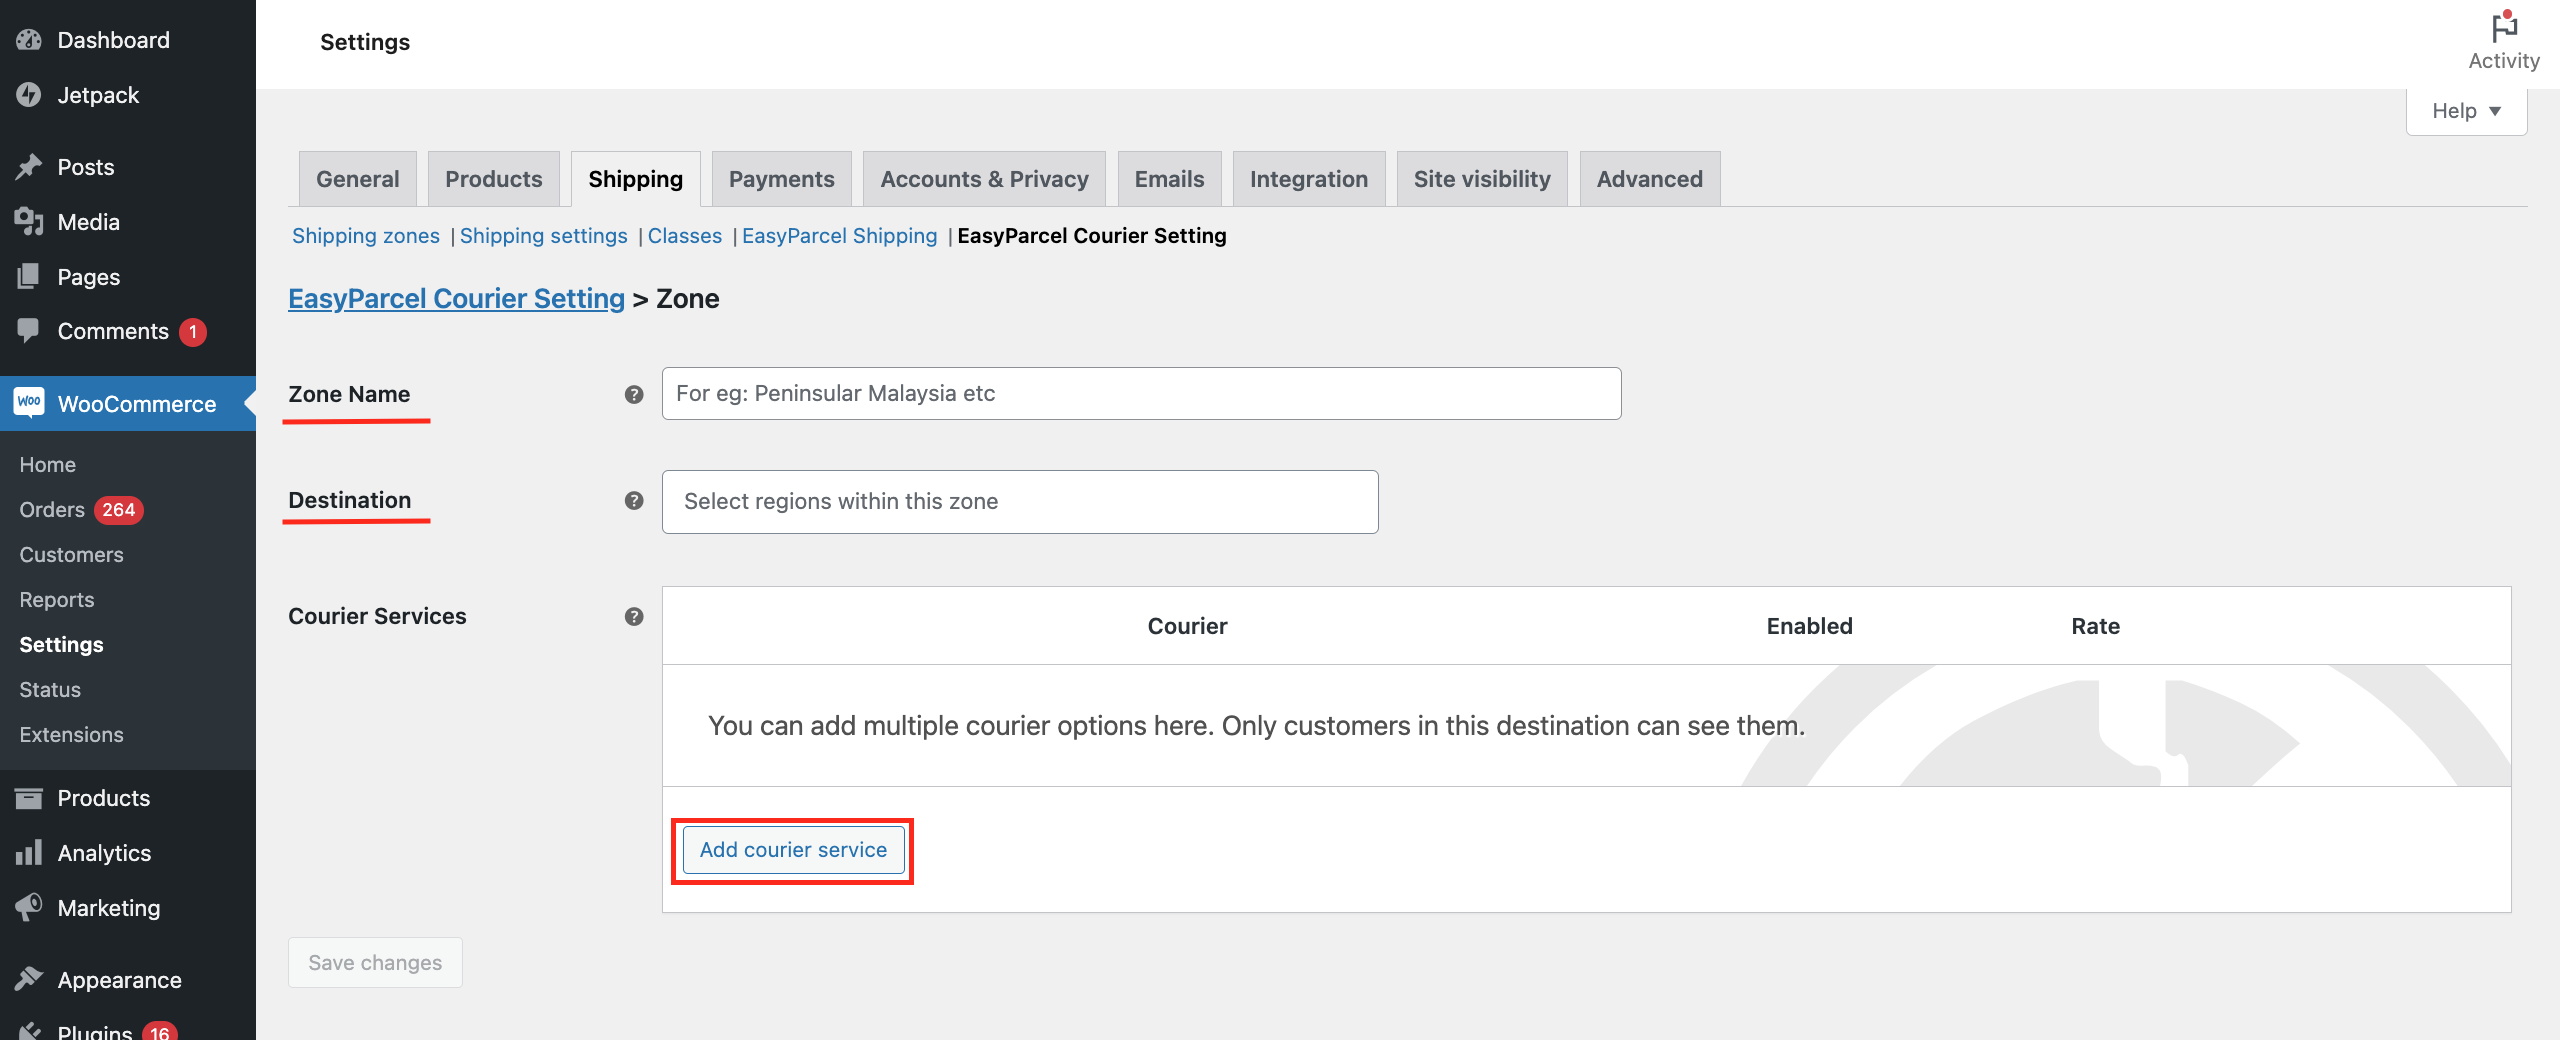
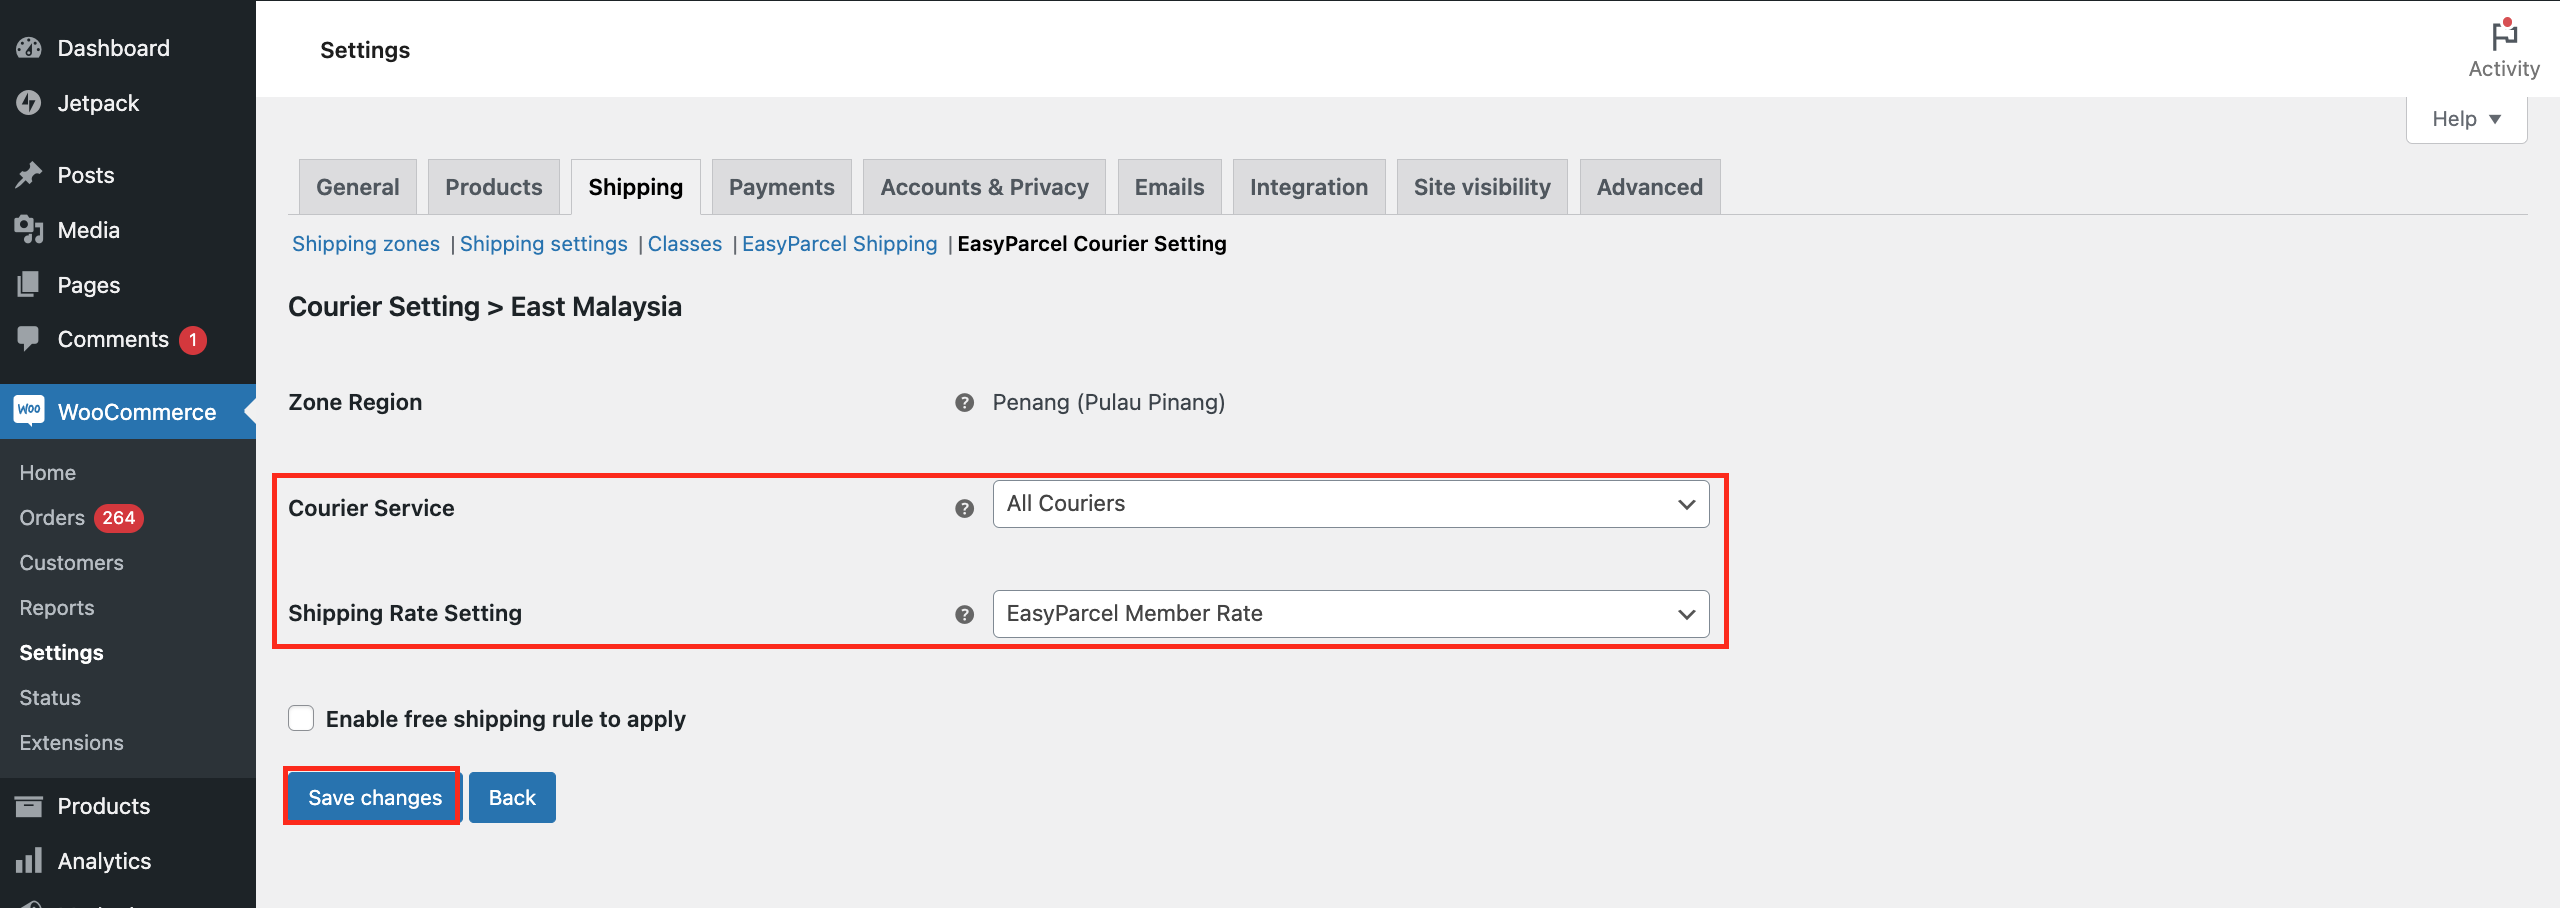
Step 9: Select your preferred courier service and fill in the display name. Next, select your preferred rate setting. Once done, click “Save changes”.
Step 10: Click “Shipping zones” > Click “Add zone” button.

Step 11: Fill in the same zone name and zone regions you added in “EasyParcel Courier Setting”. Then, click “Add shipping method”.
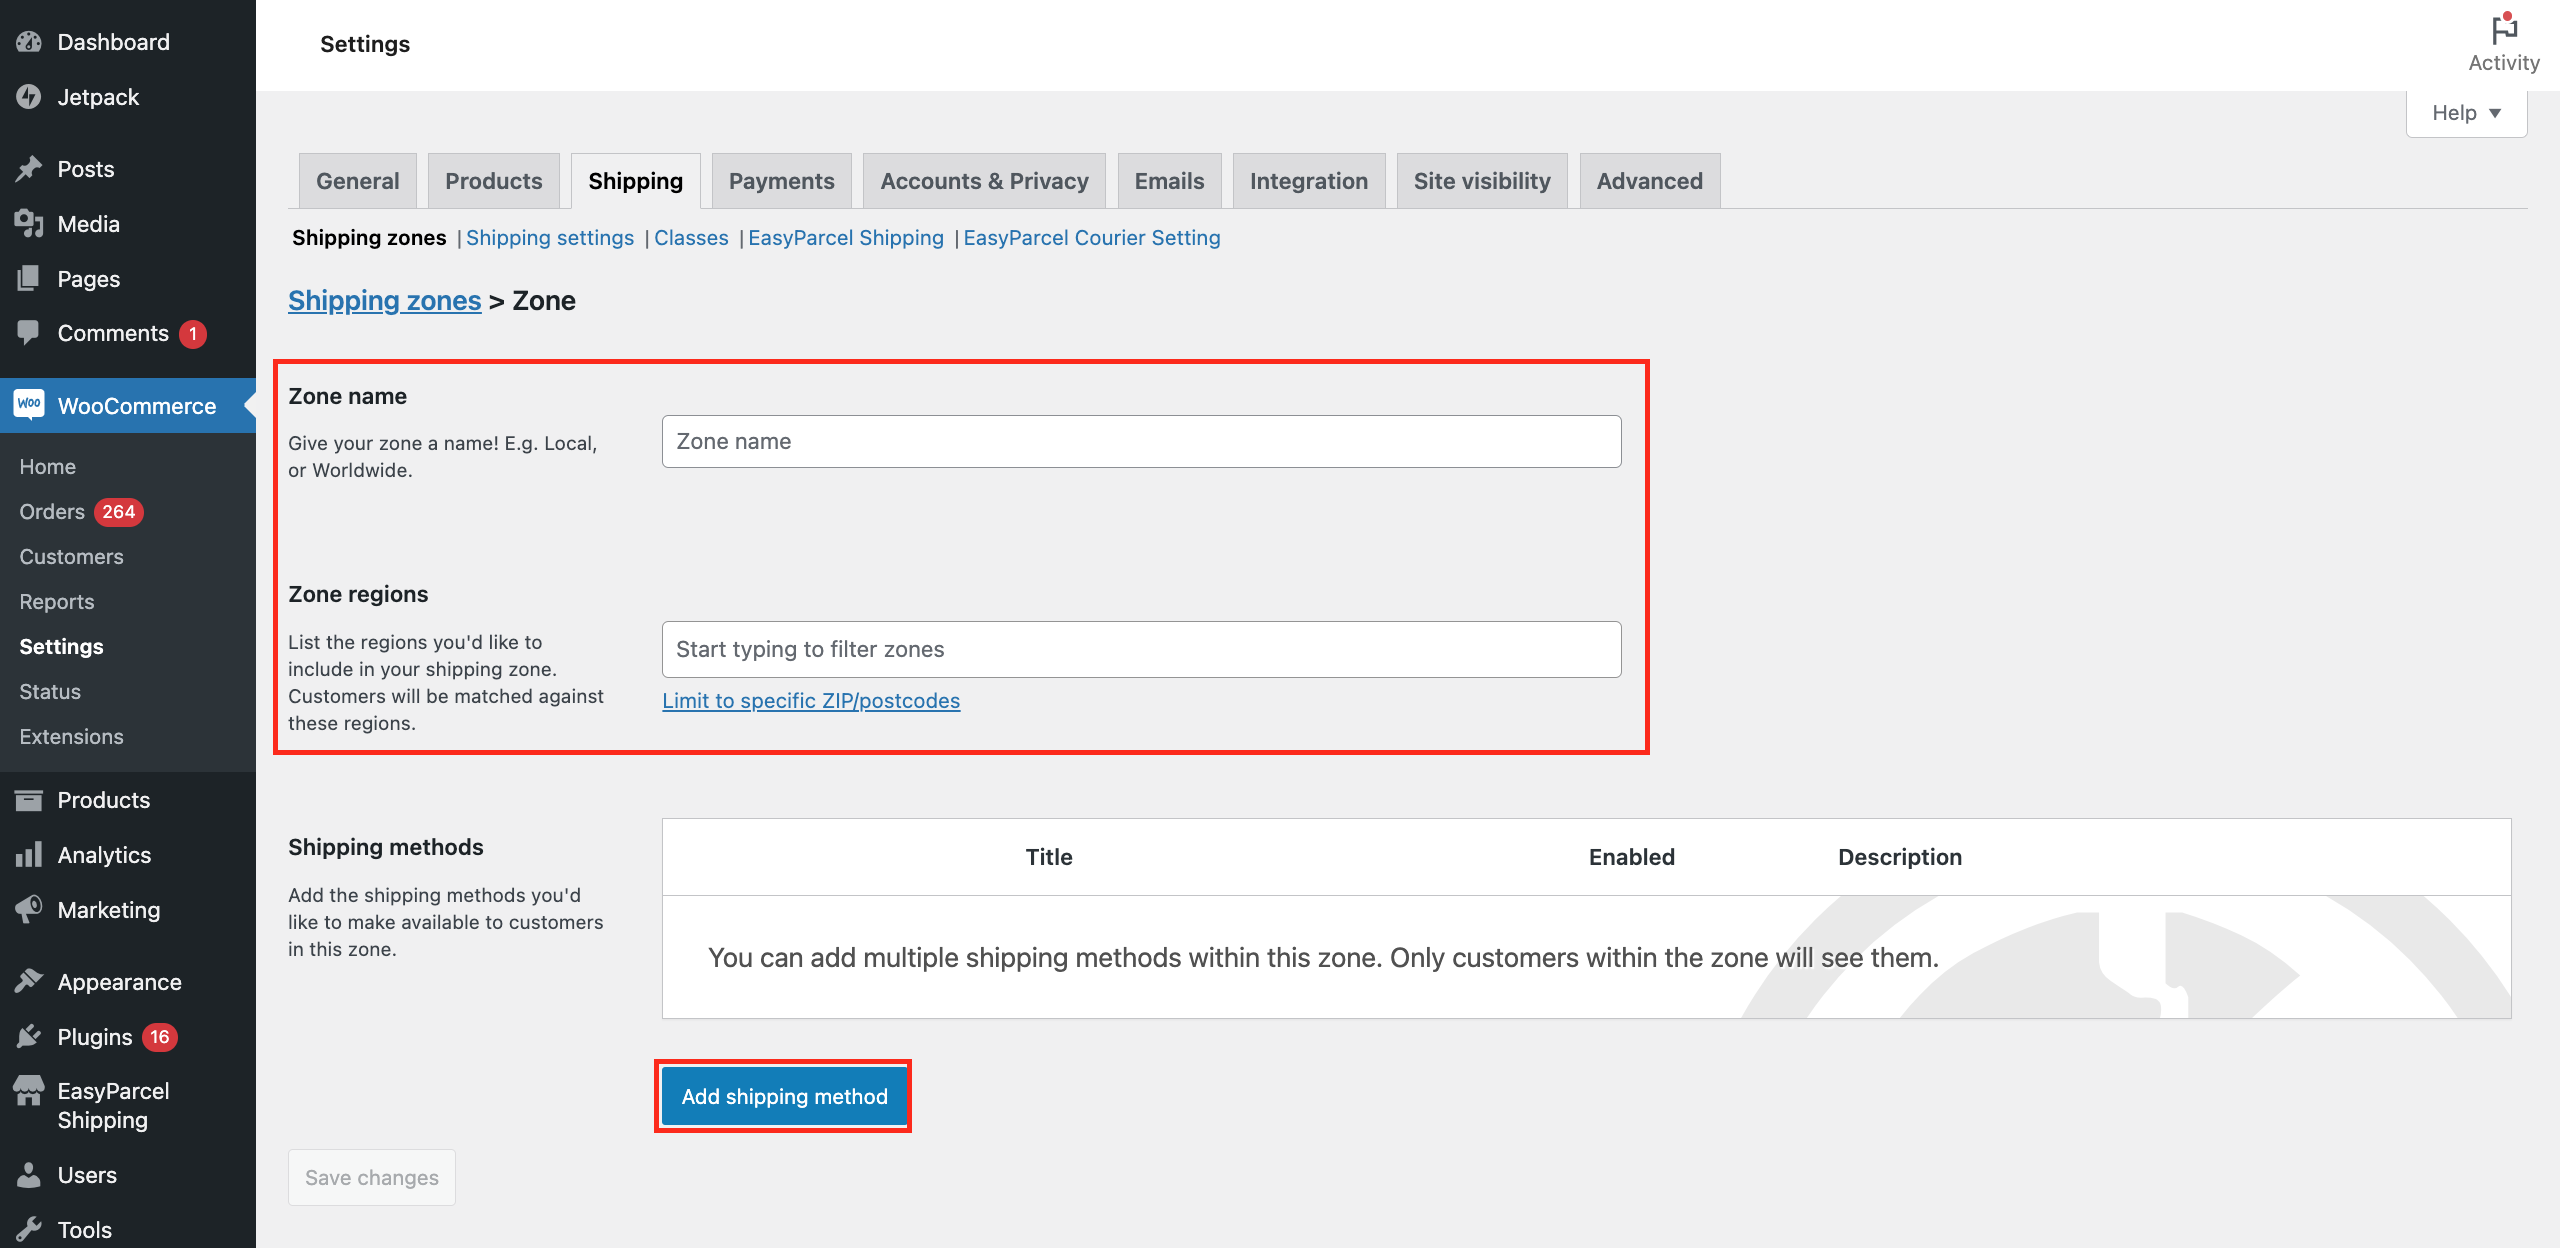
Step 12: Select “EasyParcel Shipping” then click “Continue”.
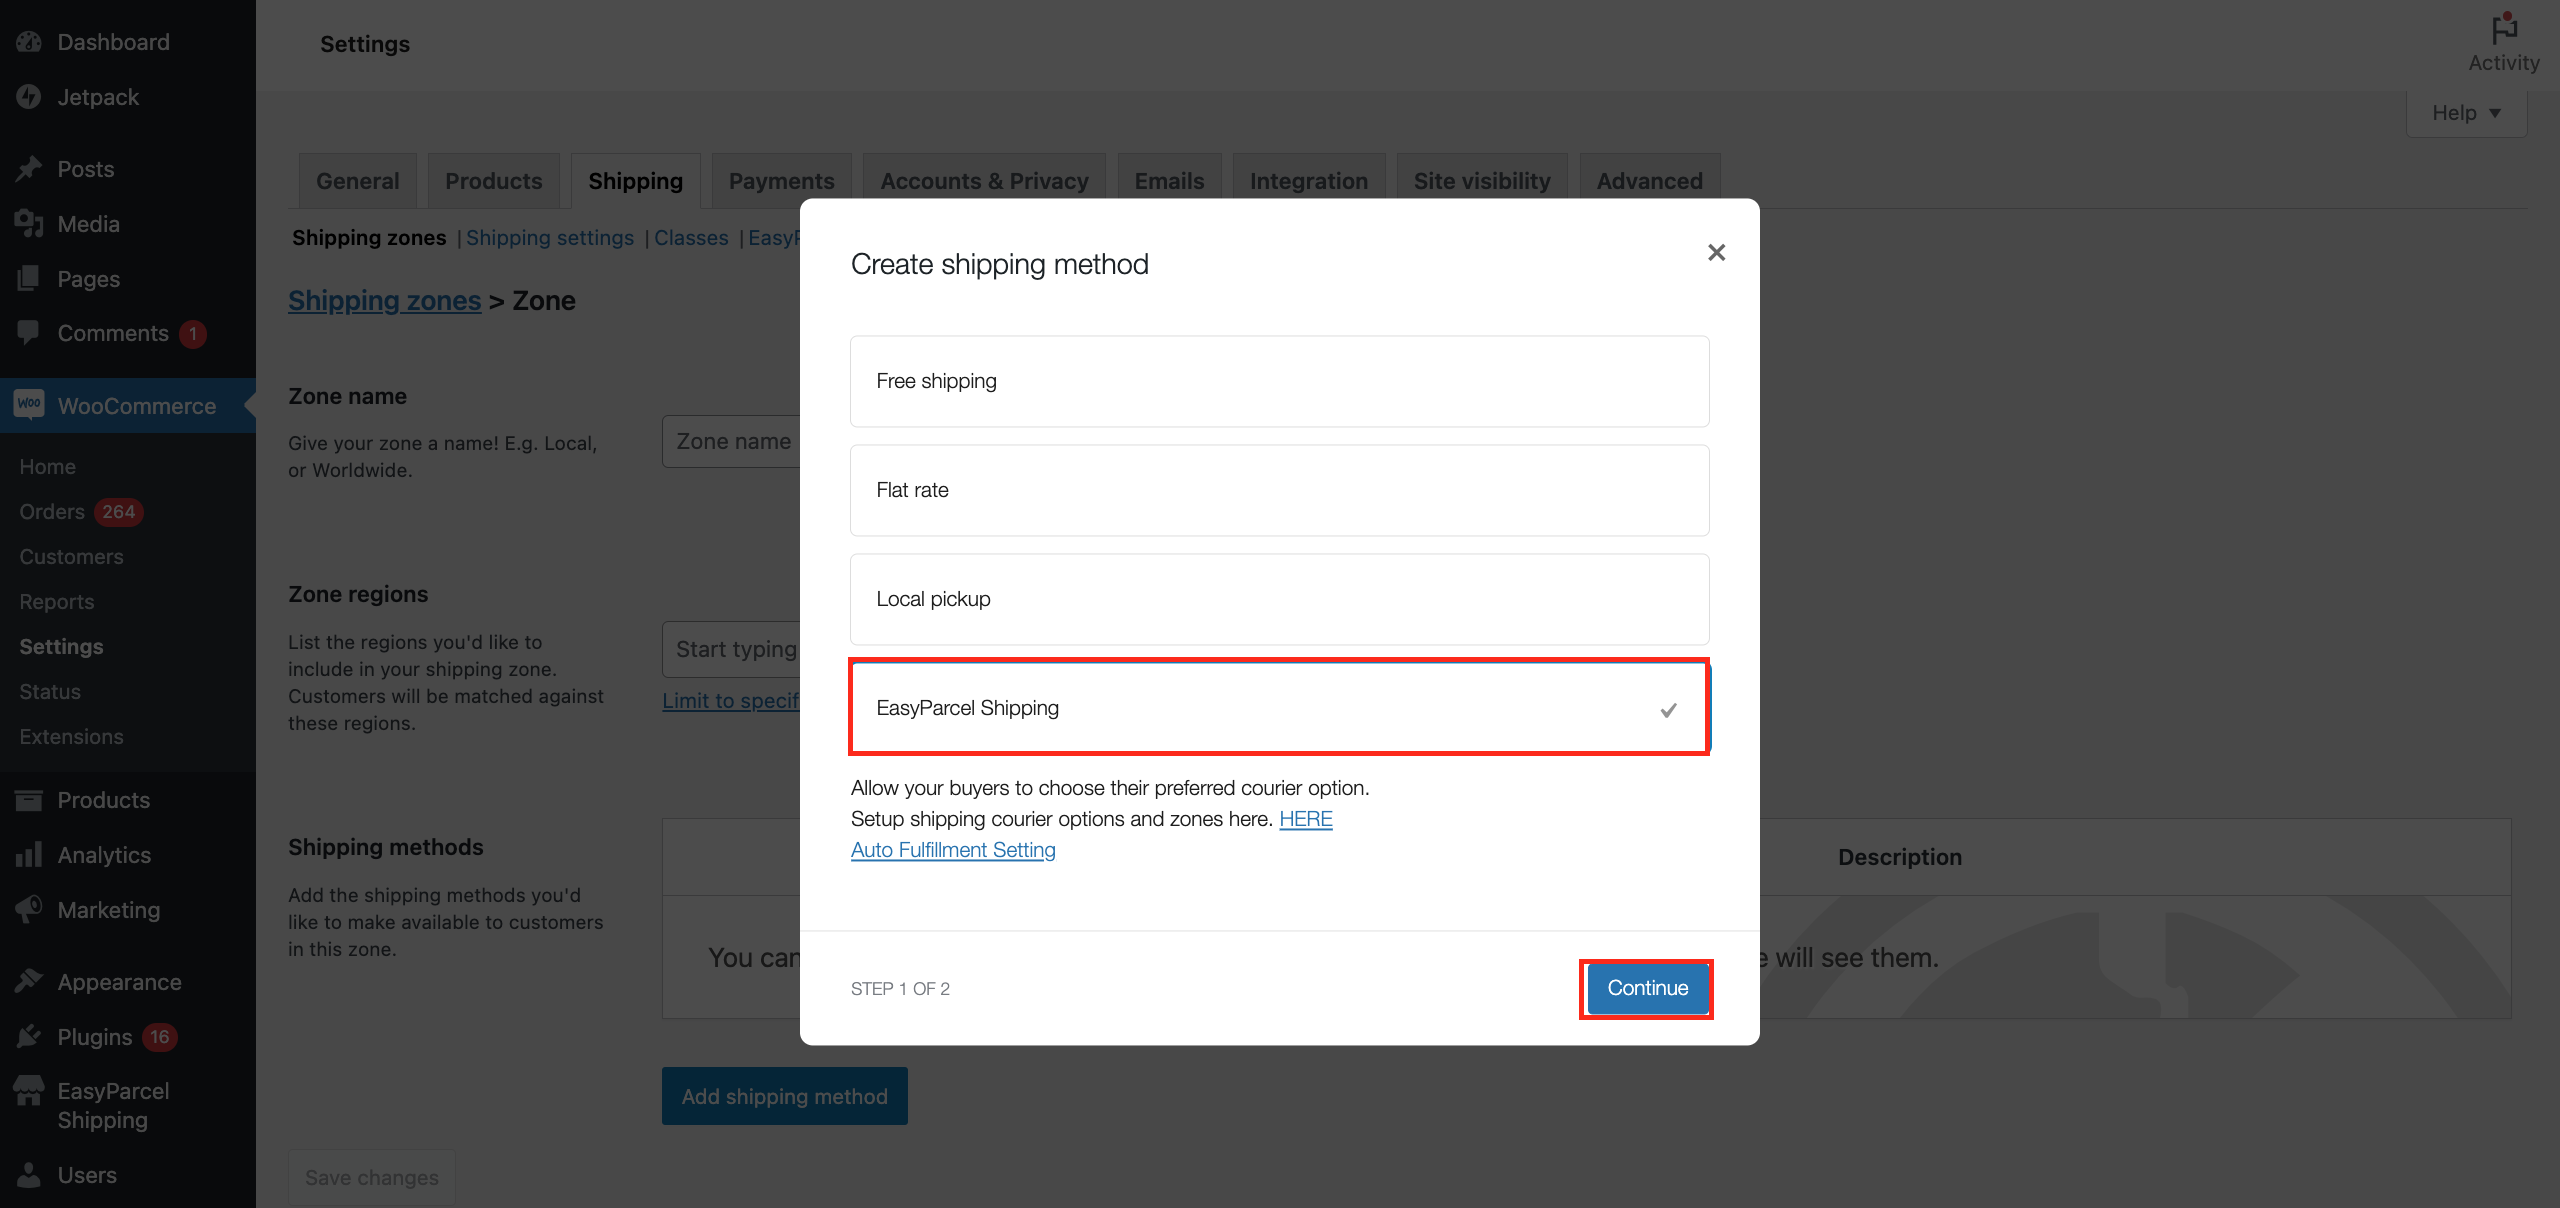
Step 13: Click “Save changes”. Yayyy! You have done setting up EasyParcel WooCommerce plugin!

Step 1: Login to your WordPress account.

Step 2: Navigate to Dashboard > Plugin. Look for existing plugin “EasyParcel Shipping Extension” > Click “Deactivate”.

Step 3: Click “Add New Plugin” button.

Step 4: Search “easyparcel” > Click “Install Now” button > Click “Active” button to activate the plugin.

Tadaaaaa! Your plugin is all set! All your setting from previous plugin will auto sync to new plugin.
Plugin version below 1.6.8.1
Step 5: Navigate to “EasyParcel Shipping” > Fill in all the required information. **How to get Integration ID?

Step 6: Click “Save changes” after done.

Step 7: Click “EasyParcel Courier Setting” > Then, click “Add Courier Setting”.

Step 8: Fill in the zone name, destination, and click “Add courier service”.

Step 9: Select your preferred courier service and fill in the display name. Next, select your preferred rate setting. Once done, click “Save changes”.

Step 10: Click “Shipping zones” > Click “Add zone” button.

Step 11: Fill in the same zone name and zone regions you added in “EasyParcel Courier Setting”. Then, click “Add shipping method”.

Step 12: Select “EasyParcel Shipping” then click “Continue”.

Step 13: Click “Save changes”. Yayyy! You have done setting up EasyParcel WooCommerce plugin!

Get Started Today!
FAQ
How do I install EasyParcel plugin?
How to setup EasyParcel plugin?
After activating the EasyParcel plugin, log in to your EasyParcel account to obtain your integration ID. Go to the EasyParcel dashboard, select Integrations > Add New Store, click the WooCommerce logo, and enter your shop name and store URL. Click Submit, then copy the integration ID. Return to your WordPress dashboard, navigate to EasyParcel Shipping, paste the integration ID in the appropriate field, fill in any other required information, and save changes. Your store is now successfully integrated with EasyParcel!
Can I use EasyParcel with WooCommerce?
Absolutely! The EasyParcel plugin provides a comprehensive WooCommerce shipping solution, enabling a hassle-free and automated shipping experience. We make delivery EASY!
How to show real-time shipping rates on the checkout page?
How to set custom shipping rates?
From your WordPress dashboard, hover over EasyParcel Shipping and click on EasyParcel Courier Settings. Click Add Courier Setting, fill in the “Zone Name,” select the “Destination,” and click Add Courier Service to be redirected to another page. Look for “Shipping Rate Setting” to choose between “EasyParcel Member Rate,” “Add On EasyParcel Member Rate,” or “Flat Rate.”
What is Auto Order Fulfillment and how it works?
Auto Order Fulfillment is a new feature in the EasyParcel plugin that automatically fulfills all your orders with EasyParcel as soon as customers place them—no additional clicks needed! Focus on growing your business while we handle fulfillment.
How to make custom shipping zone settings?
From your WordPress dashboard, hover over EasyParcel Shipping and click on EasyParcel Courier Settings. Click Add Courier Setting, fill in the “Zone Name,” select the “Destination,” and complete all fields before saving changes. Your zones are now set up in the EasyParcel plugin. Next, go to the “Shipping Zones” tab, click Add Zone, fill in the zone name and regions, add a shipping method by selecting “EasyParcel Shipping,” then click Continue and save changes.
 Malaysia
 Thailand
 Indonesia


